Wednesday, November 19, 2014

Banana Walnut Kuzhi Paniyaram / Vella Kuzhi Paniyaram / Kuzhi Paniyaram / Sweet Paniyaram

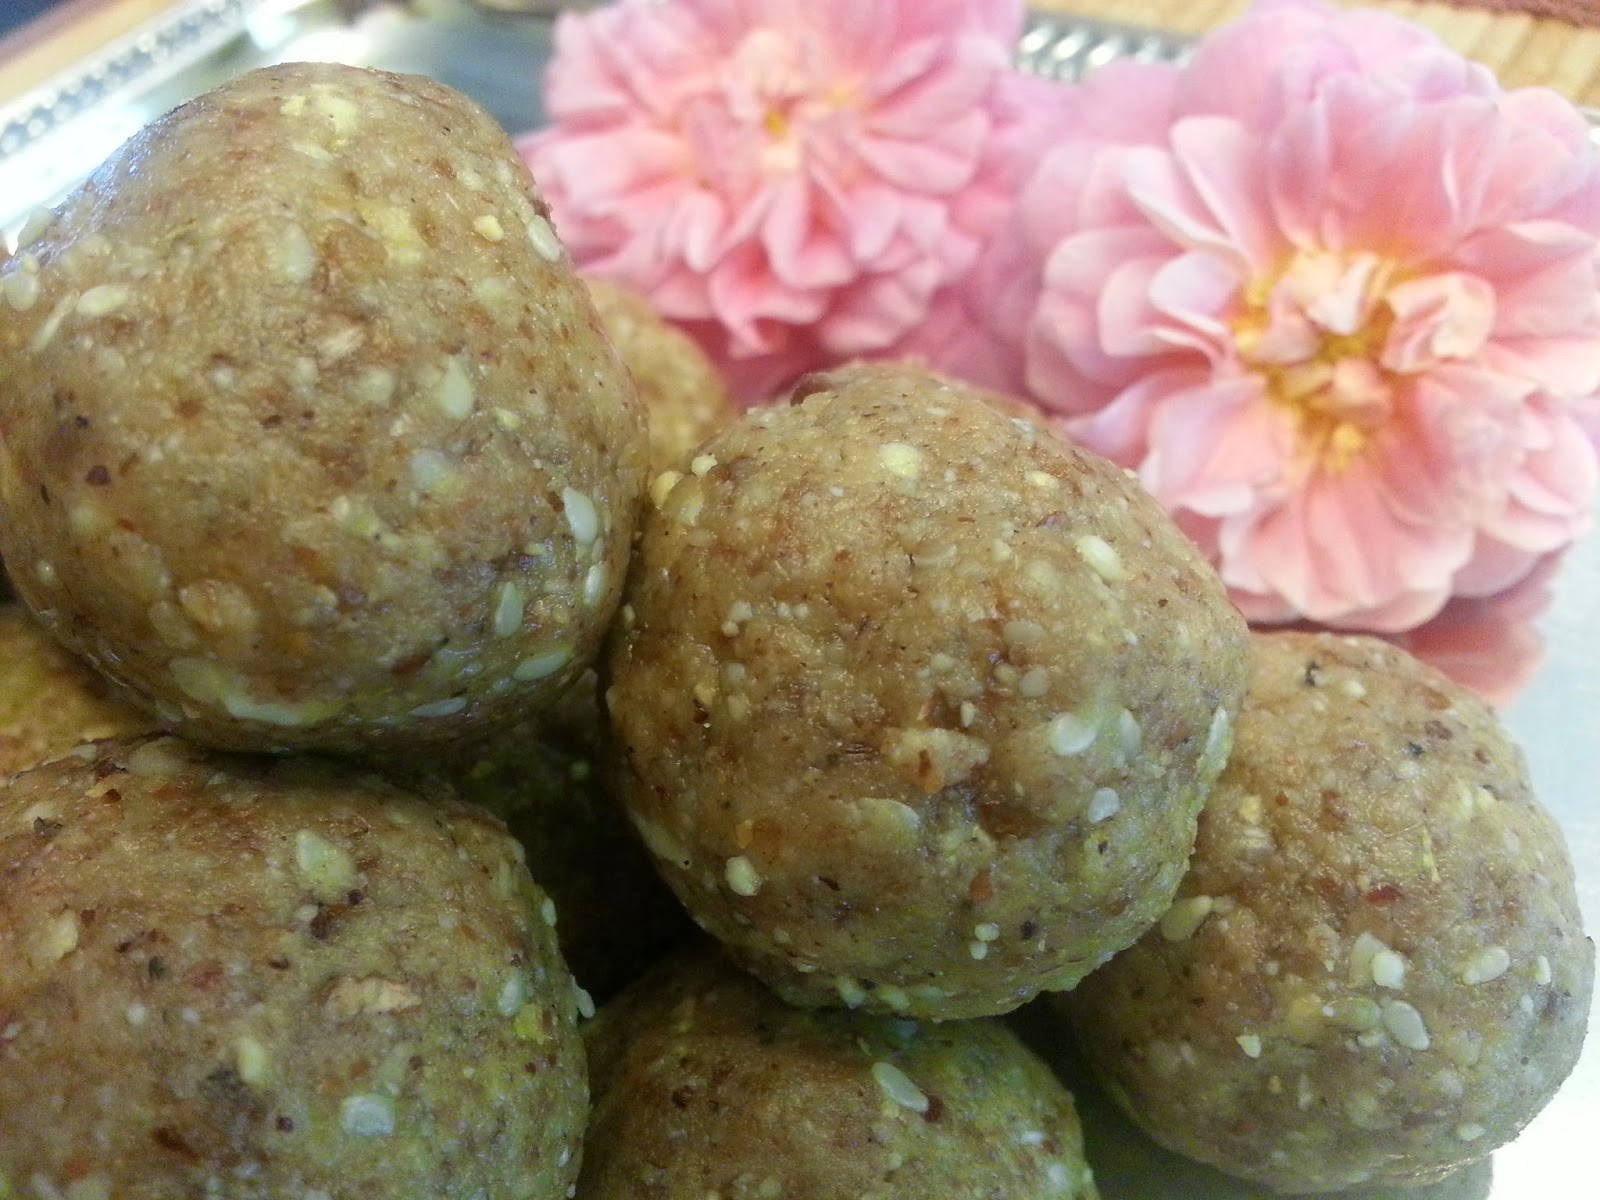
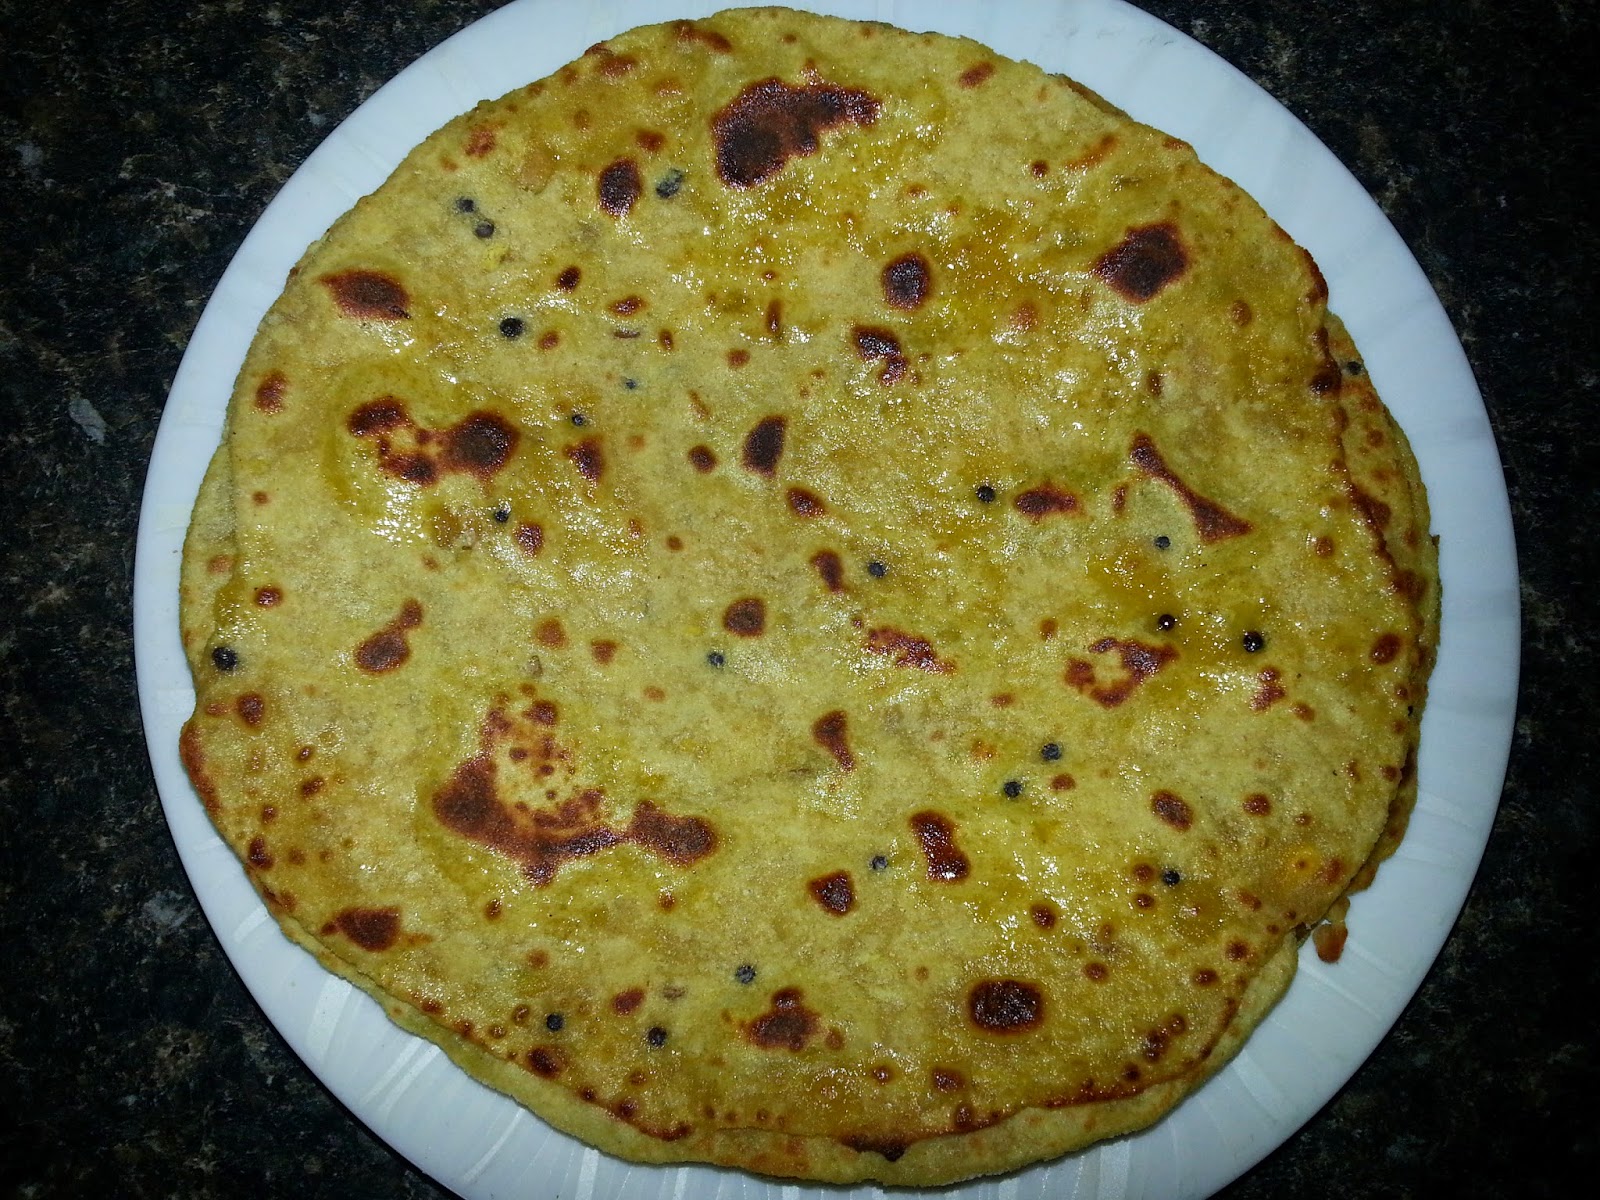
Fully ripened bananas in the banana stand will always be sympathized and thrown away in our home. Just wanted to rescue those ripened soggy bananas, I made these yummy sweet treats called as "Banana Walnut Kuzhi Paniyaram".  Tiny round shaped muffin like Paniyarams melted in the mouth and its an excellent treat for the kids at any time. Well, I served these sweet Paniyarams for breakfast one day. Kids loved those paniyarams and more than them, my husband loved those. So, he's got into the habit of leaving 2 or 3 bananas in the stand nowadays.!!! Creativity starts once you wish to transform something in your kitchen and make an edible food item. Like that, we moms do this everyday and come out with great ideas, right. My dear bloggers, try to ignite the spark in you and share with us your thoughts and findings.

Ingredients
Fully ripened bananas - 4 or 5
Chopped walnuts - 1/2 cup
Powdered Jaggery or Brown Sugar - 1 Cup
Whole wheat flour - 1 Cup
Cardamom Powder / Elachi - 2 tsp
Water - As required to make the batter.
Ghee - Enough to brush the moulds and paniyarams.

Procedure
  • In a big mixing bowl, add the powdered jaggery first with little water. Let it completely get dissolved in the water. Then, add the other ingredients into the bowl and mix them into a thick batter. Consistency of the batter should not be too thick ( like chappathi dough ) and not too thin ( like rava dosa batter ). It should be in a medium thick consistency enough to pour them into the small round moulds. 
  • While preparing the batter, heat the Kuzhi Paniyaram pan on medium heat. Brush the rounds with little ghee.
  • When its heated enough, reduce the flame and pour the batter into the paniyaram moulds carefully. Spilling the batter or improper pouring might result in shapeless paniyarams or might spoil the round shaped treats.
  • After pouring into the moulds, slowly heat the pan on medium heat with the lid closed. Rotate the pan slightly so that the heat is spread uniformly across the entire pan. 
  • After 3 minutes, open the lid and check whether the sweet paniyarams are steamed properly. Flip the paniyarams onto the other side carefully using a thin spoon. Brush the top of the paniyarams with little ghee. 
  • After 3 minutes, check if the paniyarams are fully cooked and turned into golden brown colour. Take out the paniyarams from the moulds and repeat the process with the rest of the batter.


Tips and Suggestions
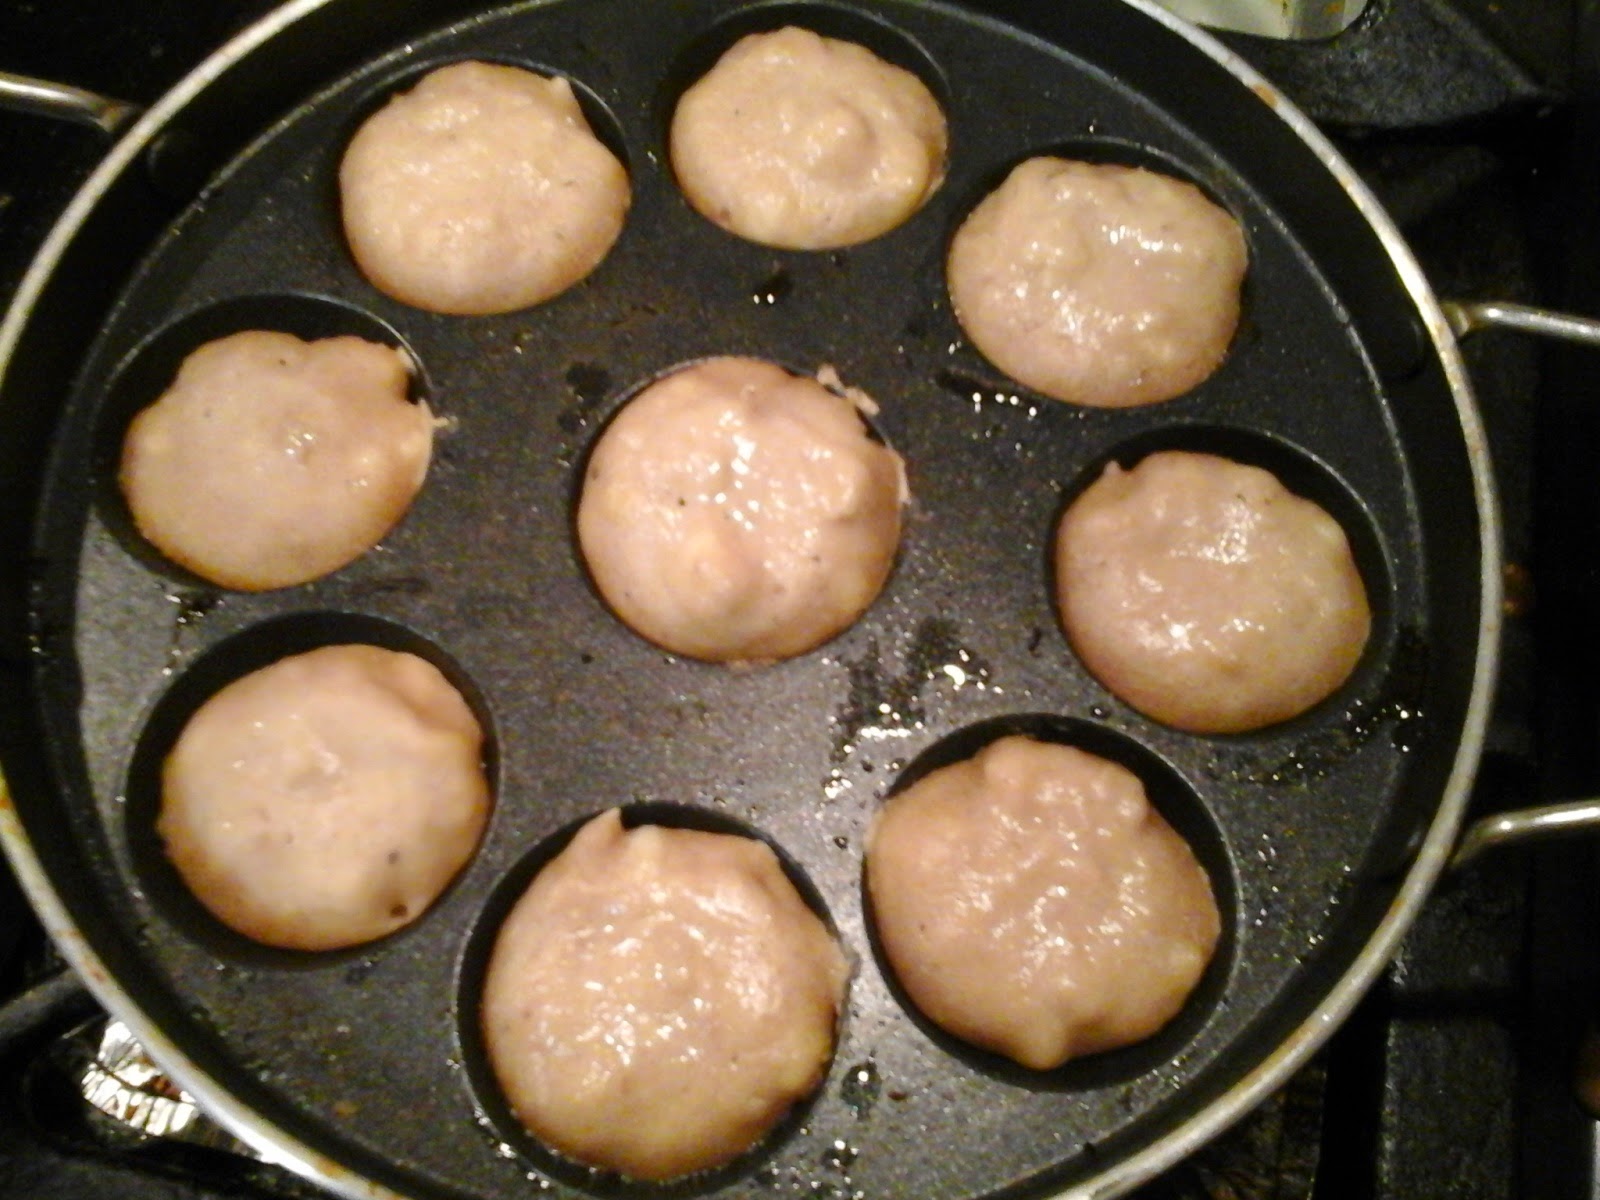
  • Make sure the flame is not high while making the paniyarams. Otherwise they might turn black very quickly.
  • You can add chopped nuts like almonds, cashewnuts, pistachios into the batter as well and make it more nutritious and tastier.
  • You can add ghee drops on the sides of the moulds if you wish to. I just brushed the moulds with little ghee and brushed the paniyarams with little ghee for flavour.

Sunday, November 16, 2014

Gujarathi Kadhi / Gujju Kadi / Gujarati Kadi

Gujarathi Kadhi with some pakoras in it!!
Kadhi is one the gravy food item made out of sour buttermilk and flavoured with spices. Though the basic preparation of Kadhi remains the same, each and every regions of India have a different version of Kadhi and they are unique in their own way. Punjabi Kadhis are bit thicker with pakodis in it and gujarathi kadhis are bit thinner and little sweet. We love all kinds of Kadhi and enjoy the authentic taste of the kadhisEver since we tasted the gujarathi kadhi in restaurants and at my friend's home, I wanted to try it out at home and save the recipe for future use.  After tasting this Kadi at various places including resturants, friend's home, BAPS temple, I found out that there are many versions of  Gujarathi Kadi.  Now I am blogging the version which I learnt from my gujarathi neighbour as I loved the flavour and punch of the Kadi at their home. But we would never forget the taste and warmth of the Kadhi served at my friend's home earlier and her mother in law ultimately sets a standard making us compare every gujju food with hers. But till today, we could not find any gujju platter better than hers. Her taste is unique and uncomparable though...

Ingredients

Into the Curd / Yogurt :
Sour Thick Buttermilk - 5 Cups
Grated Ginger - 1 tbsp
Grated Garlic - 1 tbsp
Salt - As Required
Sugar - 2 tsp
Turmeric Powder - 1 tsp
Besan / Chick Pea Flour - 3 tbsp ( if sour ) or 2 tbsp ( if not that sour )
Cumin Powder - 3/4 th of a tsp
Yellow Split Mustard Seeds Powder - 3/4th of a tsp

Tadka ( Tempering )

Ghee - 2 tsp
Dry Red Chillies - 3
Cardamom Seeds - 2
Cinnamon Sticks - 2 or 3 small
Lavang or Cloves - 3 or 4
Green Chillies slit into halves - 3
Curry Leaves - 1 Stem
Cumin Seeds / Jeera - 1 tsp
Methi Seeds /Fenugreek seeds - 1/2 tsp
Split Mustard Seeds - 1/2 tsp

To Garnish :
Crushed Coriander Leaves - 1 tbsp

Procedure
  • In a big cooking vessel, add the thick buttermilk first. Add all the other ingredients under the column "Into the Curd / Yogurt". Using a spatula or hand mixer, mix them thoroughly. Add little water to get the right consistency if the curd mixture is too thick. After getting the right consistency for Kadhi, allow the Kadhi to cook on medium flame.
  • Meantime, finish the tempering process in the other gas stove. Add all the ingredients under the column "Tadka/ Tempering" into the ghee and after they are tempered properly, pour them over the cooking Kadhi.
  • Keep stirring the Kadhi continuously on medium flame so that it does not get burned at the bottom. When you notice few bubbles at the top layer, switch off the gas stove.
  • Garnish the Kadhi with crushed coriander leaves and enjoy with jeera rice or plain basmati rice. 

Tips / Suggestions
  • Add some thin dal water into the Kadhi as well instead of adding regular water, it enhances the taste of the Kadhi.  My neighbour just washed the cooker in which we cooked the regular dal with some water and poured that water into the Kadhi vessel. 
  • As you can sip the Gujarathi Kadhi during the meal at any time, I prefer to make it in a consistency where its not too thick nor too watery.
  • You can avoid adding sugar to the Kadhi if your family does not vote for the sweet taste in it. Still it tastes heavenly.
  • Add more grated ginger to the curd mixture if the curd / buttermilk is too thick and sour.

Tuesday, November 11, 2014

Vaazhaithandu Mor Kootu / Banana Stem Mor Kootu


Banana Stem called as "Vaazhaithandu" in Tamil and "Arati Duvva" in Telugu is widely used in South Indian Cuisines. Tender Plantain stem is widely used in making dals, kootu, curry, stir fries or even in salads. Extracting the nutritious stem from the covered layers looks like a tedious process but the effort is really worthy. Inclusion of the banana stem in your daily menu prevents you from stomach related problems, prevents kidney stones and helps in weight reduction etc., Previously it was quite difficult to see Banana Stems in our Indian markets but recently I have been getting this precious stem in many Indian stores and I could not resist my hands grabbing one stem. Today I am blogging another recipe of this stem called as "Vaazhaithandu Mor Kootu".  Process of making this Mor Kootu is easier and it has a refreshing taste and it blends well with any Kara Kuzhambu or Vathal Kuzhambu in a meal.

Ingredients

1 Medium Size Banana Stem
Channa Dal - 1 tbsp
Salt - To Taste

For Ground Paste
Thick Curd - 1 tbsp
Fresh Coconut Flakes - 1 tbsp
Cumin Seeds - 1 tsp
Green Chillies - 2 Medium
Rice Flour - 1/2 tsp

For Tempering
Mustard Seeds - 1 tsp
Curry Leaves - 5 or 6
Dry Red Chillies - 2
Urad Dal - 1/2 tsp
Hing - 1 Dash

Method

  • Remove the outer covers from the banana stem and extract the inner edible stick carefully.  
  • To see how to clean and get the banana stem stick, please see the previous post of mine in the link :    Banana Stem Poriyal
  • Soak the channa dal into warm water for 15 minutes.  Grind the paste with the ingredients as mentioned above into a thick paste and keep it ready.
  • In a cooking vessel, half cook the channa dal along with some water. Add chopped banana stem pieces into the half cooked channa dal. Let them cook on medium flame till the banana stem gets completely cooked. Add little water into the vessel if required while cooking. Do not add more water for cooking as the water content in the banana stem itself would be sufficient to get them cooked.
  • After the channa dal and banana stem get cooked, add the grounded paste into the vessel along with some salt. Mix them well and allow them to cook again for 2-3 minutes on medium flame.
  • Finally do the tempering and pour them over the cooked content in the vessel. Mix them well and enjoy with good accompaniments in your meal.

Thursday, October 16, 2014

Pudina Tomato Chutney / Mint Tomato Chutney - For Idly, Dosas


Mint / Pudina always sit in my refrigerator and comes as a handy ingredient at times. Today I made a spicy, flavourful and super tasty chutney for my golden crisp dosas in the morning. Freshness of the pudina makes the chutney so special and it is an excellent accompaniment to dosas. Try this chutney in your kitchen with fresh mint leaves and enjoy with any south indian tiffin varieties.   

"Adding Mint / Pudina in your daily cooking is a very healthy option. It has good antioxidant properties, prevents allergies, relieves cold symptoms, helps in indigestion. "

Ingredients

Fresh Mint leaves - 2 cups
Tomato - 2 Medium
Garlic Pods - 6 Big
Green Chillies - 2 Big
Dry Red Chili - 2
Sesame Oil - 2 tsp
Hing / Asafoetida - 1 Dash
Mustard Seeds - 1/2 tsp
Jeera / Cumin Seeds - 1 tsp
Urad Dal / Ulutham Paruppu / Mina Pappu - 2 tsp
Channa Dal / Kadalai Paruppu / Senaga Pappu - 2 tsp
Salt - To Taste
Tamarind - 1 pinch
Jaggery - 1/2 tsp

Method
  • In a frying pan, add sesame oil first. When its heated, add hing, mustard seeds, cumin seeds, urad dal, channa dal in succession. When they turn golden yellow, add garlic pods, green chillies, dry red chillies into the pan and fry them for a minute. Add the tomato pieces next and fry them till they get mushy. Finally add the mint leaves and fry for another 2 minutes. Switch off the flame.
  • After the contents cool down a bit, grind them along with other ingredients. Add salt while grinding the chutney in the blender.
  • Transfer the chutney into a serving bowl and enjoy with your dosas, idlies or any other tiffin.

Green Dried Peas Sundal / Pachai Pattani Sundal / Green Peas Sundal


"Pachai Pattani" in tamil is mostly added in many south indian tiffin along with other vegetables. Pattani Sundal is also one of the popular navarathri sundals that can be prepared easily. Process of preparing sundals is almost the same except that the soaking time might differ. Green Peas / Pachai Pattani sundal can be made in different ways. Here I have blogged the common version. We can also add shredded carrots, tiny pieces of mango and make a colourful version called "Thenga Manga Pattani Sundal". Needless to say that the leftover sundal can be added in sambar, kootu or kuruma along with other veggies at the end.

Ingredients
Green Peas / Pachai Pattani ) - 1 Cup
Water - Enough to soak the green peas.
Oil - 2 tsp
Hing / Asafoetida - 1 Dash
Mustard Seeds - 2 tsp
Urad Dal / Ulutham paruppu / Mina Pappu - 1 tsp
Curry Leaves - 1 small stick
Dry Red Chillies - 2 
Salt - As Required
Fresh coconut flakes - 1 tbsp
Method
  • Soak the green dried peas / pachai pattani in water for 7-8 hours. Drain the water from the soaked peas.
  • Pressure cook them for 2-3 whistles.  Drain the pachai patani and keep aside.
  • In a cooking pan, add oil first. Add mustard seeds , urad dal , curry leaves, dry red chillies and temper them.
  • When the mustard seeds sputter, add the drained cooked green peas into the pan.
  • Add required amount of salt into the pan. Allow them to set for a minute with the salt.
  • Finally add the grated coconut flakes into the pan and garnish them.
  • Enjoy this sundal either as an evening snack or with meals. But its a very healthy option for kids.
Tips
  • Do not overcook the green peas in the pressure cooker.
  • You can make some special sundal powder ( using coriander seeds, red chillies) and sprinkle them at the end to enhance the taste of any sundal.

Wednesday, October 15, 2014

Yellow Dried Peas Sundal / Vellai Pattani Sundal / White Vatana Sundal


Yellow Dried Peas called as "Vellai Pattani" in tamil, "Vatana" in Hindi is a good source of Protein. Vellai Pattani sundal is definitely prepared on one day during Navarathri at my home. We all like the buttery taste of this Vellai Pattani sundal. Even if we have some leftover, it can be easily transformed into Kurma or added into sambar. I love making this Sundal at home during Navarathri and I love to do patties, kurma or other Indian delicacies using this Yellow Peas ( Vatana ) during other time.
Ingredients
White Vatana ( White Peas / Yellow Peas ) - 1 Cup
Water - Enough to soak the white peas.
Oil - 2 tsp
Hing / Asafoetida - 1 Dash
Mustard Seeds - 2 tsp
Urad Dal / Ulutham paruppu / Mina Pappu - 1 tsp
Curry Leaves - 1 small stick
Dry Red Chillies - 2 
Salt - As Required
Fresh coconut flakes - 1 tbsp
Method
  • Soak the yellow dried peas / vellai pattani in water for 7-8 hours. Drain the water from the soaked peas.
  • Pressure cook them for 2-3 whistles.  Drain the vellai patani and keep aside.
  • In a cooking pan, add oil first. Add mustard seeds , urad dal , curry leaves, dry red chillies and temper them.
  • When the mustard seeds sputter, add the drained cooked vatana / yellow peas into the pan.
  • Add required amount of salt into the pan. Allow them to set for a minute with the salt.
  • Finally add the grated coconut flakes into the pan and garnish them.
  • Enjoy this sundal either as an evening snack or with meals. But its a very healthy option for kids.

Tips
  • Do not overcook the yellow peas / vatana in the pressure cooker.
  • You can make some special sundal powder ( using coriander seeds, red chillies) and sprinkle them at the end to enhance the taste of any sundal.

Sunday, October 12, 2014

Apple Thokku / Apple Ginger Thokku / Inji Apple Thokku


An apple can be enjoyed in many different ways in Indian cooking. We can make apple jams, apple payasam, apple halwa, apple kesari, apple pickle, apple thokku, etc., I ventured again with apples and made apple thokku. Spicyness from the fresh ginger and the sweetness from the red delicious apple perfectly blend with the spices and yields a flavourful apple thokku. It can be a good accompaniment to adais, rotis or any tiffin varieties. 

Ingredients
Red Delicious Apple - 1 Big
Ginger - 1 Medium Size
Oil - 1 tbsp
Hing / Asafoetida - 1 Dash
Mustard Seeds - 1 tsp
Curry Leaves - 4 or 5
Fenugreek Seeds - 1/2 tsp
Salt - As Required
Jaggery - 1 tbsp
Red Chilli Powder - 1 tsp


Method

  • Wash the apple thoroughly and grate it. Grate the ginger too and keep it ready.
  • In the cooking pan, add oil first. When its heated, add hing and mustard seeds. After the mustard seeds sputter, add the fenugreek seeds, curry leaves into the pan.
  • Add the grated apple and ginger into the pan. Stir them slowly and allow them to cook for 8-10 minutes. 
  • Add red chili powder and required amount of salt into the pan.
  • Allow the contents to get cooked on medium flame till the quantity gets reduced considerably. Stir occasionally to avoid the thokku turning black at the bottom.
  • When the thokku consistency is reached, switch off the flame. Let the thokku cools down completely.
  • After its cooled down, store it  in a glass container and enjoy.

Saturday, October 11, 2014

Bellam Sunnundalu / Bellam Minapa Sunnundalu / Minapa Sunnundalu / Sunnundalu


"Sunnundalu" is one of the mouth watering recipes of Andhra which could be prepared either using Jaggery or Cane Sugar. I opted for the Jaggery version as my other sweets for the festival were made out of Cane Sugar.  Bellam Sunnundalu is a healthy sweet treat for the kids as its made out of Urad Dal totally. Due to Jaggery, Bellam Sunnundalu might be little... sticky in your mouth compared to the Sunnundalu made with just sugar.  Very simple to make with less ingredients and less time. Try making these yummy laddoos for the coming diwali and enjoy.

Ingredients

Urad Dal Flour / Minapappu Flour  - 1 Cup
Cardamom Powder / Elachi Powder - 2 tsp
Jaggery - 1 Cup
Melted Ghee - 1/2 cup 

Method 
  • Dry Roast the urad dal / Mina pappu on medium flame till you get a nice aroma and turns golden yellow.  Dont fry on high flame as it might turn the dal into black before we notice.
  • After the roasted dal cools down completely, blend them with jaggery pieces together to a coarse powder.
  • In a big mixing bowl, transfer the blended powder. Add the cardamom powder into the bowl and slowly add the melted ghee into the mixture.
  • Shape the flour into small round balls and enjoy.  

Thursday, September 25, 2014

Happy Navarathri 2014

Golu at our home, first day - 2014
Navarathri always bring lots of cheers inside my mind and the body gets energized by unknown power suddenly. Mind constantly thinks about the various activities which we would be doing at home during these lovely nine days. I do have to install a speed braker to slow down my thoughts and events sometime. Honestly I wish to pass on all the goody moments I had during my childhood navarathri / golu at my native place Thanjavur to my kids. My kids neither took a small bag to different houses for collecting sundals or dressed up in sarees or other costumes during this occasion like us. Still, they cherish Navarathri in a different way now by listening to all P.Suseela navarathri devotional songs in the mornings ( in a little higher volume to get a south indian temple feel!!!!) , munching the sundals I make in the evenings, dressing up in indian costume when some families visit our home for thamboolam, chant slokas along with me, everything they do as I am asking them. But I trust that these feelings are so unique and they will appreciate it one day when they grow up. I still remember each and every thing my parents did during navarathri at my home and the shades of childhood always brings up brightness in my eyes and melts my heart. 

Hoping that they will keep golu, make sundals, sing songs, chant slokas, invite friends to their homes in future and appreciate their mom and dad as I do now, I will keep Navarathri Golu every year for achieving that. 

Happy Navarathri to all my dear family, friends and everyone in the world. Let us all pray to have peace throughout the world with no war zone, fights, blood sheds. 

Monday, June 16, 2014

Healthy Ladoo / Nutty Ladoo / Ladoo - With No Sugar / Sugarless

On a sunny hot afternoon, my little one was asking for a dessert and wanted a yummy one. I was breaking my head and did not have an idea of what to offer. I had dates, dry grapes, jaggery as sweety things in my kitchen except multi vitamin gummy vites. Then I realized that i did not have any sweety things in my kitchen at all. ( In a way, its good!!)  I offered the dates but the demand was for a dessert only. So, in minutes, a nutty ladoo was made with all the available ingredients. Brownish nutty ladoo was made in a quick fashion with the goodness of almonds, pistachios, walnuts, peanuts, white sesame seeds, dates and little jaggery. No need to add ghee to make these ladoos as the dates itself act as a good binding agent while forming them.. But for good flavour, add a tsp of ghee and cardamom powder to the nutty mix. This ladoo can be made in minutes and its highly nutritious too...Its definitely a healthy dessert to the kids at any time.
Ingredients
Almonds - 1/2 cup
Walnuts - 1/4 cup
Pistachios - 1/4 cup
Sesame seeds - 1/2 cup
Peanuts - 1/2 cup
Dry Grapes - 1/2 cup
Cardamom Powder - 2 tsp
Jaggery - 1/4 cup
Dates seedless chopped into pieces - 1 cup
Ghee - 1 or 2 tsp
Note : You can adjust the ratio of the ingredients as you like and enjoy.!!
Method
Dry roast the nut ingredients except dry grapes,dates,jaggery for 2-3 minutes on medium flame till a nice aroma emanates.Grind all the roasted ingredients as mentioned in the list except ghee to a fine powder in a good blender. Transfer them into a mixing bowl and add ghee. Mix them well and form laddoos of small lemon size. 

Colourful Bell Pepper Besan Fry / Capsicum Besan Fry / Capsicum Subzi with Besan

 Bell Peppers generally sit in my refrigerator all the time and I wish to include them in most of my side dishes. Nowadays I am so obsessed with the colourful yellow, orange, red and green bell peppers. Especially these colourful glories are found abundant in farm markets during summer season. Out of special interests, whenever I pick bell peppers, I cannot compromise on few picks. So, to exhaust all the remaining colourful ones before I hunt for the next vegetable purchase, I made a easy side dish just with these colourful peppers for the rotis. Bell peppers coated with besan flour, flavoured with other spices slightly fried is an excellent accompaniment to rotis / chappathis. Its an easy to make side dish and it can never go wrong. As its colourful and flavourful, you will never have to worry about leftover!!!

Ingredients
Bell Peppers of any kind ( Yellow , Orange, Green, Red ) - 6 or 7
Onion chopped into 1 inch squares - 3/4 cup
Oil - 1/2 tbsp
Turmeric Powder - 1 tsp
Dry Red chili Powder - 3 tsp
Garam Masala Powder - 1 tsp ( I used Kitchen King Garam masala )
Coriander Cumin Powder - 1 tsp
Cumin Seeds - 2 tsp
Besan Flour / Bengal Gram Flour - 2 tbsp
Salt - To Taste
Coriander Leaves - To Garnish

Method
  • In a cooking pan, add oil first. When its heated, add cumin seeds first.
  • Next fry the onions till they get translucent. Then, add all the bell peppers and fry them on high flame till they get cooked and crunchy. I love to fry them on high flame in order to have them crunchy. 
  • After they get cooked and fried to a satisfactory level, reduce the flame and add all the spices, besan flour and salt and fry them again till the raw smell of the besan flour completely goes off.
  • Make sure that the fry does not turn black at the bottom. You would get a nice aroma from the bell pepper fry after the raw smell goes off. That's the point to switch off.
  • Enjoy your rotis with the bell pepper fry and some fresh raita.

Thursday, June 12, 2014

Pesarapappu Uppuma / Pesarapappu Upma / Biyam Pesarapappu Upma / Andhra Pesarapappu Upma


Biyyam Pesarapappu Upma is one of Andhra's tradiitional tiffin, which is made with lentils and broken rice steam cooked and tempered with seasonings. Its a healthy heavy tiffin packed with proteins and carbs. With a side of a spicy ginger chutney / allam pachidi and some fresh curd, its heavenly and can be a best option for tiffin night. I tasted this tiffin first at my in-laws home days after marriage. Initially I thought i was going to have pongal upon looking at the ingredients which they took. But what I saw in my plate was some tasty upma in puttu texture and I absolutely loved it. Without having any embarassment or shyness ( especially after marriage ), I finished the whole plate in few minutes and went for the next round. It showed my interests in food indeed.!!! Till today, my mother in law would remember that moment and came to know of my foodie interests through various occasions like this. I learnt the recipe from her and its definitely her recipe. I just followed the way she taught me and we enjoy this upma often in my household. Whenever I visit them during vacation, she never failed to give us a big bag of homemade biyam rava for making this yummy delight. This is once again my mother-in-law's recipe to you all my dear bloggers.

Ingredients
Biyam Rava / Broken rice rava - 1.5 cups
Pesarapappu / Moong Dhal - 3/4 cup
Salt - As Required
Fresh coconut flakes - 1 tbsp
Water - Enough to cook the upma
(Add 2.5 cups of water for 1 cup of rice rava and 1/2 cup of Moong dhal )

Tempering / Tadka 
Oil - 4 tsp
Hing / Asafoetida - 1 Dash
Mustard Seeds - 2 tsp
Jeera / Cumin Seeds - 2 tsp
Shredded Ginger - 1 tbsp
Green Chili - 2 slit into halves
Dry Red chillies - 3 or 4
Curry Leaves - 1 stem

Method
  • In a big thick bottomed vessel, dry roast the moong dal for a minute till a nice aroma emanates. Take it out and store it in a plate.
  • Add oil into the pan and do the tempering process by adding all the ingredients in order.  Once its done, add the Moong Dhal and biyam rice rava and toast the mix with the tempered seasonings for a minute. Add water in the ratio as mentioned above to the vessel. ( I added 41/4 cups of water for 1.5 cups of rice rava and moong dal ).
  • Allow them to cook on medium flame for 10-15 minutes. When its done three fourth, add salt to the upma and mix well. Allow them to cook on low flame for another 10-15 minutes till the rice rava and moong dhal get cooked to the right consistency. Switch off the flame and garnish with coconut flakes just before serving.
  • Enjoy this upma with allam pachidi / ginger chutney and fresh curd.


Tips / Suggestions 
  • Amount of water for cooking depends on the type of rice variety you use. For some rice varieties, it may require more water to cook and so check with the age of the rice you use and add water accordingly.
  • Adding salt at the end of the cooking process is ideal after the mix gets cooked to a fluffy consistency.
  • If this upma's consistency is pasty, its difficult to enjoy. If its in the form of "puttu" consistency ( where cooked rice rava and moon dal is totally separate and dry ), then its enjoyable. So, add right amount of water which is important in this process.
  • If you wish to omit coconut, its totally fine. 
  • Adding coconut flakes is recommended only if you are going to consume then. Becaz storing the coconut sprinkled upma in the refrigerator might not be good option for later use. 

Tuesday, June 10, 2014

Basic Marinara Sauce / Marinara Sauce / Italian Marinara Sauce


For making a quick pasta, we use the store bought Marianara Sauce of various combinations generally. But I noticed that the  marianara sauce served at Italian restaurants would be so rich in texture and tastes much better than the store bought ones. I tried to venture out the possibility of making marinara sauce at home by following a very good marinara recipe. I followed Giada's Marinara Sauce recipe almost with few additions from my side to suit our taste. Trust me, the regular pasta plate looked so different in texture and looked delicious. Ah, why not execute this with some real shredded picorino romano cheese? Adding a feather to the crown, this paste sauce topped with the Italian cheese melts in your mouth. Above all, I like the sauce so much and try making the sauce with vine tomatoes. I added few toasted baby bella brown mushrooms in my marinara sauce. You can store it in refrigerator for 4-5 days and consume. As I don't add more oil, I prefer to exhaust them quickly. 
Ingredients
 
2 Cans Tomato Puree - 32 Oz
Carrots - 2 peeled and shredded
Celery Stalks - 2 finely chopped
Garlic cloves - 2 finely chopped
Salt - As Required
Extra Virgin Olive Oil - 1/4 cup
Bay Leaves - 2
Yellow Onions - 2 finely chopped
Black Pepper Powder - 2 tsp ( We wanted little punch, so added more but you adjust )
Dried Oregano - 1 tsp
Dried Thyme - 1 tsp
Dried Basil Leaves - 2 tsp

Method
  • Ziti Pasta coated with homemade marinara sauce 
    In a thick bottomed pan, add oil first followed by shredded garlic and onion pieces.
  • Sprinkle little water and fry them for 5 minutes till the onion get translucent.
  • Add the shredded carrot, celery into the pan and saute them for another 3-4 minutes.
  • Add the tomato puree with all the spices except salt into the pan and allow them to cook on low flame with the lid open for nearly 30-45 minutes till the quantity reduces and get into a thick sauce consistency.
  • Add salt at the end and allow them stand on the stove for 2-3 minutes.
  • Let the sauce cool completely and store them in the refrigerator for later use.
  • Enjoy some fresh sauce with cooked pasta with a side of pickled olives, toasted rosemary bread and fresh arugula salad.
Tips
  • I used dried spices while making the sauce as the dried herbs hold the flavor for longer time when cooked on low flame. If you prefer to use the fresh herbs, try to add them at the end to hold the fresh flavours in the sauce.
  • I prefer to puree the tomato before making the sauce which gives an unique taste and texture.
  • Caramelize the onions perfectly before putting the carrots and celery into the pan.

Monday, June 9, 2014

Tiramisu / Tiramisu Dessert / An Italian Dessert - Tiramisu / Tiramisu Cake

"Tiramisu Cake" is a very popular Italian Dessert with a mild coffee flavour which stole our heart few years before. Since then, our family never fail to enjoy this dessert at the end of any Italian dinner. Due to its mild sweetness we could enjoy this Tiramisu Cake comfortably more. My kids love this cake and when I announced them that I would make them at home, their eyebrows went up and were really worried whether I would be able to duplicate the dessert perfectly or not. Well, with a list of right ingredients and at right proportions, I successfully duplicated the great "Tiramisu" at home. ( for them!!!). Of course, it has to be presented at the end of an Italian meal. So, last Friday we enjoyed a complete Italian Meal from soup to dessert comprising of Minestrone Soup, Penne Pasta with homemade Marinara Sauce sauteed with vegetables , a side of grilled vegetables seasoned with Italian herbs and Tiramisu Cake. This meal is mainly made to please our dear son on his Kindergarten Graduation Day. A change in the routine always refreshes the mind and it proved to be true. We had a terrific weekend followed by with tons of housework.!!!  My Dear bloggers, if you are calorie conscious or weight watchers, you could enjoy only a little portion of this cake sadly...

Making tiramisu is not at all a cumbersome process. With all the right ingredients in place, its an effortless job with less preparation time. You need to be patient only during the refrigeration time. Its an ideal dessert to be made well in advance during a big get together or birthdays.

Ingredients

Mascarpone Cheese - 1 Cup
Whipped Cream -2 cups
Sugar - 1/4 cup
Vanilla Extract - 1 tsp
Unsweetened Cocoa Powder - 1/4 cup ( For Dusting )
Lady Finger Biscuits - 20 to 25
Leftover Coffee or Espresso - 1 Cup ( Enough to dip to the finger biscuits )
Chocolate Powder or Chocolate shaved curls - For decorating on top ( Optional )

Method
Make the coffee / espresso ready first. In a big mixing bowl, mix the mascarpone cheese, whipping cream and sugar and whip them.
Keep the tray or rectangular pan with good depth to assemble. Soak the lady finger biscuits into the coffee espresso lightly and arrange them in order. 
 After you place one complete layer of lady finger biscuits, coat the layer with the creamy mascarpone filling on top uniformly.
 Dust the creamy layer with cocoa powder uniformly using the tea filter on all directions.

On top of it, arrange the lady finger biscuits again and repeat the process. 
Finally on top of the cocoa layer dusting, dust the chocolate powder or decorate the cake with the shaved chocolate curls. Refrigerate the Tiramisu Cake for 7 to 8 hours. Make triangular pieces or rectangular as you desire and serve the cake on a dessert plate. Just stick a dry lady finger biscuit on its top to get the restaurant style look. 

Tips / Suggestions
  • I prefer to freeze the Tiramisu for half an hour before serving as it helps out while making pieces without cracking.
  • For making chocolate curls, you can use a dark chocolate bar and peel at the corners using a vegetable peeler. It works well.
  • Refrigerate well enough for achieving good results. 
  • Don't add more sugar to this cake than mentioned. Mild sweetness gives a divine taste to Tiramisu.
  • For big parties if you decide to make the dessert well in advance, its ideal to make it as individual dessert piece for any guest. If you have individual dessert rectangular serving cups or any deep serving cups, you can adopt the same method and make mini versions of the Tiramisu cake for all the guests. In this way, there are no hastles in cutting the big Tiramisu cake before serving and worrying about cracking them. Instead, you arrange the dessert cups in a serving tray and in no time your dessert will be fixed perfectly. 

Saturday, June 7, 2014

Dal Tadka - Restaurant Style Dal Tadka


"Dal" is the staple Indian food which is widely eaten across all regions of India. Dal varieties differ from state to state and as a result there are so many varieties of Dals across India. Out of that, Dal Fry and Dal Tadka are the popular food items that are seen in almost every food menu of the Indian  Restaurants. Initially I was quite confused with the two items and I was pretty sure that they were made out of the same main ingredient Dal. Later I understood why they were called differently and its only the preparation process that actually differentiates them. 
In this post, I am blogging the recipe of Dal Tadka. Dal Tadka is a very popular dhaba food item tempered with aromatic spices and it tastes very good with hot hot rotis. Tadka means tempering in hindi which the tempering acts like a garnish to the protein rich lentil stew. Sometimes even the simplest menu choices make the meal more delicious and gives us warmth. And the combo of a simple Dal Tadka with roti is the one which reminds us of our mother all the time.
Ingredients
Masoor Dal - 1 cup
Moong Dal - 3/4 cup
Tomato diced into small cubes - 1/2 cup
Red Onion shredded - 1/2 cup
Garlic Pods - 3 or 4
Turmeric Powder - 1 tsp
Salt - As Required
Water - As Required for the Dal consistency
Grated Ginger - 1 tsp
Coriander Leaves - To Garnish

Tempering / Tadka :
Oil - 2 tsp ( To be tempered with ghee instead of oil for rich taste, add 2 to 3 tsps of ghee and do the tempering)
Hing / Asafoetida - 1 Dash
Mustard Seeds - 1.5 tsp
Jeera / Cumin Seeds - 2 tsp
Curry Leaves - 5 or 6
Dry Red Chillies - 2 Medium

Method
  • Pressure cook the dal mixture of Masoor dal and Moong dal, tomato, onion, garlic  for 4-5 whistles till they cook perfectly and get pasty. Add a tsp of turmeric powder to the contents in the pressure cooker before actually started cooking them.
  • After the pressure settles down completely, open the cooker and mash the cooked dal mixture. Add some water if its too thick and bring them to the right consistency.
  • On low flame, allow the dal to get cooked with lid open. Then, add required amount of salt, grated ginger to the dal. Simultaneously, do the tempering on the other stove.
  • In a small tempering pan, add all the ingredients for tempering to the oil and pour the tempering over the dal mixture.
  • Garnish the dal that's tempered with these aromatic spices and serve with hot rotis.
Tips / Suggestions 
Addition of a tsp of ghee to the dal tadka gives more flavour and enhances the taste of the dal. But its totally optional.
I would suggest you to dry roast the dal mixture for a minute before actually cooking them. 

Monday, June 2, 2014

Mango Salsa


Having Grown up with lots of good mango memories, I was quite interested in trying out the sweet, tangy also spicy Mango Salsa in my kitchen. Sweetness from the mangoes blends well with the spicy jalapenos and with the sourness from tomatoes and lime juice. Scoopful of this colourful salsa with a tortilla chip satisfies the tummy and its certainly not easy to resist the temptation of grabbing more and more...

Ingredients
Ripe Mango but firm diced into tiny squares - Between 1 cup to 1.5 cups depending upon its sweetness
Red Bell Pepper shredded - 1/4 cup
Yellow Bell Pepper shredded - 1/4 cup
Orange Bell Pepper shredded - 1/4 cup
Green Bell Pepper shredded - 1/4 cup
Jalapeno seeded and diced - 1/2 cup 
Coriander Leaves chopped - To Garnish 
Red Onion shredded - 1/4 cup
Lime Juice - 1 tbsp
Salt - To Taste
Spice Powder - 1/2 tbsp ( Dry roast 2 tsp of jeera( cumin seeds) and make a fine powder ) I like to add this in my mango salsa as it enhances the flavour and taste.

Method
In a big mixing bowl, add all the veggies, lime juice, spice powder and salt and mix them well. Add mango pieces at the end and mix once again. Leave the salsa to stay for few hours before serving for the real taste to set. Enjoy this salsa on a sunny day with a full bag of tortilla corn chips.!!

Friday, May 30, 2014

Kobbari Mamidikaya Pachi Pachidi / Mamidikaya Kobbari Pachi Pachidi - Andhra Summer Delight


Kobbari Mamidikaya Pachi Pachidi is truly an Andhra Summer Delight. Flavoured with garlic and spices, its definitely a kick start in any meal. With hot rice and a drop of ghee, it tastes heavenly with few padads and fryums. We love to enjoy this spicy, tangy pachidi during our lunch menu whenever we have raw green mangoes. Sourness of the raw mango is the key factor here. If the mango is not that sour, then the pachidi will taste more like a normal kobbari pachidi.!!! I know few versions of making pachidi with raw mangoes and this version is purely using raw mango, fresh coconut and raw garlic. Later I will post the other versions in the blog. 

Ingredients

Grinding 
Raw Mango grated -- 1 cup
Fresh Coconut Flakes - 1 cup
Raw Garlic - 5-6
Jeera / Cumin Seeds - 1 tsp
Coriander Seeds - 2 tsp
Urad Dal - 1 tsp
Dry Red Chillies - 7 to 8
Salt - As Required

Tempering / Tadka 
Oil - 3 tsp
Hing / Asafoetida - 1 Dash
Mustard Seeds - 2 tsp
Cumin Seeds / Jeera - 1 tsp
Urad Dal - 1 tsp
Channa Dal - 1 tsp
Curry Leaves - 1 Stem
Dry Red Chillies - 2 Small

Method
Wash the mango and peel the skin off. Grate the mango and shred the coconut as required. Grind all the ingredients into a coarse paste in a blender and transfer them into a serving bowl. Just before serving, do the tempering process by putting all the ingredients into a small tadka pan with few drops of oil. When they turn golden brown, pour them over the top of the Pachidi and serve.

Wednesday, May 21, 2014

Chickpeas Bell Peppers Salad / Chickpeas Salad / Garbanzo Salad - With Garlic Sesame Dressing


Chickpeas Salad with colourful bell peppers tossed with some garlic sesame dressing is a very delicious,colourful and flavourful salad. If i could bring out the real flavour of this salad to the blog right now, I would be more than happy. Wonderful flavour emanating from the salad bowl while tossing the salad with the sesame garlic dressing was absolutely great and it was quite difficult for me to control the temptation of grabbing some salad during the preparation process itself. I am ardent lover of Chickpeas / Garbanzo since childhood and no wonder this salad made me happier. For the dressing, I decided to make my own version using white sesame seeds, garlic and extra virgin olive oil. To me, chickpeas and sesame seeds could get along well and uplifts the taste too which proved to be true. So, my dear friends, make this delicious aromatic salad in your kitchen and enjoy summer.

Ingredients

Cooked Chickpeas - 4-5 cups
Cucumber - 1 Medium
Red Bell Pepper - 1/2 cup chopped
Orange Bell Pepper - 1/2 cup chopped
Yellow Bell Pepper - 1/2 cup chopped
Green Bell Pepper - 1/2 cup chopped
Tomato - 1 Medium chopped 
Jalapeno Peppers - 1 medium chopped into tiny bits ( with no seeds )
Salt - As Required
Lime Juice - 1/2 tbsp
Black Pepper Powder - 1/2 tsp
Fresh coriander Leaves - 1/2 cup chopped
Dressing 
White Sesame Seeds - 1/4 cup
Garlic Pods - 2 Medium
Extra virgin olive oil - 1/2 tbsp

Method

Toast the sesame seeds and garlic pods in microwave for about 40 seconds. You might get a nice aroma from the microwave and then grind them with extra virgin olive oil in a blender and keep the dressing ready. In a salad mixing bowl, add all the ingredients as mentioned above and pour the dressing slowly over the salad and toss them well so that the salad gets coated with the dressing perfectly. Garnish with coriander leaves on its top and enjoy the refreshing summer salad. 

Friday, May 16, 2014

Mango Milkshake / Mango Milkshake with No Sugar


Enjoying the sweet mangoes this week again with a glass of yummy mango milkshake. To enjoy this milkshake completely without any guilt, I made this without adding any extra white sugar. Trust me, no compromise in the taste and it tasted very well with a tbsp of MTR Badam Powder. Sweetness of the milkshake comes from the mangoes so make sure that the mangoes you use for milkshake are not sour but sweety. Natural sweetness from the fruit blends with 2% fat milk and few spoons of Badam Powder makes a perfect milkshake for any time of the day.Try this out in your kitchen and enjoy a healthy sugar free chilled mango milkshake.

Ingredients
Mangoes - 3
MTR Badam Powder - 1 tbsp
2% Fat Milk - 2 glasses 
Water - As required for your consistency.
Method
Peel the skin off and extract the mango pulp and cut them into chunks. Grind the mango chunks, badam powder, 2% milk in a blender till it gets fluffy. Add some water to the shake if its too thick. Pour them over the serving glasses and enjoy the green trees with a sip.

Thursday, May 15, 2014

Rainbow Salad with Quinoa / Rainbow Salad


"Rainbow Salad", the name I gave to the salad I made yesterday for lunch. While making the salad, I was astonished to see the amazing colours emerging out of all the veggies and the warm quinoa. It was kind of making a beautiful rainbow to my eyes and giving a colourful message to my mind. Wonderful lunch with lots of colour and tons of goodness to the body. Not to forget, the crunchy veggies perfectly blended with the warm, fluffy quinoa and completely upgrades the taste. Quinoa, as we all know, is called as the "SuperGrain" which is rich in proteins, contains double the amount of fibre than other grains and other numerous health benefits. 
I opt to make this as my after workout lunch as it contains all the fresh vegetables plus the protein rich quinoa which gives good punch to the salad. We can even pack this salad and enjoy in outdoors too. Kids will also love the colourful salad and it proved to be true in my case.!!
Ingredients
Quinoa - 3/4 cup
Purple Cabbage - 2 cups chopped into thin slices
Cucumber - 2 small ( cut into thin stripes of finger size )
Carrots - 1 Big ( cut into thin striped of finger size )
Zucchini - 1/2 cup ( shredded like carrot )
Green Bell Pepper - 1/4 cup ( thin slices of finger size )
Red Bell Pepper - 1/2 cup ( thin slices of finger size )
Yellow Bell Pepper - 1/2 cup ( thin slices of finger size )
Coriander Leaves or Parsley Leaves - 2 tbsp ( chopped )
Lemon Juice - 1/2 tbsp 
Salt - As Required

Dressing For the Salad :
Extra Virgin Olive Oil - 3 tsp
Black Pepper Powder - 2 tsp
Garlic Salt - 1 tsp

Method
  • Cook the quinoa in a separate cooking vessel by adding 2 cups of water. Meantime cut all the veggies as mentioned above. In a big mixing bowl, add all the colourful veggies followed by the cooked fluffy quinoa and the dressing. Toss them carefully till everything gets blended well.
  • Serve on a plate and enjoy with a side of Honey Green Tea.

Wednesday, May 14, 2014

Vazhaithandu Curry / Vazhaithandu Poriyal / Banana Stem Curry / Banana Stem Poriyal


Without realising the amazing health benefits of Banana stem, I had been enjoying the Vazhaithandu recipes since childhood. My mom used to bring 2 or 3 white sticks of Banana stem from market often and she never got tired of cleaning the banana stem. I used to notice the way she cleaned and cut them into thin rounds and the way she carefully extracted them out of the thin threads that was coming in every step of cleaning. Though I did not have any interest then, I simply noticed and the process got registered in my mind. Now, due to health reasons, I wish to bring the same goodness into my kitchen by adopting her techniques in everyday cooking. Happy to see Banana Stems in the Indian Grocery stores nowadays and I grabbed them quickly fearing that it might be taken by someone like me without glancing at the price even. I will post all the recipes that we could make using this Banana Stem. We could make Vazhaithandu ( in Tamil ) curry, Vazhaithandu Mor Kootu ( Curd gravy ) and Vazhaithandu Curd Raita, etc.,Though the cleaning process is cumbersome, once you know the technique of the process, you can prepare the Banana stem recipes in no time.

I added few Moong dal ( Payatham Paruppu ) along with the Banana Stem in my curry just to inject some protein into it. You can make this even without moong dal too. Little addition of moong dal enhances the taste of curries like cabbage, banana stem, beans, etc.,  

Looking at the health benefits of Banana Stem, its has a high source of fiber, eases constipation, helps in weight reduction, can reduce stomach pains, increases body immunity, suppresses the formation of kidney stones, etc.,

Ingredients
Banana Stem - 1 of any size.
Moong dal - 1/4 cup
Oil - 3 tsp
Hing / Asafoetida - 1 Dash
Mustard Seeds - 2 tsp
Jeera - 1 tsp
Urad Dal / Ulutham Paruppu - 3 tsp
Curry Leaves - 5 or 6
Green Chillies - 2 or 3 medium. 
Salt - As required
Fresh Coconut flakes - 1 tbsp

Method
In a small cup, soak the Moong Dal in water before you start cutting the Banana stem.Take out the outer layer of the Banana stem one by one till you get the round firm banana stem at the center.
Basically, we are not going to use any of these outer covers so discard them.
Before cutting the Banana Stem, take a vessel with some diluted buttermilk ready. This is mainly to add the chopped banana stem pieces into it to avoid discolouration. Cut the Banana stem into thin rounds from one corner. Take out the thin threads coming out during the process using your fingers as below.

Continue the process by following the same process and drop the chopped banana stem pieces into the vessel.

In the cooking pan, add some oil and do the tempering by adding the hing, mustard seeds, jeera, urad dal, curry leaves. Add the soaked moong dal into the pan along with little water enough to cook the Moong dal. Cover the lid and allow the dal to get cooked three fourth. While the dal is getting cooked, drain the banana stem pieces from the vessel and keep ready. Add them into the pan and smear some water and cover the lid.
In 3-4 minutes, the banana stem along with the dal would get finely cooked with the steam inside. Add required amount of salt into the pan and allow them to cook for another minute. Finally add fresh coconut flakes at the top and switch off the flame.

Tips / Suggestions
Try to make the curry as soon as you get the Banana stem from the market as it looks more whiter and richer in all nutrients.
Avoid adding more water into the pan while cooking as they get smashed. Water content in the banana stem itself is sufficient for them to get cooked with the steam inside on low flame.
Try to include this healthy vegetable in your cooking at least once in two weeks and enjoy the benefits.
For weightloss, drink the diluted buttermilk from the vessel after draining the banana stem pieces from it. Its suggested to be taken in empty stomach.

Monday, May 12, 2014

Mango Lassi / Mango Smoothie


No one could resist a glass of chilled mango lassi and that too given during a hot mid day. I grabbed a cart of sweet organic mangoes on mother's day. So, this week would be a "Mango week" in our home and you would be glad to see some yummy recipes out of my sweet mangoes.!! Well, I started with our traditional mango lassi / mango smoothie in a healthier way by adding plain greek yogurt and some honey. As the mangoes were sweeter, it tasted heavenly. This lassi would be a nice addition during any parties as it compliments the entire menu with its flavour, richness and taste. Feeling happier to blog this recipe during the Mothers Day time as this is my mom's favourite too. She always love to enjoy the mango lassi with more...sweetness by adding more secret sugar.!!! Mom, this treat is specially for you on Mothers Day.
Ingredients
Sweet Ripe Mango - 2
Plain Greek Yogurt - 1/2 cup
Honey - 1 tbsp
Crushed Pistachio - 3 tsp ( To Garnish at its top )
Water - As required.

Method
  • Peel the Mango skin and extract the pulp. Add the mango pulp, greek yogurt and honey to the blender.
  • Grind them smoothly for 1-2 minutes. Add some water to get the consistency as desired. If you decide to have a thick mango lassi, omit the water and enjoy the thick lassi.
  • If you wish to sip it little by little and enjoy the smoothie in a glass, add some water and acquire the right consistency.
  • Pour the lassi over the serving glasses and garnish the lassi with crushed pistachios.


Tips / Suggestions
  • Sweetness of the mangoes decide the sugary taste of the smoothie. So, add more honey if the mangoes are not that sweet. If you wish to add white sugar, add 11/2 tbsp of white sugar to the blender.
  • You can pre-prepare the mango smoothie and pour them over the serving glasses well in advance. Cover the top of the glasses with a wrapping plastic sheet and chill them in a refrigerator. During parties, its a pure blessing to us while taking out these yummy treats in the mid of all hungama.

Tuesday, May 6, 2014

Green Gram Sprouts Sundal / Sprouted Green Gram Sundal / Sprouted Green Gram Salad / Pachai Payaru Sundal


Read in magazines that "Sprouts are Super Foods and called as the Powerhouse of Nutrients". In modern life, we run around aisles in departmental stores looking for healthy and organic super food but failing to eat the natural home made sprouts. Sprouts are considered to be the cheapest source of nutrients which has good amount of protein, fiber and vitamins. We can make sprouts out of grains ( wheat for ex ), legumes and seeds. Sprouted seeds of alfalfa, mustard and sesame are used while making healthy salads and sandwiches. Out of that, alfalfa sprouts are considered to be the "father of sprouts". I love to put bunches of alfalfa sprouts or some spicy mustard sprouts into my sandwich all the time. Addition of sprouts into the sandwich always enhances the taste to a greater extent, i feel.

Sprouting Process :
Soak the grains / legumes overnight for 6-7 hours. Drain the water completely and cover the soaked legumes or seeds with a dry muslin cloth. Time span for soaking depends on the size of the seeds / legumes. Generally it takes 2-3 days for the seeds to germinate and become sprouts. Over soaking may harm the seeds to rot and ferment so the seeds should be soaked only for a limited period. After they sprout, store them in the refrigerator till you actually consume them.

Ingredients
Green Gram Dal / Pachai Payaru - 2 Cups
Oil - 2 tsp
Hing / Asafoetida - 1 Dash
Mustard Seeds - 2 tsp
Jeera / Cumin Seeds - 1 tsp
Green Chili - 2 Medium ( slit them into halves, I used green chili paste instead. )
or Green Chili paste - 2 tsp
Salt - As required
Fresh coconut flakes - 1 tbsp
Coriander Leaves - To Garnish
Curry Leaves - 5 or 6

Method

  • Make the Green Gram Sprouts by following the process as mentioned above.
  • In a cooking pan, add oil first. Add mustard seeds, cumin seeds, green chili paste, curry leaves to the oil.
  • When they sputter, add the drained sprouted green gram into the pan. 
  • Sprinkle some water into the pan and cover the lid. Allow them to get cooked with the steam inside for 3-4 minutes on medium heat.
  • When they get cooked to desired level, add required amount of salt into the pan and stir them well. Do not overcook the sprouted green gram as the nutrients might be washed away. 
  • Fry them for another 1-2 minutes. Switch off the flame and finally add the fresh coconut flakes and coriander leaves to the pan.
  • Enjoy this healthy sundal / curry as a snack or as a healthy accompaniment in your regular meal.

Carrot Beetroot Halwa - Low Calorie With No Sugar


Its really difficult to satisfy the sweet tooth especially if you are working on a weight loss program but its easy to choose a healthy dessert which does not add any extra calories to your daily count. Bags of sweet organic carrots sitting in the refrigerator along with some fresh beets triggered my mind to make some colourful dessert. Natural sweetness from carrots and beets are just enough if you prefer a milder version but a little jaggery and honey could be added to make it more sweeter. During the process, you might even wonder that the final halwa is going to be a Gerber Baby product.!!! ( Well, that's the comment I honestly got from my husband when he looked at the cooking pan in the mid of the process...) Just ignore the comments and continue the process. Trust me, the final product would be appreciated and enjoyed by all.

I did not add any ghee to my halwa but the consistency did not disappointment me at all. It came out well in a pasty form with good sweetness and flavour. 

Ingredients

Carrots - 15
Beetroots - 2 Medium
Jaggery - 1/2 cup
Honey - 1/4 cup
Cardamom Powder - 3 tsp
Rose Essence - 2 to 3 drops
Melted Ghee - 2 to 3 tsp at the end ( OPTIONAL) ( I did not add a bit of extra ghee ).
Ghee roasted Cashew nuts - 1 tbsp

Method

  • Wash the carrots and beets and peel the skin off. Cut them into squares and pressure cook them for 2-3 whistles.
  • In a cooking pan, add the mashed carrots and beets along with powdered jaggery and honey. Cover the lid and allow them to cook till it gets reduced in quantity on medium heat.
  • Stir the halwa content constantly so that the halwa does not get burned at the bottom. 
  • When the consistency of that halwa becomes little pasty, add the cardamom powder, rose essence and the melted ghee. 
  • Keep the halwa on medium heat for another 2-3 minutes. Finally add the melted ghee and ghee roasted cashew nuts at its top.
  • Serve this colourful healthy dessert to the kids in small cups and enjoy.


Friday, May 2, 2014

Cabbage Subzi for Roti / Chappathi


Green Cabbage will always be sitting  in my refrigerator like carrots. I love to include cabbage in fried rice, curries often as its a good source of fiber, helps in weight loss, well known for its anti cancer compounds and various other health benefits. Read in some health magazine that red cabbage has the highest amount of power nutrients. 

For rotis / chappathis, I made a healthy side dish with cabbage, some tomato, red onion and lilva ( thuvar seeds / Pigeon Peas ). Its wise to store some chopped cabbage in a sealed storage box in the refrigerator. In less than 5-6 minutes, the dish can be made as the process is much simpler. This is a very good accompaniment for roti, chappathi or any parathas.

Ingredients
Green Cabbage - 1/2 Medium 
Chopped Red Onion - 1/2 cup
Tomato - 1 Medium
Tuvar Lilva - 1 Handful ( Substitute Peas if you want )
Grated Ginger - 1/2 tsp
Chopped Coriander Leaves - To Garnish
Salt - To Taste

For Tempering / tadka :
Oil - 3 tsp
Jeera / Cumin Seeds - 2 tsp
Sombu / Fennel Seeds - 1 tsp
Green Chillies - 1 Medium
Chopped Garlic - 1 tsp

Powders to Add :
Turmeric Powder - 1 tsp
Red Chili Powder - 1 tsp
Coriander Cumin Powder - 1/2 tsp
Garam Masala Powder - 1 tsp

Method
  • Chop the green cabbage, tomato and red onion and keep all the other ingredients ready.
  • In the cooking pan, add oil first and finish the tempering process by adding the ingredients one by one.
  • Add the red onion next to the pan and fry them for a minute. Add tomato, lilva and fry them till the tomatoes get mushy.
  • Add the chopped cabbage and grated ginger into the pan now. Cover the lid and allow them to cook on medium heat for 2-3 minutes. Occasionally stir them in the middle. No need to add water at any stage while cooking.
  • Only with the inside developed steam, the cabbage could easily get cooked. After the contents are cooked perfectly, add all the powders and required amount of salt to the pan.
  • Mix them thoroughly and fry them for another 3-4 minutes. Garnish with coriander leaves and serve.

Tuesday, April 29, 2014

Dal Paratha / Dal Chappathi / Dal Roti / Protein Rich Paratha - Using Leftover Dal


Just had some leftover Sorakai Dal / Lauki Dal in my fridge and needed to make a yummy after school tiffin with less time...I decided to transform this Dal into a Dal Paratha by adding few cups of whole wheat flour. No need to add any water while kneading this paratha dough. May be few drops of oil might help you to knead the dough.Trust me, the texture of the dough was extremely soft and easy to spread though. Its definitely not a cumbersome process and makes our life easier with less efforts. And the process yields a healthy protein rich parathas. With some good accompaniments,these parathas will vanish from the plates quickly and makes you satisfied. 
After I decided to blog this recipe, I tried the same with leftover dals like methi dal, spinach dal and plain Dal and it all came out more than I expected. 

Ingredients
Leftover Dals - 3 cups
Whole Wheat Flour - 3 to 4 cups
Oil - 2 tsp to knead the dough. 

NO NEED TO ADD WATER.

Method
  • In a mixing bowl, add the leftover Dal and whole wheat flour and knead perfectly. Add oil little in the middle to ease the process. 
  • Take a small ball out of the kneaded dough, spread them into a thin round using a Chappathi / Roti roller.
  • Fry the Dal paratha on both sides with or without oil on a frying pan. Complete the process with the rest of the Dal paratha dough and make yummy golden parathas.
  • Enjoy these protein rich ones with a side of a pickle, fresh curd and few cucumber slices.

LinkWithin

Related Posts Plugin for WordPress, Blogger...