Saturday, May 28, 2011

Beans Paruppu Usiliyal


Though I already mentioned the process of making Paruppu Usili with Drumstick leaves earlier, I again make this post for Beans paruppu Usili. The main difference here is that I used very less oil ( about 1 tbsp ) for the entire process and steamed the Dal mixture ( Paruppu mixture ) which makes it more healthy and also fastens the process of making.
Method
  1. Steam the fresh cut beans with little salt and a pinch of sugar and keep it aside.
  2. Grind the soaked dals ( Toor dal, Channa Dal, Moong Dal ) with a dash of Hing \ Asafoetida and 5-6 dry red chillies with some water.
  3. Steam cook the grounded mixture in Idly pans like regular idlies. Then, grind the steamed Dal Idlies in a mixer grinder few rounds to get a coarse Dal mixture ( like a Dal Puttu ).
  4. Then, add the ingredients for tempering in a pan followed by the coarse dal mixture, steamed beans and required amount of salt.
  5. Mix them well and let the usiliyal cook for about two minutes. Then, switch off the heat.
  6. Its ready to be eaten with rice.

Onion Pakoda - With Wheat Rava Leftover Idly batter

It was very breezy, cloudy and slightly drizzling since afternoon. Its a perfect weather in all aspects to have some crunchy pakodas on the side of hot chai. We have been avoiding oil fried pakoda or any snacks as we have been trying to lose weight and be more conscious about what we eat. But today we have got a nice excuse. Yes.!!! Our friends family was visiting us this evening, and I decided to make crunchy pakodas with my leftover wheat rava idly batter. I added few extra ingredients to the leftover batter and finally the pakodas came out well.
Ingredients
Wheat Rava Idly Batter ( Leftover ) - 3 Cups
Besan \ Kadalai Maavu \ Senaga Pindi - 3 tbsp
Rice Flour \ Biyam Pindi \ Arisi Maavu - 3 tbsp
Red Chilli Powder - 3 tsp
Salt - To Taste
Hing \ Asafoetida - 1 Dash
Green chilli - 3 Medium finely cut into tiny pieces
Sombu \ Fennel - 1 tbsp
Coriander Leaves chopped - 2 tbsp
Curry Leaves - 5 or 6 crushed into tiny pieces
Red Onion - 1 medium cut into small pieces
Method
  1. Take the left over wheat rava idly batter in a big bowl. Add the other ingredients as mentioned above to the left over idly batter and mix everything in the bowl thoroughly without adding any water.
  2. Heat oil in a small pan. When you start noticing flames coming out of the oil, simmer the heat and small dropping the pakoda batter by hand into different small shapes. 
  3. Now increase the heat to medium level and allow the pakodas to get fried uniformly.
  4. When its golden brown, take out the pakodas and spread them on a plate covered with a tissue paper.
  5. As noticed, there is not much oil in these type of pakodas. Unnoticed extra oil from the pakodas would be absorbed in the tissue paper.
  6. Continue the process till you finish the whole pakoda batter.
Tips
Try to make the pakodas into very smaller shapes to get more crunchy ones.
Try to use red onion instead of yellow or white onions in this batter as its more tastier with red onions.

Thursday, May 26, 2011

Pappu Charu - Andhra Style

For so many days, I was quite confused about Pappu Charu, Sambar, Rasam. Atleast rasam would be easily differentiated with its watery nature. But I was unable to get the correct differentiation between the other two. Now I can clearly conclude by telling that Sambar is a thick version of lentils, sambar powder, veggies whereas Pappu charu is a thin version with lentil water, powders and veggies as I do both Sambar and charu regularly at home. We can add any vegetables in Pappu Charu and it can be well accompanied by any vegetable fry.  As I am a veggie freaker, I add lots of vegetables into the Pappu Charu.
Ingredients
Toor Dal -- 1/2 Cup
Tamarind Extract - 1 Cup
Jaggery - 2 tbsp full
Salt - To Taste
Turmeric Powder - 2 tsp
Coriander Powder - 1 tbsp
Red Chilli Powder - 3 tsp
Fenugreek Powder / Methi powder - 1/2 tsp
Tempering
Olive Oil - 1 tbsp
Mustard Seeds - 2 tsp
Jeera - 2 tsp
Fenugreek Seeds / Menthilu / Vendhayam - 1/2 tsp
Hing / Asafoetida - 1 Dash
Dry Red Chillies - 2 big
Curry Leaves - 1 stem
Vegetables
Okra / Ladyfinger / Vendaikai - 4  ( cut into finger size )
Carrot - 1 Small ( Sliced into smaller rounds )
White Raddish / Mullangi - 1 ( Sliced into smaller rounds )
Sorakai / BottleGourd - 1/2 Cup ( Cut into small squares )
Onion - 1 Small
Tomato - 1 Small ( cut into small pieces )
Brinjal - 2 ( Cut into small pieces )
Broad Beans/Avaraikai/ Chikkudukaya - 5 or 6 ( Cut into finger size)
Green Chillies - 4 ( Slit into Halves)
Method 
  1. Soak the tamarind in water and extract the juice and keep it handy.
  2. Cook the toor dal / Thuvaram paruppu / Kandi Pappu in a pressure cooker to a fine paste. Add some water, mix and keep the dal water ready.
  3. Wash and cut all the vegetables in desired form and keep it ready.
  4. On a thick bottomed vessel, add all the vegetables, turmeric powder, little salt, hing/asafoetida, tamarind juice and little water and allow them to cook till the vegetables get mashy and softer.
  5. Then, add the dal water into the vessel followed by salt, coriander powder, red chilli powder, fenugreek powder and jaggery. Mix them well and let the charu cooks and comes to a boil.
  6. Add more water if you feel that the consistency of the charu is thick due to excess boiling.
  7. On a separate tempering pan, add all the ingredients in order in Olive Oil and pour the tempered contents from the pan into the Pappu Charu.
  8. Garnish with coriander leaves and switch off the heat.
  9. Enjoy the Pappu Charu with white rice and ghee.
Variations
You can add more green chillies to increase the spicyness of the charu.
You can add any vegetables of your choice into the Pappu Charu.
Tips
Dal water and tamarind juice are very important in this charu. So make these perfect and keep it ready.
If you add few drops of ghee during tempering, the whole pappu charu smells very good.
Adding drumsticks,small onions to the pappu charu gives an excellent flavour and taste.
Patiently wait till the vegetables get completely cooked. After its cooked fully, continue the process. Otherwise, your veggies would be little raw in the Pappu charu making it difficult for the kids to eat the veggies.

Groundnut Chutney / Peanut Chutney / Verusenaga Pachidi

Peanut Chutney is a good substitute for Coconut Chutney.  Any south indian tiffin varieties can be nicely accompanied by this creamy, spicy groundnut chutney.   As its one of my daughter's favourite, I make this chutney more often at home. Very easy to make with minimal ingredients.
Ingredients
Groundnuts - 1 Cup
Dry Red Chillies - 6 or 7
Jeera - 1 tsp
Urad Dal - 1 tsp
Tamarind - 1 small pinch
Salt - To Taste
For tempering
Olive Oil - 1 tbsp
Hing / Asafoetida - 1 Dash
Mustard Seeds - 1 tsp
Jeera - 1 tsp
Urad Dal / Minna Pappu / Ulutham Paruppu - 1 tsp
Red Chillies - 1 big
Curry Leaves - 3 or 4 crushed
Method
  1. Roast the groundnuts, dry red chillies, jeera, urad dal, tamarind with a tsp of Olive Oil till the groundnuts turn golden brown. But don't roast them to black. Keep it aside.
  2. On the same pan, add Olive oil and add the ingredients in order for tempering.
  3. Grind the groundnut mix in a mixer grinder and add required amount of salt into it.
  4. Pour the tempered oil and its contents over the chutney. Mix it well and serve with idli, doasa, pongal or any other south indian tiffin.
Variations
You can add more red chillies to the chutney to make it more spicy. Spicyness totally depends on the type of red chillies too.

Wednesday, May 25, 2011

Veg Fried Rice-Restaurant Style-Type 2

For the potluck we had on last weekend, I made a different vegetable fried rice, not in a typical south indian style. This try is mainly due to the fried rice I tasted in Delhi couple of years ago..It would be in a mild yellow colour with small veggie pieces, little nuts and flavoured with some special spice powder. Having that in mind, I started making this type of veg fried rice since few years.  This type of fried rice would go well with any north indian dishes like Dal Tadka, Dal Makhani, paneer dishes and other vegetable dishes.
Ingredients
Basmati Rice - 3 Cups
Beans - 1 Cup cut into tiny squares
Carrot - 3/4  Cup cut into tiny squares
Potato - 1 Cup cut into tiny squares
Fresh Peas or Frozen Peas - 3/4 Cup
Green Capsicum - 1/2 cut into thin pieces
Onion - 1 Medium cut into small pieces
Cashew Nuts - 1 Handful
Jeera - 2 tsp
Cinnamon Sticks / Pattai - 2 Medium
Lavang / Cloves - 3 or 4
Bay Leaves - 5 or 6
Marathi Moggu - 1
Elachi / Cardamom - 2
Pudina Leaves - 1 Handful
Olive Oil - 2 tbsp
Ghee or clarified butter - 1 tbsp
Salt - To Taste
Turmeric Powder - 2 tsp
Ginger Garlic Paste - 1 tbsp
Green Chillies - 4 Big slit into halves
For the Powder
Cinnamon Stick / Pattai - 2
Cloves / Lavang - 5 or 6
Jeera - 1 tsp
Black Pepper - 1 tsp
Elachi - 1
Cashew Nuts - 1 tbsp
Marathi Moggu - 1
Pista - 1/2 tbsp
Method
  1. Wash and cut the vegetables into desired shapes and keep it aside.
  2. Roast the ingredients slightly for the powder and grind them in a mixer grinder and keep it ready.
  3. Wash and soak the basmati rice in a separate vessel. Now start the process of making...
  4. On a medium heat, keep a thick bottomed cooker or a thick bottomed nonstick vessel on the stove.
  5. Add 2 tbsp of Olive Oil and 1 tbsp of clarified butter into it. When its heated, add jeera, cinnamon sticks, cloves, Cardamom, Marati Moggu, Bay Leaves into it and fry them for few seconds.
  6. Add the onions and fry them for a minute with a small pinch of salt.
  7. Add the ginger garlic paste now and fry till the raw smell goes off completely.
  8. Add green capsicum, pudina leaves,green chillies in order and fry them again for a minute.
  9. Add all the cut veggies, turmeric powder, cashew nuts, little salt and fry them for a minute. Now close the lid and let the contents in the pan cook for about 3-4 minutes on a low flame.
  10. Veggies would get cooked with the steam formed inside..Open the lid and add the grounded powder now and fry all the contents in the vessel or pan for few minutes.
  11. Now drain the water from Basmati Rice and add the rice into the cooking vessel directly.
  12. Fry them again for few seconds till the basmati rice becomes little dry and get fried a bit.
  13. Now add water ( about 5 Cups ) ans required amount of salt to the vessel and close the lid. Let the vegetable fried rice cooks completely on a low flame for about 10-12 minutes.
  14. If you are making this rice in an electric cooker, transfer the contents from the pan into the cooker and then add water.
  15. Generally I prepare this veg fried rice directly in a Non stick flat bottomed vessel which makes my process easier.
  16. After 10-12 minutes, the veg fried rice would have risen upto the edge of the vessel nicely. Carefully mix the fried rice upside down without breaking the basmati rice and close it.
  17. Now the vegetable fried rice would be in a mild yellow colour with a nice aroma of Indian spices. Serve this with any good side dish and a raita.
Variations
Amount of water depends on the quality of the Basmati rice. So, add water accordingly.
You can add slightly fried cashew nuts, pista, badam into pieces on the top of the fried rice at the end instead of adding the cashew nuts in the beginning.
Tips
Take out the green chilli slits after the veg fried rice is completely done. Its very helpful especially when you are serving this in parties.
No need to add more spices during the tempering process as you would be adding the grounded spice powder too.

Tuesday, May 24, 2011

Wheat Rava Idlies


Though I am a big fan of regular Idlies, I just wanted to try the same Idli concept with wheat rava. Since few weeks, I have been planning to try this out by myself.  I substituted Idly rice ( Idly Rava ) with Wheat rava, the one that we generally use for making Uppuma. Looking at the idlies, its difficult to find out that its made out of wheat rava. As these idlies don't have any rice, I am sure that it should be a good tiffin item for diabetic people and a very healthy breakfast for all ages. With a side of good spicy chutney, these mild yellow colour idlies would definitely be added in your regular breakfast menu or dinner menu.
Ingredients
Wheat rava -  3 Cups
Urad Dal / Ulatham paruppu / Minna Pappu - 1 Cup
Fresh Coriander Leaves - 1 Handful finely shredded
Salt - To Taste
Fresh Curd - 1 / 2 Cup
For Tempering
Olive Oil - 2 tsp
Hing / Asafoetida - 1 dash
Mustard Seeds - 2 tsp
Jeera - 2 tsp
Curry Leaves - 5 or 6 crushed
Black Pepper Powder - 1 tsp
Turmeric Powder - 1 tsp
Method
  1. Soak the wheat rava and the urad dal separately for 3-4 hours.
  2. Grind the Urad Dal to a fluffy consistency like how you grind for a normal Idly.
  3. Now mix the Urad dal batter with the wheat rava in a big container thoroughly.
  4. Add required amount of salt to the Idly Batter and keep it for fermentation.
  5. After its fermented, do tempering process with the ingredients as mentioned above with little oil and pour them over the batter.
  6. Add a handful of finely shredded coriander leaves on top of it.
  7. Add 0.5 cup of fresh curd to the Idly batter and mix very well.
  8. Now add drops of oil into the Idly Moulds and spread the oil over the Idly plates.  Pour the idly batter over the Idly moulds upto the level equally on all the moulds.
  9. Cook all the Idlies in a Idly cooker for about 10-12 minutes.
  10. Check whether the Idlies are fully cooked inside. After its cooked, allow the cooker to cool down for few minutes.
  11. Then open the Idly plates and carefully take out the Idlies from the Idly moulds one by one.
  12. Serve the Idlies with any spicy chutney.
Variations
You can add finely shredded carrot, peas to the Idly batter and serve it to kids.
You can add a cup of sour curd to the Idly batter and can make the Idlies instantly without the process of  fermentation. But from my experience, if you make these Idlies with a slightly fermented batter, the idlies are softer and have enough moist content inside and not too dry.
You can make mini idlies with this batter and give it as an evening snack to kids.

Tips
Allow the Idly batter to ferment atleast for few hours before making the idlies.
Don't grind the batter too watery. Grind the batter to the correct Idly consistency.

Monday, May 23, 2011

Dal Makhani - Creamy Soup of Lentils / Lentils Soup

We had a Potluck on Saturday night with a full course of North Indian Menu starting from chat...I made Dal Makhani as one of the side dishes..This time I made it with Rajma ( Dark Red Beans ), Kali Masoor Dal ( Black Lentils ), Red Chori ( Red karamani ) not with black urad dal. This brownish bowl of lentil soup fills the stomach of the family greatly and fills my heart with great satisfaction as it contains high amount of protein, folate,vitamins, energy ,etc. Its great for parties as its very easier to prepare this Dal Makhani and the process is also quicker. Did not add the fresh cream at the end as we liked to taste the Makhani with its mild spicyness..
Ingredients
Red Beans ( Rajma ) - 1/2 Cup
Red Chori ( Red Karamani ) - 3/4 Cup
Kala Masoor ( Black Lentils ) - 3/4 Cup
Jeera - 2 tsp
Cloves / Lavang - 4 or 5
Cinnamon Sticks / Pattai - 3 Medium Size
Olive Oil - 1 tbsp
Onion - 1 Medium
Ripe Tomato - 1 Big
Green Chilli - 1 Medium
Ginger Garlic Paste - 1 tbsp
Turmeric Powder - 2 tsp
Garam Masala Powder - 1 tbsp
Coriander Powder - 1 tbsp
Red Chilli Powder -  0.5 tbsp
Salt - To Taste
Sugar - 1 Pinch
Coriander Leaves - To Garnish
Method
  1. Wash the Red Beans ( Rajma ), Kala Masoor, Red Chori ( Karamani ) first thoroughly and soak it in water for 3 - 4 hours.
  2. After its soaked, pressure cook the Lentils with 1 tsp of turmeric powder, 1 cinnamon stick, 1 tsp of salt for 4-5 whistles.
  3. Meantime, cut the tomato, onion,green chilli into desired shapes, keep the other ingredients ready on the side.
  4. On a thick bottomed kadai, add Olive Oil first for tempering. When its heated, add the jeera, cinnamon stick, cloves first. Then, add the finely cut onion, green chilli pieces and fry them for a minute.
  5. Add ginger garlic paste next to the mix and fry till the raw smell goes off.
  6. Add the tomato pieces next to the mix and fry them till they all get mashed and pasty.
  7. Then, add all the powders as mentioned above and fry them nicely till all the powders get mixed with the tomato paste and fried little bit.
  8. Add a pinch of sugar and pour the cooked dal from the pressure cooker directly onto the kadai with the remaining cooked water in the pressure cooker.
  9. Add required amount of salt into the kadai and mix all the contents well. Allow them to cook for 4-5 minutes for the Makhani to get settled with all the powders and flavours.
  10. After its cooked, switch off the flame and garnish with coriander leaves. It can be well served with a combination of Ghee rice, Jeera Rice, Peas Pulao or with plain chappathi / rotis.
Tips
Soak the Lentils for more time if they are too dry and cook them very well to get a creamy texture of the Dal Makhani.
Add few tsp of ghee or melted butter at the end if its made for a potluck or a party.

Variations
You can add fresh cream at the end on top of the Dal Makhani.
You can add or reduce red chilli powder to fine tune the spicyness of the Makhani.
You can substitute different lentils like Black Urad Dal in this dish with the ones I used.

Friday, May 20, 2011

Spring Flowers LAST WEEK


Last week, our garden was filled with beautiful spring flowers and could enjoy the fragrance of lilac...Hope the sun comes soon and protect our garden....

Spring in Utah


Utah weather is very unusual this year, still cold like winter with heavy rain in the middle. It went upto 75 last week but this whole week has been cloudy, rain and no signs of sun at all.!!!! Hope it gets better from Saturday.

Bisibelebath

In Bangalore, we enjoyed this Bisibelebath many times in Darshini. It would be in a semi solid state with lots of veggies in it served with a side of raita. Darshini style bisibelebath was too tastier for me, though it would not have more ghee and sometimes little watery too...This veggie bath would be more suitable on a cold, rainy day with a side of appalams / Pappads. My whole family likes this bisibelebath and so it would be seen in our kitchen more often. I have seen more versions of Bisibelebath since the day I started to prepare. But I stick on to one method which is easier for me..
Ingredients

Vegetables :
Fresh Peas or frozen Peas - 1 Big Handful
Potato - 1 Medium Size
Beans - 10 or 12
Carrot - 1 medium
Zuccini - 1 Big
Chayote / Chow Chow - 1 Small or 1/2 Big
Onion - 1 Medium
Ripe Tomato - 2

Ingredients for the Bisibelebath Powder
Channa Dal / kadalai Paruppu / Senaga Pappu - 2 tbsp
Urad Dal - 1 tbsp
Coriander Seeds - 1.5 tbsp
Fenugreek Seeds / Vendhayam / Menthilu - 1/2 tsp
Jeera - 1 tsp
Black Pepper - 1 tsp
Cloves / Lavang - 3
Cinnamon / Pattai - 1 Stick medium size
Dry Red Chillies - 5 or 6 Big Ones
Fresh Coconut - 1 tbsp
Khus Khus - 1 tbsp

Other Ingredients
Sona Masoori Rice - 1.5 Cups
Toor Dal - Between 1/2 and 3/4th of a cup
Hing / Asafoetida - 1 Dash
Turmeric Powder - 2 tsp
Salt - To Taste
Jaggery - 1 tbsp
Ghee - 2 tsp
Tamarind Juice - 1/2 thick

Tempering
Olive Oil - 1 tbsp
Mustard Seeds - 2 tsp
Jeera - 1 tsp
Urad Dal / Ulutham Paruppu / Minna Pappu - 1 tsp
Curry Leaves - 1 stick
Dry Red Chillies - 2

Method
  1. Wash the rice and dal and add it into a  big pressure cooker.
  2. Wash all the vegetables and cut it into desired shapes as you like and add it into the cooker.
  3. Add little Hing / Asafoetida,turmeric powder, 2 tsp of salt into the mixture.
  4. Add 6 cups of water into the cooker and cook the contents in the cooker for 4 whistles. Switch off the heat.
  5. Meantime, fry the ingredients for the Bisibelebath powder to golden brown ( Not too brownish or black ) and grind them in a mixer grinder to a fine powder.
  6. On a thick bottomed pan, add 1 tbsp of Olive Oil . When its heated, add Hing, Mustard seeds, Urad Dal, Jeera, Curry Leaves, Dry Red Chillies into it in order for tempering. When it sputters, add the grounded powder too into the pan, fry it for a minute and add the extracted tamarind juice and jaggery into it. Fry all of them for a minute.
  7. Then, pour them over the Bisibelebath in the pressure cooker. Add required amount of salt to the Bisibelebath and mix everything in the pressure cooker nicely.
  8. On a very low flame, add some more water to the Bisibelebath and allow it to be on heat for 3-4 minutes for the powder to get completely mixed and cooked with the bath.
  9. Switch it off and add ghee on top of the Bisibelebath and serve this with raita and hot urad dal appalams/ Papads.
Variations
  • You can add the onions, tomatoes into the tempering pan itself and fry them along with the grounded powder and then add them to the bisibelebath.
  • You can add half green capsicum along with onions, tomatoes into the tempering pan. It adds more taste to the Bisibelebath definitely. As I don't have that vegetable now, I could not add it.
  • You can add any type of vegetables like Brinjal, Drumstick, white pumpkin,etc., into the Bisibelebath. I have added the vegetables that I have at home.
  • You can add groundnuts along with the vegetables into the Bisibelebath before cooking.
  • You can decorate the bath with fried groundnuts, cashewnuts or boondi on top before serving.
Tips
  • Don't cook the bisibelebath in the cooker into a fine, smooth paste. Because, after you add the powders, water at the end, the final cooking process will make it more pasty and you wont be able to see any rice separately.
  • If you have small onions, try to make this Bisibelebath with the small onions. The Taste of the bisibelebath definitely gets upgraded with small onions, green capsicum, drumsticks and good bisibelebath powder.
Notes
In this process, I added all the vegetables at one shot into the cooker as I made it for the kids. If you are making the Bisibelebath for a Potluck / Party,  add small onions, tomatoes, green capsicum into the tempering pan. When they get mashed and fried, add the grounded powder , tamarind extract, jaggery and then fry and pour them over the Bisibelebath.

Thursday, May 19, 2011

Gobi Fry / Cauliflower Fry - For Roti and Chappathi


Gobi Fry / Cauliflower fry is a simple, quickest and tastiest fry for chappathis/rotis. Generally I make this gobi fry along with some dal varieties for chappathis / rotis. Crunchy florets coated with spices and a slight tangy taste of tomatoes make this a nice accompaniment to hot rotis. Upon looking at the nutrition, cauliflower is very low in fat, high in dietary fiber, folate, water, Vitamin C, contains several chemicals that are beneficial to human health. High Intake of Cauliflower reduces the risk of prostate cancer. Its recommended to steam, microwave or stir-fry the cauliflower and boiling is not at all recommended as it reduces the anticancer compounds in it.
Some people don't like the smell of cauliflower at all...May be with the spices and powders, if they try this Gobi fry, they might start liking the cauliflower slowly..
Ingredients
Fresh Gobi / Cauliflower - 1 Big One
Shredded red onion - 1/2 cup
Diced tomatoes - 1/2 cup
Olive Oil - 1.5 tbsp
Jeera - 1 tbsp
Turmeric Powder - 1 tsp
Red Chilly Powder - 2 tsp
Garam Masala Powder - 1/2 tbsp
Coriander Cumin Powder - 2 tsp 
Salt - To Taste
Method
  1. From the cauliflower, take out the small florets slowly. Wash all the small florets with luke warm water thoroughly.
  2. Drain the water and allow them to get dried for few seconds.
  3. On a thick bottomed kadai, add Olive Oil first. When it gets heated add the Jeera seeds followed by red onion and tomato pieces. Fry them till the red onion turns golden brown and tomato gets mushy.
  4. Then add the washed cauliflower florets into the kadai directly without any water. Sprinkle some water if the florets are too dry and to assist uniform cooking.
  5. Add the turmeric powder into the kadai. Mix them well and close the lid.
  6. Allow the cauliflower to get steamed and cooked inside with its own water content. 
  7. But keep the flame on low heat. After 4 minutes, the florets would have been cooked very well.
  8. Open the lid and add the other powders, salt and fry them on low heat till the florets get coated, fried nicely..
  9. Size of the small florets could get reduced little bit when they are fried finally.
  10. Switch  of the flame and garnish the fry with coriander leaves and serve...
Tips
If you don't overcook the florets, then the fry would be little crunchy, tasty. 

Coriander Chutney / Kothamalli Chutney

Coriander, a regular herb which we use in our regular meal has various health and medical benefits. First, it has antioxidants like other spices,  has antibacterial chemicals in it, used in the treatment of diabetes as the coriander extract has both insulin-releasing and insulin-like activity. Coriander juice is an excellent treatment for acne by applying it on the face as a toner.  So, its definitely a healthy choice to add coriander leaves in all the dishes we prepare at home. I made a coriander chutney for my idli as I got more fresh coriander bunches from our local farm market this week....
Ingredients
Fresh Coriander Bunch - 1 Big Bunch or 2 medium bunches.
Green chillies - 4 medium ones
Red Chilly Dry - 2
Olive Oil - 1 tbsp
Hing / Asafoetida - 1 Dash
Urad Dal / Ulutham paruppu / Minna Pappu - 1.5 tbsp
Tamarind - 1 Small pinch
Jeera - 1 tsp
Salt - To taste
Sugar - 1 pinch
Fresh Coconut Flakes - 1 tbsp
Mustard Seeds - 1 tsp
Method
  1. Wash the coriander leaves and cut them into pieces. Keep the other ingredients ready before starting the heat.
  2. On medium heat, add Olive Oil first. When its heated, add jeera, urad dal,hing,dry red chillies,green chillies, tamarind, sugar in order. When its slightly toasted, switch off the flame.
  3. Add the cut coriander leaves and stem to the kadai and fry them nicely for a minute. Finally add the fresh coconut flakes into the kadai and fry again for few more seconds.
  4. Transfer them into a mixer grinder, add required amount of salt into it and grind it into a coarse paste with very little water.
  5. Pour some mustard seeds,urad dal tempered in oil over the green coriander chutney.
  6. Serve it with idlies, dosais, adais or with any tiffin.

Sambar / Amma's Sambar / Regular Sambar

Sambar was one of the regular item in our daily meal since childhood. My mom never failed to make Sambar in her menu along with rasam. To me, every sambar has its unique flavour due to the addition of different vegetables into it. Taste and flavour of brinjal sambar is different from the taste of lady finger ( Okra ) Sambar. Out of all, small onion sambar scores more marks in all aspects.  If small onion sambar was made, our eyes would automatically roll around for baby potatoes fry. That combo is my all time favourite. In my perspective, white rice with simple sambar and a side of a vegetable curry or kootu is an excellent healthy meal for kids. It gives them good amount of carbohydrates, protein, vitamins and energy equally.
I will soon post the Sambar Powder recipe as it determines the taste of the Sambar.
Ingredients
Brinjals - 2 medium size
Drumsticks - 6 or 7 cut into finger size
Toor Dal - 1 Cup
Hing / Asafoetida - 1 Dash
Turmeric Powder - 1 tsp
Sambar Powder - 1.5 tbsp
Sugar - 1 pinch
Salt - To Taste
Tamarind Juice - 1 Cup ( mild juice not very thick )
Olive Oil - 1 tbsp
Ghee - 1 tsp
Mustard Seeds - 2 tsp
Jeera - 1 tsp
Fenugreek Seeds / Vendhayam / Menthilu - 1 tsp
Curry Leaves - 1 stem
Dry Red chillies - 2 medium size
Method
  1. Wash the vegetables and cut them into desired shapes. Keep the tamarind juice ready. Keep the ingredients ready on the side. Cook 1 cup of toor dal into a smooth paste and add little water to the cooked dal thereby making it into a semi solid state.
  2. On a thick bottomed vessel, start making the sambar. First, add the oil and when its heated, add mustard seeds, hing, jeera, fenugreek seeds, dry red chillies, curry leaves for tempering.
  3. Add the cut brinjals, drumsticks into the oil and fry them for few seconds.
  4. Then, add the turmeric powder, sambar powder, sugar and fry them with all the contents, veggies in the vessel. Veggies would get coated with the powders well.
  5. Now add the extracted tamarind juice , required amount of salt and some water into the vessel.
  6. Close the lid and allow the sambar to cook for 5-6 minutes.
  7. You would get a nice aroma of the sambar throughout the kitchen. Check to see if the vegetables are cooked fully.
  8. If its done, then add the semi solid dal paste into the sambar. Mix the sambar thoroughly without any dal lumps in it.
  9. Allow the sambar to boil for just 1 or 2 minutes. Then switch off the flame. Garnish with coriander leaves and serve it with white rice and ghee.
Tips
  • As this is a plain, simple sambar which we make on daily meal, I don't suggest any extra powders into it. This is just to enjoy the dal sambar with the real flavour of the sambar powder...
  • Don't boil the sambar too much after adding the dal. Just switch off the heat at the right time. In this way, it retains the flavour and consistency well.
  • Like this, you can make plain, simple sambar with different vegetables. ( Like Okra sambar, capsicum onion sambar, chow chow sambar, white pumpkin sambar , etc., )
 

Tuesday, May 17, 2011

Kovakkai Curry / Tindora Fry / Dondakaya Fry

Kovakkai / Tindora / Donadakaya vegetable has good medicinal values and rich in beta carotene. Its good for diabetic patients as it regulates the blood sugar level. I made tindora fry with Brinjal, drumstick sambar for dinner yesterday. Mostly, this fry would get over fast and wont have any left over. Cutting this tindora would be a debate topic whenever I make this tindora fry. One person would like to see the round shaped fried tindora and the other one would like to have finger shaped fried tindora. Finally the cutting process would be decided by Mommy's mood and time factor. Yesterday, finger shaped fried tindora won the debate, of course.
Ingredients
Fresh Tindora / Kovakkai / Dondakaya -  25-30 pieces
Turmeric Powder - 2 tsp
Red Chilli Powder - 2 tsp
Sambar Powder - 2 tsp
Salt - Enough to taste
Sugar -- 1 Pinch
For Tempering
Olive Oil - 2 tbsp
Hing / Asafoetida - 1 Dash
Mustard Seeds - 2 tsp
Jeera - 2 tsp
Urad Dal / Ullutham Paruppu / Minna Pappu - 1/2 tbsp
Curry Leaves - 5 or 6 ( if you have )
Dry Red Chillies - 3 or 4  
Method
  1. Wash all the tindora thoroughly and drain the water. Keep the tindora aside for drying.
  2. After its dried, cut the tindora into thin slices lengthwise.
  3. On a thick bottomed kadai, add oil. When it gets heated, add all ingredients for tempering as mentioned above in order. Make sure that the heat is on medium flame and the items on the kadai don't turn black.
  4. After tempering is done, add the cut tindora slices into the kadai. Add a pinch of sugar, turmeric powder into the kadai and little water too. Close the lid and allow the vegetable to cook inside.
  5. After 4-5 minutes, check to see if its cooked fully. If cooked, then add the red chilli powder, sambar powder, required amount of salt and mix them well.
  6. Let the vegetable gets cooked and fried openly on low flame for another 6-7 minutes.
  7. On low flame, the tindora fry would be done automatically after few minutes and you could see the fried thin slices of tindora.
  8. Now the tindora fry is ready to be served in a meal.
Tips
Try to make this fry as soon as you get this vegetable from the store. Does not taste good with aged and soggy tindora.
Don't add more water while cooking. Actually very little water is enough for cooking  tindora. If you add more water, the fry would turn into a regular soggy curry!!!
Variations
You can add grounded powders to make this tindora fry spicy, make it richer in a special meal. You can add grounded mix of coriander seeds, dry red chilli powder, little coconut flakes, channa dal ( kadalai paruppu / Senaga Pappu ) into the vegetable and fry them..It tastes so good.

Monday, May 16, 2011

Mexican Taco Salad Bowl

I Love Mexican Taco Salad Bowl all the time and my kids love too...Whenever we go to Bajjio or Costa Vida, without even looking at the menu I would order this taco Salad bowl all the time. Its loaded with lots of fresh veggies, cheese, rice, beans, corn roti and this dish has a perfect combination of carbohydrates, protein, calcium and vitamins in it. With a side of a milkshake or cucumber buttermilk, its an excellent combo for all ages. As its very colourful, kids like this variety a lot. Its a good after school lunch or a quick treat for them. Making this Taco Salad Bowl takes very less time. You just have to keep the ingredients ready before making them in place. Though the number of ingredients make you tensed, making this simple salad bowl is not that difficult at all..
Ingredients
Corn Tortilla / Big Tortilla / Wheat Tortilla - 1 ( Of your choice )
Olive Oil - Enough to fry the Tortilla
Mexican Cheese -  3 tbsp
Cooked Sona Masoori Rice - 1/2 Cup
Ripe Tomatoes - Cut into tiny pieces
Coriander Leaves - 1 tbsp nicely shredded
Lemon Juice - Few Drops
Cooked or Baked Red Beans or Black Beans - 2 tbsp
Romaine Lettuce or Lettuce of any kind - 2 Handfuls
Cucumbers - 2 tbsp nicely cut into tiny pieces
Onions - 1 tbsp nicely cut into tiny pieces
Avocado Paste -- 1 tbsp
Ranch or Sour Cream or Thick Curd - 1 tbsp
South Western Sauce or Taco Sauce - 1 tsp
Nacho Chips or Corn Tortilla Chips - 2 tbsp Crushed.
Salt - To sprinkle at the end ( optional )
Pepper - To sprinkle at the end ( optional )
Method

Pre-Preparation
         Wash the vegetables and cut the tomato, onion, cucumber, lettuce and coriander leaves into desired shapes and keep them ready.  Take one corn tortilla or wheat tortilla and keep it ready. Take a cup of cooked sona masoori rice. Take 2 tbsp of cooked beans or baked beans and keep it on the side. Take out the sauce, ranch,mexican cheese shredded from the fridge and keep them on the side. Keep the salt, pepper shakers on the side too. If you have a ready made lemon juice available, take it out from the fridge or make 1 tsp of fresh lemon juice and keep it ready.  Take an avocado and scoop the inside flesh,mash and keep it ready too. NOW, everything is kept ready.
Process
Make the Mexican Rice first.
              On a pan, add 1 tsp of Olive Oil. When its heated, add the cooked sona masoori rice, 1 tsp of coriander leaves, little  mexican seasoning powder ( if you have ), pinch of salt and fry them on low heat for just 2 minutes.
Make the Avocado paste next.
            Scoop the inside part of the Avocado and mash it to a fine paste. Add 1 tsp of coriander leaves, pinch of salt and 2   drops of lemon juice to it.
Make a simple, quick tomato salsa kind next.
            On a small bowl, add tiny pieces of tomato, 1 tbsp of coriander leaves, 1 tsp of lemon juice, pinch of salt and pepper  and mix them well and mash it little bit.
Fry the Tortilla on both sides with little oil on its sides. Take a sound shaped vessel or any medium size bowl. Insert the fried tortilla on it and make it hollow inside the bowl.
Add shredded mexican cheese on the tortilla while its hot. Chesse would melt nicely on the Top Layer.

Add the 1/2 cup of  Mexican Rice on top of the melted cheese.
Add 2 tbsp of cooked / baked beans on top of the rice.
Spread 1 tbsp or more of the tomato salsa made on top of the beans layer. On top of it, add 1 tbsp of tiny cucumber pieces, 1 tbsp of tiny onion pieces. Spread them uniformly on its layer. Add 2 tbsp of Avocado Paste we made on it and spread it across..
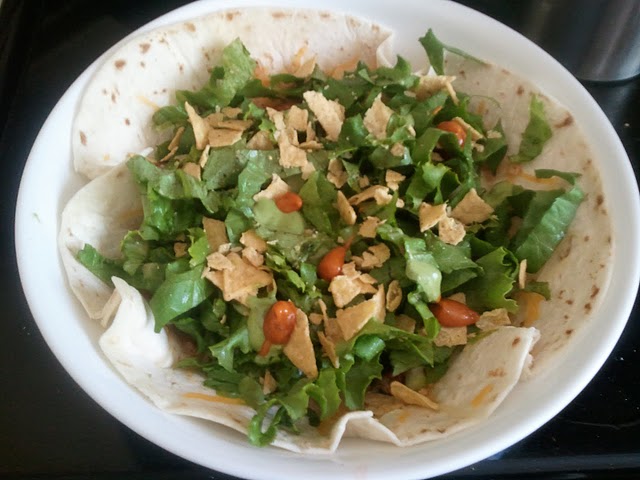
Now the cut lettuce leaves and some shredded nacho chips or corn tortilla chips on top of the leaves layer. Add 1 tsp of Taco Sauce or South Western Sauce and spread it across. Add some salt and pepper a little bit using the shakers.
Finally decorate the Taco Salad with few beans, ranch and little shredded cheese and serve it to the kids.
Variations
For more spiciness while serving to elder people, you can add taco hot sauce into it.
You can choose any type of Beans you like and add that into the bowl.
If you don't have sour cream or ranch, you can add 1 tbsp of thick fresh curd on top of the Salad Bowl.
You can add corn, small ripe mango pieces into the salad too. It adds more Mexican flavour and taste to the salad bowl. ( As i don't have them right now, i have not added ).
Tips
Choose a crunchy lettuce which makes the salad bowl more fresh and it does not get soggy quickly.
Try to fry the tortilla to the correct level and not deep fried.
If you have the right ingredients for this recipe,the taste will be amazing.

Vendhaya dosai / Menthilu Dosai / Fenugreek Seeds Dosai


Vendhayam / Fenugreek / Menthilu has more medicinal effects and is used for reducing blood sugar level and blood pressure. Its very good for digestion,constipation, asthma ,head colds, etc., Its benefits are innumerable. Buttermilk with some fenugreek powder cools the body, regulates the digestion and is a perfect treat in Summer. Introducing this wonderful medicinal seed in our regular tiffin, especially to dosai is an intelligent invention by our elders. Due to this fenugreek seeds, we get crispy,crunchy dosa in golden colour. During our childhood, we used more of this dosa at home with a fresh coconut chutney and milagaipodi.
Ingredients
Par Boiled Rice or Idly Rice - 3 Cups
Urad Dal / Ulutham Paruppu / Minna Pappu - 1.25 Cup
Vendhayam / Fenugreek Seeds / menthilu - 3 tbsp
Salt - To taste
Olive Oil - Enough for frying the dosas.
Method
  1. Wash the rice and dal thoroughly and soak them in water together in the same vessel. Add the fenugreek seeds also along with that and soak it for 4-5 hours.
  2. After that, grind them in a wet grinder nicely by adding water little by little. Due to fenugreek, the batter becomes so fluffy and the quantity may be more. So, carefully grind them and store the batter in a big vessel. Add required amount of salt to the batter.
  3. It might take few hours for fermentation. After its done, mix the batter and take out a portion from the big vessel.
  4. To that portion, add little water and make the batter ready for making dosas.
  5. On a thick dosa pan, add little oil and heat it till the kadai gets heated uniformly.
  6. After that, pour a big spoonful of the batter in the center and form a big round by spreading them uniformly.
  7. Add drops of oil on the sides of the dosa. Fry them on both sides till the dosa gets into golden colour.
  8. Take out the crispy, crunchy golden dosa and serve this hot with a spicy chutney.
  9. Continue the process for making the rest of the dosas.
  10. Store the remaining batter immediately in the fridge forlater use and also to preserve its freshness.
Tips
Use a cut onion piece for cleaning the dosa pan everytime before pouring the dosa batter. This makes it easier to flip the dosas onto the other sides and dosa does not stick to the pan.
Store the dosa batter immediately into the fridge after taking some portions of the batter. Don't keep the main batter vessel next to the stove while making the dosas. This might add some sourness to the batter.

Avarakai Tomato Fry / Broad Beans Tomato Fry / Chikkudukaya Tomato fry


Avaraikai / Chikkudukaya / Broad beans can be made as Poriyal, Kootu, can be added in aviyal too, made as a simple fry too. This time I just made a simple fry with some tangy tomato flavour in it. Instead of having only the broad beans in the fry, I just added a full ripe tomato to have some tangy flavour in the fry which makes it more tastier. This goes well with hot rasam rice or any dal rice varieties...But it tastes really good only if its made with fresh broad beans. Sometime we forget the freshly bought broad beans from shops and it might be hiding in the fridge somewhere. With those old broad beans, the taste of the fry is somewhat ok....but not as we expect. So, as soon as we bring those fresh ones, try to make this curry to enjoy its freshness..
Ingredients
Broad Beans / Avaraikkai / Chikkudukaya - 2 cups broken into small pieces by hands itself
Big ripe tomato - 1
Salt - To Taste
Sugar - 1 Pinch
Red Chilli Powder - 2 tsp
Turmeric Powder - 1 tsp
For Tempering
Olive Oil - 2 tbsp
Hing / Asafoetida - 1 Dash
Mustard Seeds - 2 tsp
Jeera - 1 tsp
Urad Dal / Ullutham Paruppu / Mina Pappu - 1 tsp
Channa Dal / kadalai paruppu / Senaga Pappu - 1 tsp
Dry Red Chillies - 2 medium ones
Curry Leaves - 5 or 6
Method
  1. Wash the Avaraikkai / Broad Beans / Chikkudukaya and break them into finger size using hand only.
  2. Cut the tomato into small pieces and keep them ready.
  3. On the kadai, add heat and complete the tempering process by adding all the ingredients in order.
  4. After tempering is done, add the tomatoes, turmeric powder and fry them for 2 minutes till they become mashy.
  5. Add the washed, broken pieces of Broad Beans into the kadai and a pinch of sugar into it. Mix well.
  6. Add little water into the vessel, cover it with a lid and allow them to cook inside for 3-4 minutes.
  7. After the broad beans are cooked perfectly, open the lid, add required amount of salt,red chilli powder and fry them on medium heat for 3-4 minutes.
  8. Switch off the flame after they are nicely cooked and fried. Serve this with hot rasam rice.
Variations
Cooking time of this vegetable depends on the freshness and age of this vegetable. If the Broad Beans are tender and fresh, it cooks very fast and it definitely takes more time for aged broad beans.

Saturday, May 14, 2011

Spicy Red Capsicum Chutney


Red Capsicum Chutney recipe was told by my friend Preetha, an awesome chettinad cook. I tried this recipe and it came out very well.. As the nutrition and health benefits of Capsicum ( Bell Peppers ) are beyond description, its really wiser to make use of this vegetable in our food whichever way we like. As red capsicum tastes very well, the taste of this chutney is really different and a perfect combo for idlies, dosa, or even can be eaten with white rice. We have started loving this red chutney at home and has become one of our regular chutneys for our tiffin. I am sure you will also like this chutney and thanks preetha for sharing this wonderful recipe to us.
Ingredients
Fresh Red Capsicum - 2
Mustard Seeds - 1 tsp
Hing / Asafoetida - 1 Dash
Jeera - 1 tsp
Urad Dal / Ulutham paruppu / Mina Pappu - 2 tbsp
Channa Dal / Senaga Pappu / Kadalai Paruppu - 2 tbsp
White sesame Seeds/Ellu  - 1 tsp
Tamarind  - 1 small pinch
Salt - To Taste
Dry Red chillies - 4 or 5
Olive Oil - 1 tbsp
Method
  1. Wash and cut the red capsicum into small pieces and keep it ready.
  2. In the kadai, add Olive Oil first on medium heat. When it gets heated, add Hing / Asafoetida, jeera, urad dal, channa dal, sesame seeds , tamarind,dry red chillies and fry them for 2-3 minutes till they turn golden brown.
  3. After the contents get cooled, transfer the contents into a mixer grinder and grind them nicely and keep.
  4. Fry the red capsicum for 2 minutes till they get fried and cooked little bit.
  5. Then, transfer the capsicum part into the mixer grinder and grind everything together.
  6. Add required amount of salt to the Chutney now.
  7. For tadka / Thalimpu , add only mustard seeds in the heated oil and pour them over the chutney.
  8. Now the spicy Red Capsicum Chutney is ready to eat with your favourite tiffin.
Variations
You can add more spicyness to your chutney as you like, but for two medium red capsicums, it tastes really great with this proportion.

Simple Veg Pulav - Type 1


I guess i would have made this veg pulav more than 100 times. This is the most simplest pulav with no grinding but loaded with vegetables, mixed with good spices and basmati rice.The excellent aroma of this veg pulav always invites you to the dining area. I prefer to make this veg pulav especially for parties and get-together. Also, its kid friendly as its not having any spicy gravy or spicy powder in it. Same way, its not too bland too. Its perfect and suitable for all ages. Even with a simple curd raita, its heavenly.  You can make some spicy kurma or any spicy side dish and enjoy with this Veg Pulav.
Ingredients
Basmati Rice - 2 Cups
Salt - To Taste ( But i use 1.5 tbsp approximately)
Olive Oil - 3 tbsp
Ghee or Butter - 1 tbsp ( optional if you are weight conscious)
Carrots - 1/2 Cup cut into small cubes
Beans - 1 Cup cut into small pieces
Potato - 1/2 Cup cut into small cubes
Green Capsicum - 1/2 cup cut into small pieces
Peas - Handful
Onion - 1 Medium One cut into small pieces
Garlic Pods - 4 or 5 peeled
Tomato - 1 Small One
Ginger garlic Paste - 1 full tbsp
Pudina Leaves/Mint Leaves - 3 tbsp cut into small pieces
Green Chillies - 4 or 5 medium ones
For Tempering
Jeera Seeds - 2 tsp
Fennel Seeds / Sombhu - 2 tsp
Cinnamon Sticks / Pattai - 2 medium sized ones
Lavang / Cloves - 5 or 6
Marati Moggu - 1 or 2 small ones
Bay Leaves - 5
Cardamom / Elachi / Elakkai - 3 or 4
Cashew Nuts - 2 tbsp

Method
  1. Take 2 cups of basmati rice, soak it in water for few minutes. Keep it aside.
  2. Wash all the vegetables and cut them into desired shapes as mentioned below. Keep them separately in a big plate.
  3. Wash and cut the pudina / mint leaves and keep it ready.
  4. Cut the onion into small pieces and keep it ready. Peel the skin of 5 garlic pods and keep them ready.
  5. On medium heat, in a thick bottomed vessel, add 1 tbsp of ghee or butter and 3 tbsp of Olive Oil. When it gets heated, add the ingredients for tempering as mentioned above in order and fry them little bit.
  6. Then, add the onions and fry them for a minute. Add the ginger garlic paste and fry them till the raw smell goes off.
  7. Add garlic pods, pudina leaves, tomato, green chillies now to the pulav and fry them for 2-3 minutes.
  8. Then add the cut and washed vegetables and fry them in the kadai for 4-5 minutes. During this time, cook the vessel with a lid for about 2 or 3 minutes so that the veggies get cooked little bit with the steam inside.
  9. Meantime, wash the basmati rice and drain it completely. Add it to the veggie mix in the kadai and fry them for a minute or two till it gets dried and fried a bit.
  10. Then add 3.5 cups of water to the contents in the vessel and add required amount of salt to the mix in the vessel.
  11. Add a tsp of garam masala powder and mix them thoroughly.
  12. Close the vessel with the lid and let the pulav cooks on a low flame. If you are planning to cook the pulav in an electric cooker, transfer the
  13. contents to the electric cooker and start cooking.
  14. After 10-15 minutes, open the lid and check. Your veg pulav would have risen up with the layer of cooked veggies and the aroma of the pulav would be great.
  15. Its ready to serve now with a cool fresh curd onion raita.
Variations
You can add turmeric powder to this veg pulav if you want it more colourful. Somehow i like this veg pulav in white background with colourful veggies.
You can add 1 cup of fresh coconut milk to this Veg Pulav to make it richer and more tastier with 2.5 cups of water.
You can increase the number of green chillies to make it more spicy for you.
Tips
Don't overcook the veg pulav, it makes it more pasty and spoils the texture of the pulav. Cook it only the required amount of water and that depends on the type of basmati rice also.
Try to take out the green chillies after the pulav is done, before serving which makes the kids happy while enjoying this pulav.

Monday, May 9, 2011

Kale Paneer

Kale, a dark green leafy vegetable is known for its powerful antioxidant properties. Kale is very high in Vitamin K, Vitamin C, beta carotene and rich in calcium too. Its highly recommended to steam, microwave or stir-fry Kale leaves instead of boiling them. Because boiling tends to decrease the levels of anti-cancer compounds in them. I also tried to steam the Kale leaves while making this "Kale Paneer" side dish. Mostly I ended up making "Kale Poriyal" or "Kale Pappu" whenever i bought fresh Kale leaves before. This time, I decided to make something totally different and mainly to attract my kids. Its easier with a help of Paneer. Substituted Kale instead of Palak, this healthy Kale Paneer is very unique and tastes mostly like "Saag Paneer". So, you can boldly make this Kale Paneer and serve with your softer rotis / chappathis to your kids. My daughter liked it very much and even told me to remember how I made this dish.!!!!
Ingredients
Olive Oil - 3 tbsp
Butter - 1 tbsp
Jeera - 2 tsp
Ginger Garlic Paste - 1.5 tbsp
Turmeric Powder - 2 tsp
Coriander Powder / Dhaniya Powder - 1/2  tbsp
Red Chilly Powder - 2 tsp
Garam masala powder - 1 tbsp
Sugar - 1 pinch
Salt - To Taste
Fresh Paneer Cubes - 16 oz cut into small squares or 20 square pieces in medium size

For Grinding
Kale Leaves - 1 Bunch
Coriander Stems - 1 cup ( preserved in the fridge for grinding purpose)
Ripe Tomato - 2 Medium Size
Onion - 1/2 Small one
Green Chillies - 2 Big Ones
Jeera - 2 tsp

Method
  1. Wash the Kale leaves, tomato and cut them into small pieces. Cut the half onion too and keep it ready.
  2. On Medium heat in the big kadai, add 2 tsp of Olive Oil. When it gets heated, add jeera, onion pieces,green chillies and saute them for a minute with a small pinch of salt.
  3. Add tomatoes next and saute them for another 1-2 minutes till the tomatoes get mashed and slightly cooked.
  4. Finally add all the Kale leaves and coriander stems into the Kadai and close it with the lid. Let the veggie cooks with the steam only inside. Make sure that the flame is not on High...
  5. After 4-5 minutes, open the lid and check to see whether the Kale leaves reduced in size and get cooked. If its not cooked fully, sprinkle some water into the kadai and cover again with the lid.
  6. Allow the Kale leaves to get steam cooked thoroughly. After its completely cooked, transfer the contents into a flat vessel or plate for cooling.
  7. Meantime, shallow fry the paneer cubes in a separate kadai and keep the Paneer cubes ready too.
  8. After the Kale mixture gets cooled, grind them in a mixer grinder to a fine paste.
  9. Let the grounded Kale mix cools down.
  10. In the same kadai, add 3 tbsp of Olive Oil. When it gets heated, add jeera seeds and ginger garlic paste to the oil.
  11. Fry them nicely till the raw smell of ginger garlic paste goes off.
  12. Then, add turmeric powder, corainder powder, dry red chilly powder, garam masala powder and fry them for a minute.
  13. Then, add the grounded Kale mixture into the kadai. Add required amount of salt and a pinch of sugar too to the mix in the kadai.
  14. Mix them well once and cover the lid of the kadai.
  15. Let them cook with the steam inside. In the middle, open the lid and stir the Kale mix and cover again.
  16. Continue the process for 5-6 minutes till you are satisfied with the texture of the kale mix and its consistency.
  17. Finally add the shallow fried paneer cubes into the kale mix and stir again.
  18. Cover the lid again and let them steam cook for another 2-3 minutes.
  19. Switch off the flame and allow the Kale Paneer to settle down for sometime.
  20. Then serve this highly nutritous side dish with your softer rotis / Chappathis.
Tips
If you dont like the slight bitter taste of the kale leaves, add half cup of spinach / palak leaves and reduce the quantity of kale leaves in the grounded mixture.
Add little cream on the top of the Kale Paneer just before serving. This is just to make it look attractive in parties. Otherwise, keep the spicy taste of the "Kale Paneer" as it is.

LinkWithin

Related Posts Plugin for WordPress, Blogger...