Friday, February 19, 2021

Orange Neem flower Rasam / Orange Vephampoo Rasam


I have not planned to make this rasam. Mandarin oranges which I bought from the grocery store were too sour and we were able to enjoy those little ones. Initially I thought of making orange marmalade but I dropped that idea as I did not want to use any sugar. Finally I decided to make a spicy healthy rasam using these oranges.  The sourness of these oranges perfectly substituted in this rasam and I didnt need to use any tamarind at all.  Addition of neem flowers to this rasam makes it even more balanced in taste. Nowadays, I like to add neem flowers in all my rasams as they are very good for treating stomach related problems, for treating intestinal worms, etc.,  Totally, this rasam contains the mixed taste of all the healthy ingredients and its an excellent Vitamin C booster.

Our family enjoys a cup of rasam daily as an appetizer, including my kids which in turn triggers me to try out different varieties of rasam. After I tasted, I see a slight resemblance between this rasam and pineapple rasam. With a side of  potato fry or hot rice, it tasted heavenly. Try this rasam in your kitchen and let me know your feedback. 

Ingredients

Orange Juice of  15 little Mandarins
Tomato - 2 medium
Turmeric powder - 1/2 tsp
Rasam powder - 2 tsp
Salt - As required
Water - As required
Toor dal water - 1/2 cup ( Optional )
Coriander leaves - To Garnish

For Seasoning 

Ghee - 1/2 tbsp
Hing - 1 Dash
Mustard Seeds - 1 tsp
Cumin seeds / jeera - 1 tsp
Dry red chili - 1
Black pepper powder - 1 tsp
Cumin powder - 1 tsp
Curry leaves - 3 or 4
Dried neem flower - 1 tbsp

Preparation Process

  • Peel the Mandarin oranges and extract the juice using a blender. Filter the pulp and keep the orange juice ready. Crush the tomatoes in the blender and keep the tomato pulp ready.
  • In the cooking vessel, add half a cup of water,tomato pulp, turmeric powder,rasam powder,salt and little hing. Close the lid and allow them to cook for few minutes till the raw smell goes off.
  • Add the orange juice into the vessel and allow them to cook for a minute on low flame. Add required amount of water as per your consistency. Do not boil the rasam after you add the orange juice.
  • Start the seasoning on a separate tadka pan on its side. Add all the ingredients for seasoning in the tadka pan. When its done, pour the tadka over the rasam.
  • Garnish it with coriander leaves.
  • Switch off the flame.
  • Enjoy with hot rice and a nice veggie fry of your choice. 

Tips

  • Do not boil the rasam after you add the orange juice. Switch off the flame after a minute and let the orange juice gets cooked with the existing heat.
  • I prefer to add little black pepper powder, cumin powder in the tadka. This definitely adds more flavour and punch to the rasam. This is my mom's method of seasoning especially for rasams.

Tuesday, February 16, 2021

Simple Vaazhaikai Curry / Raw Banana Curry / Plantain Curry / Aratikaya Kura


Raw Banana / Vaazhaikai / Aratikaya is a powerhouse of vitamins and minerals. Though we can make many recipes using this vegetable, this version is my most favourite one which my mom used to make during amavasai day ( No Moon Day ).  This curry is very easy to make as it requires very less ingredients.

Ingredients

Raw banana - 3 medium
Turmeric Powder - 1 tsp
Red chili powder - 1/2 tsp ( optional )
Salt - As required

For Seasoning / tadka 

Coconut Oil - 2 tsp
Mustard Seeds - 1 tsp
Jeera / Cumin Seeds - 1/2 tsp
Hing / Asafoetida - 1 dash
Urad dal - 1 tsp
Channa Dal - 1 tsp
Curry leaves - 1 stem
Green chilli - 2 ( Chop them or slit them as you like )
Dry Red chilli - 1 

For Garnishing

Coconut flakes - 1 tbsp
Coriander leaves - 1/2 tbsp

Method

  • Heat oil in the cooking vessel. When heated first add mustard seeds and once it splutters, then add the other ingredients for seasoning and saute for a minute until the dals turn golden brown. 
  • Add the chopped raw banana pieces along with turmeric powder. Add 1/4 cup of water into the vessel.
  • On Medium-low flame, allow the vazhaaikai / raw banana to cook for 4-5 minutes. Once its cooked three fourth, add required amount of salt and close the lid.
  • Once the vazhaikai pieces become tender, add the red chili powder if you like. Saute it for 2 minutes.
  • Switch off the flame and garnish the curry with coconut flakes and coriander leaves.
  • Enjoy this delicious curry with hot rice and rasam. 

Tips

  • I definitely use coconut oil especially for making this curry as it gives a nice aroma to the cooked Vazhaikai / raw banana.
  • As this is not a fry, cook the vazhaikai / raw banana till the pieces become tender and soft.  The cooked pieces should be separate and not mushy.

Tuesday, February 9, 2021

Patnam Pakoda / Pattanam Pakoda / Medhu Pakoda


Patnam Pakoda also called as Medhu Pakoda is a famous street food in Tamil Nadu and is mostly available in many tea shops. These pakodas should be enjoyed with a cup of hot coffee or tea. Once you start enjoying these crunchy pakodas, you cannot hold your hands taking more and more. Generally pakodas are made with Besan Flour or Kadalaimaavu. But this pattnam pakoda is made with Pottukadalai Maavu ( Roasted Gram Dal / Chutney Dal ).  I made these pakodas during lockdown thinking that these would last for a week so that we could enjoy during our tea time with a nice snack for a week. On the Contrary, the bowl got emptied on the same day of preparation. These pakodas are deep fried in oil to get the delicious crunchy bite. If you have an Air fryer, you can try with few pakodas and compare both the versions. I have not ventured it out yet.

Ingredients

Chutney Dal / Roasted Gram Dal / Pottukadalai Flour  - 2 Cups
Rice Flour - 1 Cup
Green Chilli - 4 
Ginger - 1 small cube
Garlic - 2 pods
Fennel Seeds - 1 tsp
Salt - As Required
Red Onion - 1 Big or 2 Medium
Curry Leaves crushed - 1 stem
Coriander Leaves - 1 tbsp
Red chilli powder - 1/2 tsp
Hing / Asafoetida - 1 Dash
Oil - Enough for frying
Ghee - 1 tbsp
Baking Soda - 1 pinch

Preparation

  • First prepare the Pottukadalai Maavu / Roasted Gram dal flour by grinding them in a mixie smoothly and keep it aside.
  • Crush the green chilli, fennel seeds, curry leaves, garlic, ginger in a mortar or in a mixie gently. Keep it ready. Chop the onions and keep it aside.
  • In a mixing bowl, add the ghee and a pinch of baking soda. Gently mix them using the tip of the fingers in order to mix the soda with the ghee completely. This process keeps the inner part of the pakoda softer and enhances the taste as well.
  • To the bowl, add the Roasted gram flour / Pottukadalai Maavu,rice flour,chopped onions,crushed green chili mix, red chilli powder, hing and mix them thoroughly. Add water little by little to the bowl and make a dough like a roti dough. 
  • Once the dough is ready, make lemon sized balls of the dough and keep them ready for frying.
  • While preparing the pakoda dough, you can start heating the oil for frying process.
  • On low-medium heat, fry all the pakoda balls in the oil and drain them out once they turn golden brown and crispy.
  • Enjoy the delicious Pakoda with hot tea / coffee.

Tips / Suggestions

It tastes best when its slowly fried on low-medium flame. Cooking on high flame might yield half cooked inner part and dark coloured pakodas.

Friday, February 5, 2021

Thai Velli Maa Vilakku - Healthy Maa Vilakku


"Maa Vilakku"  in Tamil means Edible light with a small dent in the middle to hold the ghee. Its generally lighted during the month of "Thai" and "Aadi" in our place as a prasadam / offering to Goddess. This edible lamp is made out of processed rice flour and powdered Jaggery.  Still I remember how my mom used to light these traditional edible lights in our native place Thanjavur in front of the Goddess Bangaru Kamakshi Amman. She used to follow all the traditions in her own unique way in spite of having a hectic work schedule.  Following her traditions with heartful of thanks and respect, I made the Maa Vilakku today in our home but with a small twist. I have substituted rice flour with my processed millet flour, little almond flour, sesame seeds powder and Jaggery.  The consistency of the prasadam was good enough to make a nice ball and it tasted very good.  

Next time try this Maa Vilakku at your home especially when you want to have a healthy millet option.

Ingredients


Processed Millet Flour - 1.5 Cups 
Almond Flour - 1 Cup
Brown sesame seeds powder - 1/2 cup
Ghee - 2 tsp
Powdered Jaggery - Between 1/2 cup to 3/4th.
Elachi powder / cardamom powder - 1 tsp

Method 

1.  Soak the Kodo Millet / Varagu in water for 1 hour. Drain them completely and dry them on a dry paper towel or on a thin muslin cloth for 20 minutes. Powder them in a blender.
2. Add a cup of almond flour, sesame seeds, crushed jaggery into the blender and grind them nicely.
3. Pour the grinded mix into a bowl. Add elachi powder and ghee into the mixture.
4. Divide them into two portions and make a round lamp with a small dent in the middle.
5. Pour ghee into the dents and keep them on a silver plate. Decorate the plate with kumkum, flowers and light this divine Maa Vilakku in your pooja.

Suggestions

I used Kodri Millet / Kodo Millet for making this prasadam. You can use any millets of your choice.

Monday, February 1, 2021

Vankaya Biryani / Brinjal Biryani


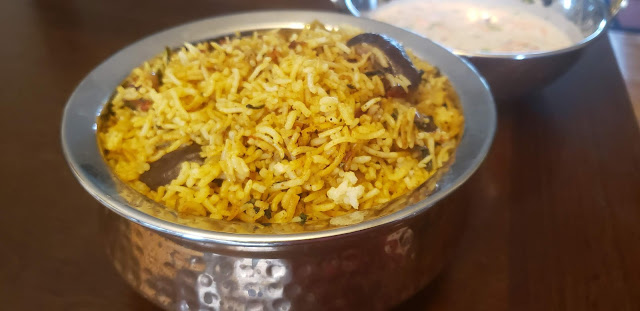
During lockdown,  I made Vankaya Biryani ( Brinjal Biryani ) just for using my tender purple brinjals in a different form for lunch. Whenever I get baby brinjals from the store, either I make brinjal gravy or curry. Big brinjals would be mostly consumed for making Baigan bhartha, Brinjal Thogayal, baba ghanoush, kathirikai Gothsu. Our foodie family totally love this biryani. Flavor of this biryani is so unique due to the addition of baby brinjals. Try this only with fresh baby brinjals as the taste is totally determined by the freshness of the brinjals. We can enjoy this hot biryani with a side of mixed veg raita. This brinjal biryani is an excellent alternative to our regular vegetable biryani. Next time, if you have abundant baby brinjals, Vankaya biryani should hit in your mind.!!!

Ingredients

Baby Brinjals ( Purple ) --  12 to 15
Red Onion - 2 Medium or 1 big one
Green Chili - 5
Tomato - 1 Medium
Basmati Rice - 2 Cups
Salt - As Desired
Ghee - 1 tbsp.
Cooking Oil - 1 tbsp.
Ginger garlic Paste - 1/2 tbsp.
Turmeric Powder - 1 tsp
Chili Powder - 1 tsp
Coriander Powder - 1/2 tbsp.
Biryani Masala Powder - 1 tbsp.
Water - 3.75 cups of water.
Lemon Juice - 1 tsp
Roasted Cashew nuts - To Garnish
Coriander Leaves - To Garnish

Masala Ingredients - For First Tadka 

Cinnamon Stick - 2 or 3
Marathi Moggu - 1
Lavang - 3 or 4
Sombhu / Fennel Seeds - 1 tsp
Jeera / Cumin Seeds - 1 tsp
Kali jeera - 1 tsp
Cardamom - 2
Bay Leaves - 2 or 3

Procedure 


Wash the brinjals and slit them into four keeping the stem intact and keep it ready.  Cut tomato, onions, green chilies and keep it aside.

Cook the Basmati Rice Separately
Soak the basmati rice and keep it ready. Cook the basmati rice separately in a vessel or pressure cooker along with a cinnamon stick, 2 lavang, 1 bay leaf, 1 tsp of ghee. Add 3.5 cups of water for 2 cups of basmati rice. Basmati rice should be cooked three fourth and not mushy.  

While the rice is getting cooked, finish the remaining process as below.

Brinjal Cooking Process
  • Take a wide deep vessel to prepare the biryani. Add 1 tbsp. of ghee and 1/2 tbsp. of oil first. 
  • Add all the masala ingredients and fry them little on medium heat. Then add the red onion slices into the vessel. Fry them till it turns light golden brown and not burnt. Add the ginger garlic taste then and fry them till the raw smell goes away.
  • Add the tomato, green chili into the vessel now and let it cook till they get mushy.
  • Add the slit brinjals into the vessel now along with the remaining oil.  Fry the brinjals on medium heat for 2 to 3 minutes.
  • Add all the powders required for making the biryani. Add salt just enough for the brinjals sitting in the vessel. Don't add all the salt.
  • Mix them thoroughly with the brinjals. Cover the lid and allow them to get cooked on medium heat till the brinjals get cooked completely.
  • When its done, layer the vessel with the cooked basmati rice and the cooked brinjal masala. 
  • Press them and cover the lid. On a low flame, let the biryani cook for 5 to 6 minutes.
  • After its done, switch off the flame. Add a tsp of lemon juice and mix it. 
  • Garnish the biryani with coriander leaves and roasted cashew nuts.
  • Enjoy with a side of mixed veg raita. 

Tips
  • Good quality basmati rice to get a rich flavor.
  • Small baby brinjals should be fresh.
  • Brinjals should be well coated with all the masala powders and get cooked.
  • Keeping the layered biryani on low flame will give a well cooked biryani with tiny light crispy brinjals.
  • You can add some fried onions on its top just before serving.

LinkWithin

Related Posts Plugin for WordPress, Blogger...