Tuesday, February 28, 2012

Tomato Puliogare / Thakkali Puliodharai / Tomato Puliodarai

 Puliodarai / Puliogare is an authentic south indian rice variety which is generally made during festivals or on special occasions. Puliodarai is mostly liked by all and we love to taste this tangy rice during odd days also. As we all know that puliogare is generally made with thick tamarind paste along with other ingredients, I wish to try making "Tomato Puliogare" by adopting the method of making Puliogare with thickened tomato gravy instead of  tamarind gravy/paste. And I named my yummy, tangy Puliodarai as "Tomato Puliodarai". If you have "sour" tomatoes, then the taste would be heavenly. With an addition of few drops of Gingelly oil, the flavour of Puliodarai would be upgraded. With good accompaniments like Appalam, Vadams, or just with Potato chips, we can enjoy the Tomato Puliodarai at any time of the day. A good lunch box recipe, of course...
Ingredients
Tomato - 10 to 12 Medium size
Salt - To Taste
Gingelly Oil - 3 tbsp
Oil - 1 tbsp
Basmati Rice / Sona Masoori Rice - 2.5 Cups
Hing/Asafoetida - 1 Dash
Mustard Seeds - 1 tbsp
Cumin Seeds - 1 tsp
Dry Red Chillies - 5
Urad Dal /Minna Pappu/Ulutham Paruppu -  1 tbsp
Channa Dal/Senaga Pappu/Kadalai Paruppu - 1 tbsp
Ground nuts / Peanuts - 2 handful ( Adjust according to your taste )
Curry Leaves - 2 stems
Jaggery - 1 tsp
For the powder
Channa Dal / Senaga Pappu / Kadalai Paruppu - 1.5 tbsp
Urad Dal / Ulutham Paruppu / Minapa Pappu - 1 tbsp
Vendhayam / Fenugreek seeds / Methi Seeds - 1 tsp
Coriander Seeds - 3 tsp
Dry Red chillies - 5 or 6 big
Method
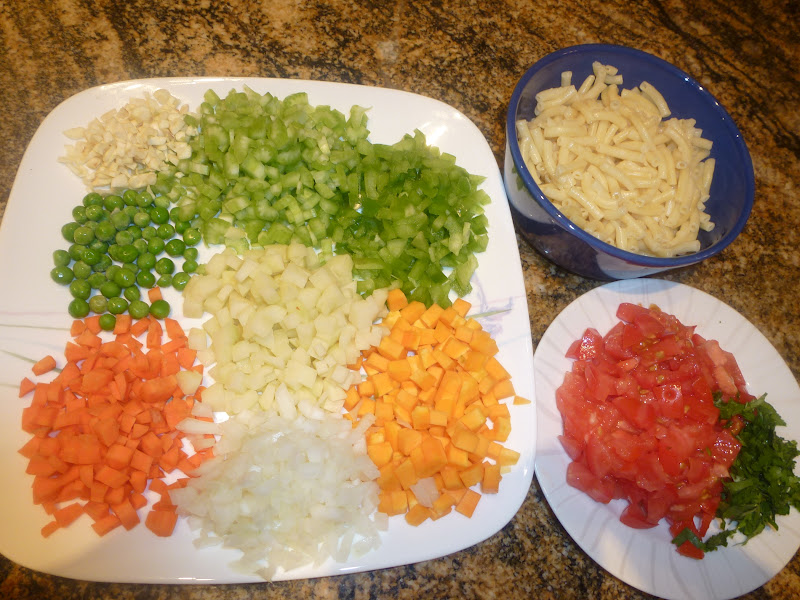
  1. Wash the tomatoes and chop them ready. In the frying pan, add a tsp of oil and fry all the ingredients for making the spice powder till a nice aroma emanates. Then, grind them nicely using a mixer grinder and keep the spice powder ready.
  2. Cook the Basmati Rice / Sona Masoori Rice and keep it ready. For 1 cup of basmati rice add 2 cups of water. For 1 cup of Sona Masoori rice, add 2.5 cups of water. But this ratio totally depends on the type and age of the rice.
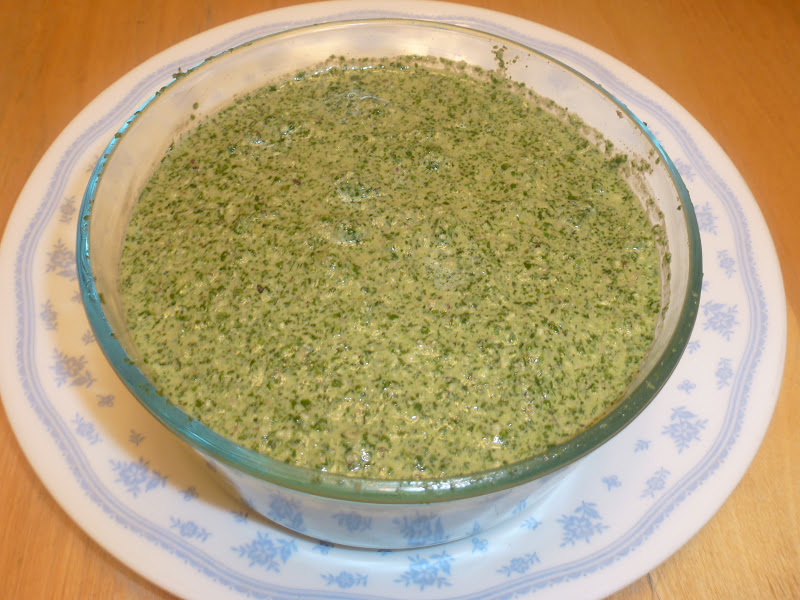
  3. In a separate frying pan, add a tbsp of oil and when its heated, add the chopped tomatoes and a pinch of salt and fry them till they become mashy. Make a thick paste of this tomato gravy and keep it ready.
  4. In a big frying pan, add the remaining oil and start adding the ingredients for the tempering process like Hing, Mustard seeds, Urad Dal, Channa Dal, Ground nuts, Dry red chillies, curry leaves. Roast them till they turn golden brown.
  5. Then, add the thicken tomato paste and the spice powder to the pan. Mix them well and fry them for about 2-3 minutes till they all blend together.
  6. Add the cooked rice to the pan and spread them using a spatula. Add the Gingelly Oil, required amount of salt to the rice and mix them well with the spicy paste.
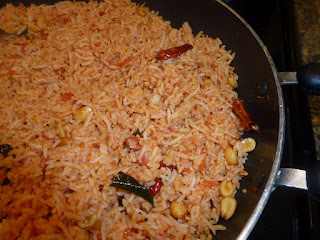
  7. Leave the rice in the pan as it is for couple of minutes and transfer the rice to the serving container.
  8. Tomato Puliodarai is now ready to enjoy with a side of few papads and crunchy vadas.
Tips / Variations 
  • Instead of directly adding the chopped tomatoes, you can add the crushed tomato puree into the frying pan while making the thick tomato paste.
  • You can add cashew nuts too while making this Puliodarai for a special occasion.
  • Try not to forget the Gingelly Oil as its the main taste maker in Puliodarai.
  • Cook the rice to the right consistency so that its not sticky or pasty. Rice should look separate but cooked.

Monday, February 27, 2012

Pal Kova / Theratti Pal / Thiratti Pal - Using Ricotta Cheese

Pal Kova, also called as Theratti Pal in Tamil is a creamy milk sweet made with thick milk, jaggery or sugar and some melted butter or ghee. Out of all Pal Kova I tasted, Aavin Palkova stands the best. Its always tricky for me to understand how they arrive at the unique taste of  Aavin Palkova and howmuchever I try, my version would not taste the same. But this time, I used my brain so much to come closer to that version. I made this specially for one of my friend Preetha's Seemandham / Baby Shower. I used the combination of both sugar and jaggery while making this Pal Kova so as to get the brownish colour. Process is much simpler as I used only microwave for my entire cooking. This basic idea was originally given by my friend Soundarya couple of years back..I customized little bit and tried her method and the final result was awesome.
Ingredients
Ricotta Cheese - 32 Oz ( Used Part Skim 32 Oz / 2 lb ) or 5 Cup
Fat Free Milk Powder - 2 packets / 3 Cup
Condensed Milk Can - 1
Powdered Jaggery - 1 Cup
1% Milk - 1 Cup
Melted Ghee - 1 Oz Bar / 3/4th of a cup
Cardamom Powder / Elachi Powder - 2 tsp
Roasted Cashew nuts - 1 Handful to decorate.
Method
  • In a big deep glass vessel or any deep microwave vessel, add all the ingredients except cardamom powder and cashew nuts and mix them thoroughly.
  • Cook them on high in microwave for about 5-6 minutes. Open the microwave and stir them on all sides.
  • Continue the process for another 3 to 4 times. Every time stir the PalKova and you would notice the Kova changing to light brownish colour and getting closer to a thick consistency.
  • When the Kova comes to the actual semi solid state, add the cardamom powder and mix well.
  • Microwave for another 1-2 minutes and decorate with roasted cashews.
Tips / Variations
  • Instead of Sweet Condensed Milk you can add sugar directly.
  • Instead of fat free versions, you can very well make it with whole milk Ricotta Cheese and milk powder to achieve a more richer taste.
  • Don't microwave till the kova gets completely dry. In order to obtain the right kova taste, try to retain some moisture in the Pal Kova.

Wednesday, February 22, 2012

Dal Shorba - Healthy Indian Soup

Dal Shorba is a very tasty, healthy, lentil based soup in Indian Cuisine flavoured with Indian spices. This soup is an excellent appetizer for a gathering. I never tried making this soup before. So I am just presenting my Husband's recipe through this post. This is totally made by him with his own customizations. So all plus and minus should go to him.!!! As he always try to upgrade any existing version with his own healthy customization, he did the same for this soup too..He chose three lentils that are pink, red based..( like Red Masoor Dal, Red Moth, Brown Masoor..) for the base and other vegetables like Carrot, Celery, White onion, Broccoli, beans, butternut squash as an addition. He started making the soup from scratch and the soup was awesome for that cold wintery night. Needless to say that he is an excellent foodie who enjoys cooking and always gives right feedback (!!) to my food too. We all enjoyed the soup with a side of few toasted multigrain bread. ( An Appetizer item turned out to be a wholesome meal with a slice of bread for all of us.!!!! ). Recipe follows as described by him....
Ingredients
Masoor Dal ( Red Lentils ) - 1 Handful
Brown Masoor Dal  ( Brown Lentils)- 1 Handful
Red Moth Dal ( Moth Beans )- 1 Handful
Lavang / Cloves - 2
Cinnamon Stick - 1 Small
Bay Leaves - 2
Oil - 4 tsp
Salt - To Taste
Sugar - 1/2 teaspoon

Powders to be added :
Turmeric Powder - 1 tsp
Cumin / Jeera Powder - 1 tsp
Black Pepper Powder - 2-3 tsp ( He added more for his portion..)
Red Chili Powder - 1/2 tsp ( Optional )
Vegetables
Garlic crushed / shredded - 1 tbsp
White onion - 1/2 finely shredded
Carrot - 1 Medium
Broccoli - 12-15 florets
Tomato - 3 Big ripe
Butternut Squash - 1/2 cup cut into small cubes
Celery - 5 Sticks
Peas - 1 Handful
Coriander Leaves - 1 handful finely shredded
Grated Ginger - 1 tbsp
Lemon Juice - 2-3 tsp


Method
  • Wash the lentils / Dals and pressure cook them separately or cook them in an electric cooker. Keep the cooked lentils paste and the dal water if any separately.
  • Wash all the vegetables and cut them into different size as desired and keep them ready.
  • Meantime, dry roast the cumin seeds, black pepper seeds and powder them nicely and keep it ready.
  • In a big thick bottomed soup pot, first add the oil. When its heated, add the crushed garlic and onion first. Fry them well with a pinch of salt till the onion pieces get translucent.
  • Add the Bay leaves, cinnamon stick, cloves, turmeric powder into the pot now and fry them.
  • Next add the other vegetables like carrots, broccoli, butternut squash, peas, tomatoes into the pot and cook them with some water. At this time, you can even add the remaining cooked dal water into the pot.
  • When they are cooked enough, add the cumin/black pepper powder, red chili powder and crushed ginger into the pot. Add the other watery vegetables like celery into the pot now.
  • Add the cooked dal paste into the pot and required amount of salt, 1/2 tsp of sugar and water into the soup pot. Stir them well and allow them to get cooked for about 3-4 minutes on a medium flame.
  • When the soup is boiled well enough, remove the Bay Leaves, cinnamon stick and cloves from the pot carefully. Using a masher or hand blender, gently mash the soup for few seconds just to set it to the right consistency.
  • Switch off the flame. Finally add the lemon juice and mix it well.
  • Before serving, garnish with coriander leaves and few drops of melted butter on its top.
  • A Healthy and tasty appetizer loaded with protein and good amount of other vitamins is an ideal choice before a healthy meal.
Tips / Variations 
You can include your favorite vegetables in this soup but try to include atleast two watery vegetables in your choice.

Tuesday, February 21, 2012

Blueberry Kesari

In the Krishna Temple, I first tasted this purple colour kesari and got attracted with the colour, flavour and taste of that Kesari. Since then, I have been thinking to make this kesari in my kitchen. Maha Shivarathri was the best choice to try out this Prasadam as I somehow feel some closeness between Lord Shiva and Blueberry, may be due to the colour.!! My version also turned out good with the exact blueberry flavour, taste and colour..So, I have decided to make this Prasadam mainly for Lord Shiva and Lord Krishna for the reason I mentioned.
 
Ingredients
Blueberries - 1/2 cup
Rava / Sooji - 1/2 cup
Sugar - Between 1/4 and 1/2 cup
Ghee - 1 tbsp
Cardamom Powder / Elachi / Elakkai - 1 tsp
Ghee roasted cashew nuts - 8 or 10 small pieces
Method
  • In a cooking pan / frying pan, first roast the Sooji / rava with a drop of ghee till it turns golden brown.
  • Then add 2 cups of water and stir them well. When the sooji is cooked well, add sugar and blueberries into the pan. Stir constantly till the blueberries get cooked and mashed thoroughly.
  • Slowly the Kesari would be turning into light purple colour when the blueberries are getting mashed.
  • Next add the Cardamom powder and ghee and stir them well on a medium flame.
  • Switch off the flame when you notice the kesari coming out of its side easily and the ghee oozing out of the Kesari.
  • Drop few ghee roasted cashew nuts on its top and offer the prasadam to Lord Shiva.

Maha Shivarathri


Maha Shivarathri festival generally falls in the month of February or March which depends on the 6th night of the dark Palghun. This is the famous festival for Lord Shiva celebrated by all Hindus. Shiva devotees will sacrifice their sleep on that night and chant mantras on Lord Shiva and offer abhishekams and prayers to him. Its also believed that one will attain Mukthi if they pray to Lord Shiva the whole night of Shiva rathri by chanting Shiva Nama. Devotees observe fasting on the day of Shivarathri. In all the hindu temples, special prayers, abhishekams and annadanams would be conducted and devotees would visit the temple to get a glimpse of Lord Shiva on the day of Shivarathri.

Mantras to be recited on Shivarathri Day :

Sri Bavaya Namaha:
Sri Sarvaya Namaha:
Sri Rudraya Namaha:
Sri Pasupathaye Namaha:
Sri Ukraya Namaha:
Sri Magadevaya Namaha:
Sri Beemaya Namaha:
Sri Eesanaya Namaha:

Also, its good to recite Lingashtakam on Shivarathri Day.

Prasadams
Generally for Prasadams, as devotees fast for a longer period, they eat light prasadams like Moong Dal Kheer / Payasam , Tamarind Aval, Aval soaked in Curd or Milk, etc., But in my mind, I wanted to make a nice and different prasadam for Lord Shiva which should resemble him. Blueberry Kesari came into my mind. I could not find any other suitable prasadam to offer to my Lord Shiva.

Blueberry Kesari

For knowing the recipe of Blueberry Kesari , click down...

Kale Poriyal / Kale Sundal / Kale Curry


Kale, the dark greenish vegetable is the king of all vegetables. Its rich in dietary fiber, dieter's dream food as it fights against fat. Its an excellent source of nutrients and vitamins like Vitamin A, Manganese, Calcium, beta -carotene, etc., It protects the eyes, helps the human body's immune system, prevents cancer and heart disease considerably. After knowing all these benefits, who would not stock Kale in the Kitchen. I also get tempted to buy some fresh Kale and try out different food items out of it. Kale Poriyal with lentils is the food item I tried with kale and the poriyal was very tasty, rich in protein and fiber. The taste reminded me of the Drumstick Leaves Poriyal which my mom used to make during my childhood. It can be kept as one of the sides in any vegetarian thali we make at home. A cup of Kale Poriyal, cup of brown rice and a cup of fresh cucumber raita is an excellent meal option for weight watchers.
Ingredients
Kale - 1 Bunch
Payatham Paruppu / Moong Dal / Pesara pappu - 1 Handful
Fresh Coconut Flakes - 2 tbsp
Oil - 4 tsp
Hing / Asafoetida - 1 Dash
Mustard Seeds - 2 tsp
Jeera / Cumin Seeds - 2 tsp
Dry Red chillies - 3 or 4
Turmeric Powder - 1 tsp
Salt - To Taste
Sugar - 1 Pinch
Method
  • Soak the Moong Dal in warm water. Meantime, wash the Kale leaves and chop them nicely and keep it ready.
  • Half cook the Moong dal in the cooking pan by adding little water and keep it ready.
  • In the frying pan, add oil first. When its heated, add the Hing, Mustard Seeds, Cumin seeds, red chillies and finish the tempering process.
  • To the pan, add the half cooked Moong Dal and the finely chopped Kale Leaves and turmeric powder.
  • Mix them well with a pinch of sugar and sprinkle some water into the pan.
  • Allow the contents to get cooked thoroughly on medium flame. Occasionally open the lid and check whether the water is enough for the leaves and dal to get cooked. If required, add little more water.
  • When the Kale leaves and dal are completely cooked, ( it might take roughly around 5-6 minutes or more depending upon the Kale leaves ) add required amount of salt and fry them openly for 1-2 minutes.
  • Switch off the flame and add the fresh coconut flakes at the end. Mix them well and serve this side in your healthy vegetarian thali.

Asparagus Fry


Using Asparagus, I tried few food items like MorKootu, Mor Kuzhambu, Milagu Kootu before and enjoyed the taste of every item. This time I wanted to make a fry. It came out well like a Bindi / Vendaikai fry...Just added few red onions to asparagus just to coat some indian taste. It goes very well with plain rasam rice / charu. As asparagus is one of the healthiest food item in Top 10 list, its recommended to eat this tasty vegetable at least once a week. To kids, its the most healthiest choice as it increases the immune system.
Ingredients
Tender Asparagus Stems - 1 Big Bunch
Red Onion - 1/2 finely shredded
Oil - 3 to 4 tsp
Mustard Seeds - 2 tsp
Cumin  Seeds -  1 tsp
Urad Dal / Ulutham Paruppu / Minna pappu - 2 tsp
Curry Leaves - 6 or 7
Dry Red Chillies - 3
Hing / Asafoetida - 1 Dash
Salt - To Taste
Turmeric Powder - 1 tsp
Red Chilli powder - 1 tsp ( Optional )
Method
  • Wash the Asparagus and chop into small pieces and keep them aside. Cut the red onions into small pieces and keep it ready.
  • In the frying pan, add oil first. When it gets heated, add Hing, Mustard Seeds, Cumin Seeds, Urad Dal, Channa Dal, Curry leaves, dry red chillies first. When they sputter, add the red onion pieces and fry them with a pinch of salt for 2-3 minutes till they turn golden brown slightly. Add turmeric powder now and mix them well.
  • Finally add the asparagus cuts and cover them with a lid. Let them cook with the steam inside for few minutes, say 4-5 minutes.
  • When its cooked, add required amount of salt and a tsp of red chilli powder and fry them well for another 3-4 minutes on a low flame.
  • Serve this healthy fry with any hot rice combinations.
Variations / Tips
Do not add water while cooking the asparagus. Allow them to cook with the steam inside.
Instead of red chilli powder, you can sprinkle some black pepper powder too.

Green Capsicum Chutney


Green Pepper / Capsicum is one of my favourite vegetables which has numerous medicinal and health benefits. So, i love to make use of this green pepper / capsicum in my cooking as much as possible. When I tasted the green capsicum chutney with Idlies at my friend Preetha's house, I really got so impressed with this combo and especially this spicy chutney. Needless to say the taste of her softer idlies with a dip of this flavourful chutney was divine....So I got the recipe of this green capsicum chutney from her. Earlier, I got the recipe of Red Capsicum Chutney from her and posted before. Thanks Preetha for sharing this healthy recipe with us...
Ingredients
Green Pepper / Capsicum - 1 Big
Fresh Coconut Flakes - 2 tbsp
Urad Dal / Minna Pappu / Ulutham Paruppu - 2 tsp
Channa Dal / Kadalai Paruppu / Senaga Pappu - 2 tsp
Groundnuts / Peanuts - 2 tsp
White Sesame Seeds - 1 tsp
Tamarind - 1 tiny pinch
Dry red chillies - 3 Medium
Salt - To Taste
Sugar - 1 pinch
Hing / Asafoetida - 1 Dash
Oil - 3 to 4 tsp ( Depending upon the size of Capsicum for frying )
For Tempering
Mustard Seeds - 2 tsp
Cumin Seeds - 1 tsp
Curry Leaves - 3 or 4
Oil - 1 tsp
Method
  • Wash and cut the green pepper into small pieces and keep them aside.
  • In a frying pan, add oil first. When its heated, roast the urad dal, channa dal, groundnuts, dry red chillies, sesame seeds, tamarind to golden brown and transfer them to the mixer grinder.  In the same pan, add the green pepper pieces and fry them with a pinch of salt for 3-4 minutes till they get cooked and fried.
  • Transfer them to the mixer grinder and grind them along with coconut flakes coarsely.
  • Transfer the chutney into a bowl. Add required amount of salt and a pinch of sugar to the chutney and mix well.
  • Do the tempering process in the pan and pour them over the chutney and mix well...
  • Good to serve with idlies, dosas and even with rotis / chappathis or any upma.
Tips / Variations
You can omit the sesame seeds if you wish.. I added it as we like the taste of the addition of few sesame seeds in this chutney.
Likewise, you can increase / decrease the number of red chillies while making..
Coarse paste gives the right taste than the smooth paste.

Thursday, February 16, 2012

Minestrone Soup


Minestrone Soup, is a thick Italian Soup which is made with vegetable stock, tomatoes, onion, celery, carrots and other vegetables with an addition of some pasta and beans. If you wish to have a wholesome meal at nights, you can very well go for this soup. It fills the stomach and the soup contains everything needed for an one time meal. Happy to mention that some leftover soup was totally enjoyed by my daughter and she requested me to make this often.!!!

Ingredients
Tomato - 3 Big or 32 Oz Tomato Puree Can
Carrot -- 1 Medium
Potato - 1 Medium
Butternut Squash - 1 Cup cubed
Zucchini - 1 Medium
Green Pepper / Capsicum - 1/2 Medium
Celery Sticks - 2
Green Peas - 1 handful
White Onion - 1/2 Medium
Cooked Pasta - 1 Cup ( preferably mini size pasta )
Coriander Leaves or  Parsley  - 2 tbsp
Crushed Garlic - 2 tbsp
White beans / Red Beans cooked - 1/2 cup
Beans - 7 to 8 Medium
Vegetable Stock - 4 to 5 cups
Salt - To Taste
Dried Oregano Seasoning - 1 tsp
Dried Thyme Seasoning - 1 tsp
Dried Basil Seasoning - 1 tsp
Black Pepper Powder - As required
Olive oil - 1 tbsp
Parmesan Romano Cheese - To Garnish on its top before serving


Method
  • Wash and cut all the vegetables into tiny cubes. Keep them ready.
  • In a thick bottomed soup pot or vessel, add the Olive Oil first. When its heated, add the crushed garlic and onion and fry them till golden brown. Then, add the other vegetables and fry them for 2-3 minutes. Cover the lid for a while tilll the tomatoes get mashy and cooked. Cook all the vegetables for another 3-4 minutes on a low flame.
  • Add the vegetable stock now and if required, add some water into the pot and cook everything on a medium flame till the vegetables get cooked completely.
  • Finally add the italian seasoning powder, required amount of salt, black pepper powder into it and allow them to get blended well for few more minutes.
  • Garnish with parmesan cheese and shredded coriander leaves or Parsley ( of your choice ) and serve in a soup bowl. Serve with a side of toasted garlic bread.

Tips / Variations
You can add any seasonal vegetables of your choice while making this soup. I have not added few due to unavailability. In addition to Italian seasoning powder, we can add crushed basil leaves to make it more flavourful.

Mint Coriander Pesto

Lots of fresh mint leaves and coriander bunches in the fridge really tempted me to make this Pesto. Though I am a hardcore fan of the regular Basil Pesto, I tried this version and served with a butterfly shaped Farfalle Pasta. It was indeed very tasty with few coats of Olive Oil, Parmesan Cheese on its top. I customized the Pesto and made it little spicy as we wanted. With a side of Minestrone Soup, I tried to bring some Italian Flavour into our Kitchen during dinner last night....

Ingredients
Coriander Leaves Bunch - 1 Big
Mint Leaves - 1 Bunch
Walnuts - 1 Full Handful or 1 Cup
Garlic Pods - 2 or 3
Black Pepper Seeds - 1 tsp
Lemon Juice - 1/4 Cup
Grated Parmesan Cheese - 1 tbsp
Green Chili - 1 Medium
Salt - To Taste
Olive Oil - 1 tbsp

Method
Roast the raw walnuts slightly on medium heat. Switch off the flame. On the heated pan, add the coriander leaves, mint leaves, garlic pods, green chili, black pepper seeds and toast them slightly with the existing heat. Grind them together with all the other ingredients in a mixer grinder coarsely. ( Not a fine paste ). Store it in a glass container as we might use it for a week.

Pasta with Mint Coriander Pesto


Cook the Pasta with little salt and keep them ready. In the cooking pan, add 3 tsp of Olive Oil. When its heated, add the cooked pasta and few spoons of Pesto as required and required amount of salt, black pepper powder and stir them nicely for 2-3 minutes. Add grated Parmesan cheese on its top just before serving on the plate. A healthy, quick meal is fixed and also a good treat for the kids.

Monday, February 13, 2012

Veg Paneer Kofta in Spring Mix Green Gravy


Really frustrating to see some of the Spring Mix Salad bought from Costco getting spoiled at the end, though we consume a considerable quantity to our level of satisfaction...I really wanted to make use of all the Spring Mix that we buy from the wholesale Costco. Before I used to make Pappu out of the leftover Spring Mix salad but  this time I wanted to try out something different with this salad mix. Using Paneer ( which is an all-time favourite at home), I made some crunchy Koftas and made them to dance in my healthy Spring Mix Green Gravy...I followed the same procedure of Palak Paneer for making this Green Gravy. With few tricks, the dish got upgraded and a perfect Kofta gravy was achieved...( with my leftover Spring Mix salad..!!!) . More than that, I felt so relieved while throwing the big Spring Mix Salad Box without any wastage in it.
Ingredients
Photo Courtesy by Wiki -- Spring Mix Salad
For the Green Gravy
Spring Mix Salad - 5 cups fully
Ripe Tomatoes - 2 Big
Green Chillies - 1 Big
Cumin Seeds - 1 tsp


For the Koftas
Potato - 3 medium
Carrot - 2 medium
Peas - 1 Handful
Beans - 6 or 8
Green Pepper / Capsicum - 1/2 Medium
Paneer - 1 Cup shredded
Yellow Corn Flour - 1/2 cup
Water - Little to make the corn paste.
Salt - To Taste
Turmeric Powder  - 1 tsp
Red Chilli Powder - 1 tsp
Dhana Jeera Powder / Coriander Cumin Powder - 1 tsp
Sugar - 1 pinch
Oil - Enough for frying the Koftas

For the Main Process
Oil - 1 tbsp
Butter or melted ghee - 1 tsp ( just for flavour , optional )
Cumin Seeds - 2 tsp
Garlic Ginger Paste - 1 tbsp
Onion Shredded / finely sliced - 1/2 cup
Turmeric Powder - 2 tsp
Red chilli Powder - 1 tsp
Coriander Cumin / Dhana Jeera Powder - 1 tsp
Garam Masala Powder - 1 tsp
Sugar - 1 Pinch
Thick whole Milk - 2 tbsp
Salt - To Taste

Method

Paneer Veg Koftas
Kofta Preparation
In a big thick bottomed vessel, cook all the vegetables including Green Pepper / Capsicum completely and keep them ready. To the cooked veggies, add the crumbled paneer and the other ingredients as mentioned above, and make small balls. In a plate, add the yellow corn flour and add few drops of water and make a moist powdery paste.( Not like bajji batter...). Roll the Veg Paneer Kofta ball on the surface of the moist corn flour so that it gets coated uniformly in all the directions.
Fry them till golden brown in the oil. Continue the process for the rest of the balls and keep the fried koftas ready.

Gravy Preparation

In the cooking pan, add the Spring Salad Mix, tomatoes, green chillies and cumin seeds and allow them to cook inside for few minutes. No need to add water. Let them cook with the steam inside on a low flame. When its cooked and shrunk in size, grind them together with little water and keep the green gravy paste ready.

Main Process

  • In the cooking pan, add oil and little melted ghee / butter first. When its heated, add cumin seeds.
  • Add the ginger garlic paste and fry them till the raw smell vanishes.
  • Add the onion pieces next and fry them with a pinch of salt for 2-3 minutes.
  • Add all the powders as mentioned above and fry them again for a minute.
  • Add the green gravy paste and required amount of salt, 1 tbsp of thick whole milk and add some water if required.
  • Allow the gravy to cook well with all the spice powders for 5-6 minutes.
  • Switch off the flame when the gravy is done which can be noted with the appearance of little oil oozing out of the edges, in the middle slightly.
  • Finally before serving, place the koftas in the serving bowl and pour the gravy on its top.
Tips / Variations
  • You can add Tofu, shredded cabbage, tiny cauliflower florets or any other suitable vegetables of your choice while making the Koftas.
  • You can add few drops of fresh cream on its top just before serving to make it more appealing and richer.

Saturday, February 11, 2012

Tomato Pulav / Tomato Rice - Type 1

Tomato Pulav is one of  the easiest option for a quick lunch. It goes well with a simple onion raita. Though there are different versions of Tomato rice, this is the first version of Tomato Rice I am posting...Will post my different versions I tried earlier in due course. When I talk about this tomato rice, I first get into my hostel days..They used to serve a watery white chutney for the tomato rice. Till today, I am unable to find out what ingredients they would have used for making the chutney.But still I remember the taste of the Tomato rice given in the hostel. Though we used to criticize the hostel food a lot during that time, those good memories and the taste still goes through the mind often and fills the heart happily...
Ingredients
Ripe Tomatoes - 2 Big
Green Chillies - 3 Big
Oil - 2 tbsp
Basmati Rice - 1.5 Cup
Salt - To Taste
Fennel Seeds / Sombu - 1 tsp
Cinnamon Sticks - 2
Lavang / Cloves - 4 or 5
Bay Leaves - 3
Garlic Paste or crushed garlic - 2 tbsp
Turmeric Powder - 1 tsp
Method
  • Cut the tomatoes, green chillies and soak the basmati rice in water. Keep all the ingredients handy.
  • In a big non-stick cooking vessel, add oil first. When its heated, add sombu, pattai/cinnamon sticks, lavang followed by garlic paste, green chillies and fry them well till the rawness completely takes off.
  • Add the tomatoes, turmeric powder into the vessel and leave it for a minute.
  • When its soggy, slightly mash them and add the basmati rice and fry for another minute.
  • Add required amount of salt, bay leaves and 3 cups of water into the vessel.
  • Allow them to cook on a low flame. When the pulav is done completely, switch off the flame.
  • Serve this tomato pulav with a cup of Onion raita / cucumber raita.

Friday, February 10, 2012

Wheat Rava Upma / Godhuma Rava Upma - Healthy Treat

Broken Wheat Upma, a healthy Breakfast / Dinner contains low-fat, low-calorie, high dietary fiber and rich in Iron, Protein and vitamins. I always have a tendency of adding more veggies into any dish I make and this happens in this case too...and I could never make a normal, plain upma with just onion. As much as possible, I try to inject more energy into it. Due to its health benefits, I prefer this upma than the regular sooji/rava upma. Broken wheat upma is best suited for diabetic people and people who are interested in weight loss.
Ingredients
Broken Wheat ( Dalia ) -  2 Cups
Red Onion - 1/2 Big
Carrots - 1 Medium cut into small cubes
Peas - 1 Handful
Potato - 1 Medium cut into small cubes
Beans - 10 to 12 cut into small size
Salt - To Taste
Hing/Asafoetida - 1 Dash
Mustard Seeds - 3 tsp
Urad Dal / Ulutham Paruppu / Minna Pappu - 2 tsp
Channa Dal / Kadalai Paruppu / Senaga pappu - 2 tsp
Curry Leaves - 1 Stem
Green Chillies - 3 medium
Grated Ginger - 1 tbsp or finely cut ginger - 1 tbsp
Oil - 1 tbsp
Method
  • Wash and cut the vegetables as desired. Wash the dalia and drain it thoroughly and keep it ready.
  • In the frying pan, add oil first. When it gets heated, add Hing, Mustard Seeds, Urad Dal, Channa Dal, green chillies, curry leaves, Ginger in order.
  • Next add the red onion pieces and fry them for 2-3 minutes. Add all the other veggies into the pan and allow them to cook with the lid on for 2-3 minutes.
  • Add the broken wheat / dalia now into the pan and mix them well.
  • Fry all the contents in the pan for another 2-3 minutes.
  • Add required amount of salt and 4 cups of water into the pan and cover it with the lid.
  • Let them cook on a low flame till the upma gets cooked completely.
  • When its done, serve this with a spicy chutney.
Tips/Variations
  • If you don't like a pasty upma, try to add only 2 cups of water for 1 cup of Broken Wheat ( thicker variety ). Some varieties may need only 1.5 cups of water for a cup of Dalia. Check your variety and add water accordingly.
  • Instead of peas, you can add groundnuts / peanuts in the upma. I love to have some crunchy groundnuts in the middle..

Thursday, February 9, 2012

Ragi Puttu - Healthy Breakfast Option


On "Thai Poosam" day morning, I wanted to make some good healthy Prasadam and offer to Lord Muruga. ( so that we can also enjoy without guilt!!!) Ragi puttu flashed in my mind and as usual I was trying to get away from that idea due to my fear of ruining the puttu. My mom made a delicious Ragi Puttu last summer when we visited. Having that in mind, I did not even try to attempt before. But on "Thai Poosam", I decided to try my level best. I followed the detailed instructions of my mom and attempted at last and it was indeed a great success for me.!!  The method is not that complicated as I thought. Its a healthy breakfast for all ages and for kids, with few drops of hot melted ghee, its heavenly...My Dear bloggers, try this out and make a new addition in your Breakfast list.
Ingredients
Raagi Flour -  3 cups
Fresh Coconut flakes - 1 cup
Powdered Sugar - 1 cup
Melted Ghee - 2 tbsp
Cardamom Powder - 3 tsp
Cashew Nuts - 1 Handful roasted in ghee
Salt - 2 pinch
Water - Enough to make the Puttu Dough.
Method

Take 3 cups of Raagi Flour in a bowl and add few teaspoons of water gradually and make the Puttu Maavu / Dough. The consistency of the Puttu Maavu should not be too thick or watery. If you make a ball out of the Maavu in your hand, you should be able to do it and if you slightly press the ball, it should break totally. As this is an important step, care should be taken while adding the water. Rest of the process is very simple.

After you make the Maavu satisfactorily, place it on a thin clean cloth and steam cook the Raagi Maavu for nearly 8-10 minutes. Open the steamed Puttu Maavu and spread it on a clean dry bowl. Break down all the lumps and make it powdery.

Let it cools down for 2-3 minutes. Then add elachi/cardamom powder, ghee, powdered sugar, ghee roasted cashew nuts and mix them well. Finally add the fresh coconut flakes after it cools down considerably and mix them well again. Healthy Raagi Puttu is ready with an excellent flavour and delicious taste and ready for Neivedhyam.
Tips / Variations
While making the Puttu Maavu, instead of adding water at one shot, add teaspoons of water slowly and make the Puttu maavu.
Try to add the coconut flakes at the end. Before adding the coconut flakes, check to see whether they are fresh. Otherwise, the entire Puttu would be spoiled.
In addition to roasted cashew nuts, you can even add finely shredded almonds, pistachios in the puttu to make it more richer.

Wednesday, February 8, 2012

Pavakkai Fry - BitterGourd Fry


Bitter Tasting "Pavakai"/ "Bitter Gourd" are not liked by many people due to its bitter taste. But looking at the nutrient side, its highly recommended and good for diabetic people. Bitter Gourd is very low in calories and has twice the amount of Calcium, Potassium,beta-carotene found in Spinach, Banana and Broccoli respectively. I generally include this vegetable in my regular cooking at least once a week. And we could make this in different forms like Pavakai Pitlay, Pavakkai Fry, Stuffed pavakai, Pavakai Sambar,Pavakkai Vethalkuzhambu etc., Of all, I love to make Pavakkai Curry with a little sweet, tangy, bitter and spicy taste. Small round pavakkais are best suited for making this variety. As I don't get that often in my place, I tried to make this curry using a bigger Pavakai. Its a good combo with Mor Kuzhambu.
Ingredients
Fresh Bitter Gourd - 4 or 5 cut into tiny pieces 
Thick Tamarind juice - 2 tbsp
Jaggery grated - 1 to 2 tbsp
Red Chili Powder - 3 to 4 tsp
Turmeric Powder - 1 tsp
Hing/Asafoetida - 1 Dash
Salt - To Taste
Oil - 2 tbsp
Mustard Seeds - 2 tsp
Urad Dal/ Minna Pappu/ Ulutham Paruppu - 1 tsp
Curry Leaves - 1 stem

Method
  • Wash the Bitter Gourd and cut them as shown in the picture.
  • Microwave the Pavakai along with the tamarind extract and very little water in the Microwave oven.
  • In the frying pan, add oil first. When its heated, add the Mustard Seeds, Urad Dal, curry leaves. When they get roasted to golden brown, reduce the flame to complete low and add the cooked Pavakai pieces.
  • Add the turmeric powder, jaggery, salt, red chili powder and mix them well.
  • Allow them to cook with a lid on for another 2-3 minutes.
  • Open the lid and fry them on medium flame till the size of the Pavakai pieces get reduced to some extent.
  • Switch off the flame and enjoy this with hot rice.

Sorakkai Tomato Kootu


 Kootu is an authentic tamilian item almost served as a side dish in any Tamilian Thali, Weddings or during special occasions. We can make kootu with different kinds of vegetables but watery vegetables like Chayote ( Chow Chow ), Sorakai, White Pumpkin, Snake Gourd are best suited. The gravy base for the Kootu is mostly coconut based and an addition of cooked moong dal / Payatham Paruppu makes it more richer. I am a big Kootu fan and always have a tendency to include this in my regular menu itself. Also we could eat this Kootu ( if there's any leftover..) with hot chappathis too...
Ingredients
Sorakaya / Bottle Gourd - 1 Medium
Tomato - 1 Big
Moong Dal / Payatham Paruppu / Pesara Pappu - 1 Handful
Turmeric Powder - 1 tsp
Hing/Asafoetida - 1 Dash
Cumin Seeds - 2 tsp
Salt - To Taste
Sugar - A small pinch

For the Gravy
Fresh Coconut Flakes - 2 tbsp
Green Chillies - 2 Medium

For the Tadka / Tempering
Oil - 3 tsp
Hing/Asafoetida - 1 pinch
Mustard Seeds - 2 tsp
Urad Dal / Ulutham Paruppu / Minna Pappu - 1 tsp
Channa Dal / Kadalai Paruppu / Senaga Pappu - 1 tsp
Curry Leaves - 7 or 8

Method
  • Peel the skin off and cut the Bottle Gourd into small cubes. Pressure cook the Sorakaya Pieces along with tomato pieces, Moong Dal, turmeric powder and little Hing for 2 whistles.
  • Meantime, make the gravy by grinding the above mentioned ingredients and keep it ready.
  • After the cooker cools down, add the gravy paste into the cooked kootu.
  • Add required amount of salt and a pinch of sugar to the Kootu and allow to boil for few minutes.
  • In a separate tadka pan, add oil and all the ingredients for the tempering and pour them on top of the Kootu.
  • Serve this with hot rice or hot chappathis.

Tuesday, February 7, 2012

Mulaikeerai Poriyal / Amaranath Poriyal

Amaranth leaves also called as Mulai Keerai in Tamil and Thottakura in Telugu have high nutritional benefits and rich anti-oxidant values. They can be available in either green, purple or reddish colours.
These amaranth leaves are widely used in Indian Cuisine along with Lentils. I tried to make dal, vadais, poriyals with these amaranth leaves so far. Out of the varieties I tried and liked, this poriyal variety is simpler, tastier, quicker and fits in any good South Indian Thali as a healthy side.
Ingredients
Amaranth Leaves / Mulai keerai / Thottakura - 1 Big Bunch
Oil - 1 tbsp
Hing/ Asafoetida - 1 Dash
Salt - To Taste
Sugar - 1 Small pinch
Urad Dal /Ulutham Paruppu / Minna Pappu - 1 tsp
Dry Red Chillies - 2
Channa Dal / Kadalai Paruppu / Senaga pappu - 1 tsp
Fresh Coconut Flakes - 2 tbsp
Method
  • Take out the Amaranth leaves along with the stem and keep them separately. Omit the big stem at the bottom and take out till you could use.
  • Wash the Amaranth leaves and its stem thoroughly without any sand or dirt particles. Drain all the water and chop them nicely.
  • In the frying pan, add oil first. When its heated, finish the tempering by adding all the ingredients for tempering. When its done, add the leaves and a pinch of sugar and sprinkle some water on top of it.
  • Close the lid of the pan and allow the leaves to cook for 2 minutes.
  • When its cooked , open the lid and fry them for 2 more minutes. Add salt now and fry them again for another minute.
  • Switch off the flame and sprinkle fresh coconut flakes on its top.
  • Mix them well and serve as a healthy side dish in your special thali. It will look and taste like a Sundal.
Tips / Variations
Soak a tbsp of Thuvar Dal / Thuvaram Paruppu / Kandhi Pappu in water and cook them to a desired level before adding it to the Poriyal. This addition brings in more flavour and sundal taste.

Monday, February 6, 2012

Plain Medhu Vadai / Urad Dal Vadai

Medhu Vadai, the soft spongy and crispy rounds are always special and great to enjoy them during tiffin time, great prasadam during festival time and perfect on any occasions. I made this medhu vadai on several occasions but everytime failed to take pictures as they would disappear quickly from the serving plate. That's the main reason for the delay in posting this recipe. There are so many varieties of Vadai we could make using the same batter. I would append those varieties whenever I make in future.. These vadas can be an excellent breakfast treat with a side of cocnut chutney and sambar too....
Ingredients
Urad Dal / Minna Pappu / Ulutham Paruppu - 2 Cups
Rice Flour - 1 tbsp
Salt - To Taste
Curry Leaves - 7 or 8 crushed
Hing / Asafoetida - 1 Dash
Method
Soak the Urad Dal in warm water for 1-2 hours. Grind them in a wet grinder by sprinkling very little water while grinding. Do not pour more water while grinding. Try to get a fluffy batter and keep it aside. If you are using a mixie, then try to use the whipper for grinding which gives a very fluffy batter.(In my experience). To that batter, add all the other ingredients and make a small round shape with a hole in the middle ( like a mini donut ). Drop them carefully into the heated oil in the pan. Fry them on both sides till golden colour and keep doing the same for the rest of the batter. Now the golden crispy vadais are ready for Neivedhyam.

LinkWithin

Related Posts Plugin for WordPress, Blogger...