Saturday, April 30, 2011

Lemon Rice / Elumicham Pazha Sadham / Nimmakai Puliogare

Lemon has many nourishing elements like Vitamin C,  Vitamin B, phosphorous, proteins and carbohydrates. It helps to stengthen your immunity system ,cleanses your stomach, good for diabetic people, helps constipation problems. Benefits of using lemon is innumerable. So, if someone talks low about lemon rice, explain to them that the "lemon rice, a simple rice dish is an excellent source of all these elements plus good protein and antioxidants ( contributed by ground nuts / peanuts )".

Ingredients
Sona masoori Rice - 1 Cup
Lemon - 1 Big Size or 2 Medium Size lemons
Salt - To Taste
Turmeric Powder - 1 tbsp
Coriander Leaves - To garnish
Grated Ginger - 2 tsp

For Tempering
Olive Oil - 2 tbsp
Gingelly Oil ( Nalla yennai / Til Oil ) - 1 tbsp
Asafoetida / Hing - 1 tsp
Mustard Seeds - 1 tbsp
Jeera - 1 tbsp
Channa Dal ( Kadalai Paruppu / Senaga Pappu ) - 1 tbsp
Urad Dal ( Ulutham Paruppu / Mina Pappu ) - 1 tbsp
Curry Leaves - 1 stem
Ground nuts / Peanuts - 1 full handful
Dry Red Chillies - 2 medium size. 
Green Chillies - 1 big one.

Method
  1. Cook the Sona Masoori Rice first in a pressure cooker or electric cooker separately. Dont cook the rice in pasty form. Let it cool for sometime.
  2. In the kadai, on a medium flame, add the Olive oil first. When its heated, start adding Mustard seeds, jeera first.
  3. When it sputters, add channa dal, urad dal and ground nuts into it. Slowly fry the contents so that they dont turn black or over fried.
  4. Add dry red chillies, curry leaves, asafoetida, green chilly, grated ginger into the kadai. Fry it for a minute.
  5. Switch off the heat. Add turmeric powder into the kadai.
  6. Add the cooked rice into the kadai slowly and mix all the contents with the rice perfectly.
  7. Add the squeezed lemon juice and salt into the rice now. Mix again for few more rounds till the salt and juice spread uniformly.
  8. Add the Sesame Oil to the lemon rice and mix once again.
  9. Garnish with coriander leaves and serve.
Variations
Amount of oil and lemon juice vary depending on your taste.
Also, if you are generous, you can add a handful of Cashewnuts along with peanuts in your lemon rice which makes it rich.
You can also add 1 tbsp of  sesame powder ( white ellu podi ) if you want to reduce the sourness of the lemon in your rice, it tastes very good.

Mixed Vegetable Fry

Having few leftover veggies not enough to make a complete curry. No worries. I had 2 brinjals, 2 potatoes, 3 or 4 drumsticks and only one tomato. I decided to make a simple, mixed vegetable fry which played as a good side dish with rasam rice for us.

Ingredients
Brinjals - 2 big size cut into small cubes
Potatoes - 2 Medium Size cut into small cubes
Drumsticks - 3 or 4 cut into small finger size
Onion - 1 medium size
Tomato - 1 medium size
Frozen Peas ( cooked ) - 1 handful
Curry Leaves - 1 stem ( if you have )
coriander leaves - 1 handful
Asafoetida / Hing - 1 pinch
Mustard seeds - 2 tsp
Jeera  - 1 tsp
Red chilly dry - 1 medium size
Urad Dal / Ulutham Paruppu / Mina Pappu - 1 tsp
Turmeric Powder - 1 tsp
Red Chilli Powder - 1 tbsp ( Depends on your taste )
Sambar Powder - 1/2 tbsp
Salt - To taste
Sugar - a small pinch
Olive Oil - 2 tbsp

Method
  1. Wash the vegetables and cut those into small cubes and keep them aside. Cut the tomatoes and onions too and keep them aside.
  2. Add oil first into the kadai on medium flame. When it gets heated, add mustard seeds, jeera, red chilly dry, urad dal, asafoetida, curry leaves for tempering.
  3. When its done, then add onions and fry it little bit with a pinch of salt. Add turmeric powder to it now.
  4. Then, add cut brinjals, potatoes to the kadai and fry for a minute. Then, cover the kadai with a lid and cook the brinjals, potatoes for 4-5 minutes on medium flame with little water.
  5. Separately cook the drumsticks in the microwave for 3-4 minutes and keep it ready.
  6. When the brinjals and potatoes get cooked, add the cooked drumsticks, peas into the kadai.
  7. Add all the powders as mentioned in 'Ingredients' into it. Also add remaining salt and a pinch of sugar at this stage.
  8. Mix everything thoroughly in the kadai and let it cook openly for 3 - 4 minutes. In the middle, stir the mixture.
  9. After few minutes, when all the vegetables get cooked and fried to your satisfaction, switch off the heat.
  10. Garnish with coriander leaves and serve. An excellent dish with any rice variety.

Paneer Veggie Roti


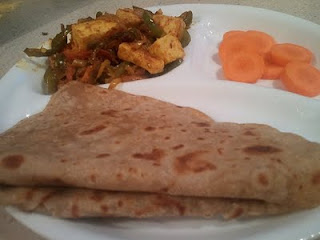
Wanted to give chappathi / Roti to my son with good protein and vegetables. Same way, we wanted to have spicy Capsicum Paneer Fry ( which he cannot have at his age), I decided to make his chappathi loaded with paneer and veggies instead.  So I transformed the normal chappathi / Roti by mixing few cubes of fresh paneer, grated carrots, peas, little omum powder, jeera powder. We were so satisfied that he also had some good healthy meal along with us. Because of  fresh paneer, the rotis came out softly and it was colourful with different veggies too.

Ingredients
Chappathi / Roti Dough - Tennis Ball Size
Grated Carrots - 1/4 cup
Frozen Peas ( cooked )- 1 Handful
Fresh Paneer Cubes - 2 Cubes medium size
Jeera Powder - 1 pinch
Omum / Ajwain powder - 1 pinch
Ghee - For frying the chappathi / Roti

Method
  1. Take the chappathi dough which you prepare for making regular chappathis / Rotis.
  2. To that, add grated carrots, cooked peas, fresh paneer cubes, jeera powder, Omum powder and crush everything and mix it thoroughly with the dough.
  3. Make a small chappathi / Roti into a round shape and fry it on medium flame both sides with little ghee.
  4. Serve it with fresh curd. Healthy evening snack or morning breakfast for the kids who refuse to eat veggies separately sometime.
Tips
Avoid mashed potatos in this dough as it does not go well with paneer and makes it too heavy.

Friday, April 29, 2011

Spicy Paneer Capsicum Fry

Need to make a quick side dish for my rotis, need to make a special paneer dish for my guests, need to avoid grinding for the gravy.....Go for Capsicum Panner Fry.!! A simplest, tastiest, quickest, healthy side dish for the Rotis.
Ingredients
Green Capsicum -  6 Medium Size
Onion - 1 Big
Tomato - 1 Medium
Paneer  -  16 oz cut into square cubes.
Jeera - 2 tsp.
Turmeric Powder - 1 tbsp
Red Chilly Powder  - 1 tbsp
Garam Masala Powder - 2 tbsp
Coriander Powder - 1 tbsp
Salt - 1 tbsp
Sugar - a small pinch
Coriander Leaves - To garnish
Olive Oil - 3 tbsp

Method
  1. Wash the capsicum, tomato and cut into thin slices. Cut Onion also into thin slices.
  2. Cut the fresh panner into small squares and keep it separately.
  3. Add 2 tbsp of Olive oil into the kadai. When its heated, add jeera seeds into it.
  4. Add slices onions first into the kadai. Add a pinch of salt into it while frying the onions. Fry for a minute.
  5. Add sliced green capsicum pieces into the kadai. Cover the lid and cook it for 1-2 minutes. DONT ADD any water into the kadai at any stage.  Then open the lid and fry the capsicum and onion for another 5-6 minutes on medium flame.
  6. Add a pinch of sugar and 1 tbsp of salt into the kadai.
  7. Add all the powders into the veggie mix in the kadai. Mix everything thoroughly.
  8. Then, add the paneer cubes into the kadai. Add the remaining 1 tbsp of Oil into the kadai.
  9. Fry the contents on a medium flame. Carefully mix the contents till the capsicum gets cooked and fried nicely and paneer cubes get toasted slightly. Make sure that the paneer pieces do not break into pieces. Carefully stir the contents in the kadai.
  10. Finally add the sliced tomatoes and mix it once again. Cover the lid of the kadai for just 2 minutes enough for the tomato slices to get cooked. Main purpose of tomatoes is to add some tangy taste to the dish.
  11. Open the lid and keep it on medium flame for 2 minutes. Mix everything once again and switch off the heat. Garnish with coriander leaves.
  12. Capsicum Paneer Sidedish is now ready to serve with Rotis.
Variations
If  "Red Capsicum" is available, try to add 1 red capsicum in this curry.  As red capsicum has some slight tangy, sweet, spicy flavour in it, it nicely enhances the taste of this paneer dish.

Tips
Good quality fresh paneer and fresh capsicum decides the taste of this dish.

Brinjal Rice / Vaangi Bath / Kathrikai Sadham

Brinjal Rice / Vaangi Baath is mostly liked by many people and a favourite mixed rice variety in our household. Our family love to have this rice with an excellent egg omelette and raita. There will be many ways to make this Brinjal Rice and each will have its own taste and speciality.
Ingredients
Sona Masoori Rice or Basmati Rice -  1.5 Cup
Brinjals - 6 Medium Size
Onion - 1 Medium Size
Ginger Garlic Paste - 1 tbsp
Turmeric Powder - 2 tsp
Curry leaves ( if you have) - 1 stem
Jeera Seeds - 2 tsp
Mustard Seeds - 2 tsp
Asafoetida / Hing - 1 Dash
Salt - To Taste
For Grinding
Channa Dal / Kadalai Paruppu / Senaga Pappu - 4 tbsp
Coriander Seeds - 2 tbsp
Jeera - 1 tsp
Black Pepper - 1 tsp
Elachi  / Cardamom - 1
Cinnamon Stick  / Pattai - 1 medium size
Dry Red chilly - 2 medium
Khus Khus / Poppy Seeds - 1 tsp
Green Chilly - 1 medium size
Fresh Coconut or Dry Coconut Powder - 2 tbsp
Method
  1. Before starting the process, cook 1.5 cups of basmati rice ( I prefer that ) or Sona Masoori Rice.
  2. Simultaneously, on a thick bottomed kadai, fry all the ingredients for grinding slightly and let it cool for somtime.
  3. Then, wash the brinjals and cut it into small pieces and also the onions.
  4. After the mixture gets cooled, grind the mixture and keep the brinjal mix powder ready. 
  5. On the same kadai, add 2 tbsp of oil . When the oil gets heated, add mustard seeds, jeera, curry leaves, asafoetida into the oil.
  6. When it sputters, add the ginger garlic paste and fry it till it raw smell completely goes off.
  7. Add onions into the kadai, a pinch of salt and fry for 1-2 minutes.
  8. Add turmeric powder into the kadai.
  9. Add the brinjal pieces into the kadai and add little salt and fry it for 2 minutes. Then cover the kadai with a lid and let the brinjals get cooked completely with little water.
  10. Check to see if the brinjals are cooked. If its done, slightly mash the brinjals and add the grounded powder into it.
  11. Fry all the ingredients in the kadai with 2 more tbsp of Olive Oil.
  12. Finally add the cooked rice into the brinjal mixture in the kadai. Mix the rice and brinjal mixture thoroughly. Add 1 more tbsp of salt after adding the rice. Mix it again so that brinjal mixture gets blended into the rice perfectly with salt.
  13. Add more salt if  its required after the mixing is completely over.
  14. Now, the brinjal rice is ready to serve with a raita or an omelette. Its a popular rice variety in many potluck parties.
Variations
You can increase / decrease the black pepper, red chilly powder, green chilly depending on your spicy taste.
Tips
Dont overcook the rice in this process which in turn decides the fate of Brinjal rice.

Drumstick Leaves Dal Dosa / Murungai Keerai Adai

Adai , a lentil based dosa is loaded with lots of protein, iron and dietary fiber and good amino acids. In addition, if drumstick leaves are added to the dal mixture, it contributes more of its good nutrition to the dosa and makes it a complete healthy meal. Its an excellent meal for the kids with a combination of fresh curd. They will love it like that.
Ingredients
Boiled Rice / Idly Rice - 1 Cup
Channa Dal / Kadalai Paruppu / Senaga Pappu - 1/2 cup
Thoor Dal / Thuvaram Paruppu / Kandhi Pappu - 1/4 cup
Moong Dal / Payatham Paruppu / Pesara Pappu - 1/4 cup
Urad Dal / Ulutham paruppu  / Mina Pappu - 1/4 cup
Ginger - 1 small cube
Jeera - 1 tsp
Dry Red Chillies - 3 or 4 medium size
Asafoetida / Hing - 1 tsp
Salt - 1.5 tbsp ( According to your taste)
Olive Oil - For frying the Dosa
Drumstick Leaves - 1 cup

Method
  1. Wash all the dals, rice and soak it in cold water for 2-3 hours. Then, drain the water and grind it coarsely ( not like a paste) along with dry red chillies, ginger piece, jeera seeds, asafoetida. Keep it aside.
  2. Meantime, take out the drumstick leaves carefully from its stem, wash the leaves and slightly cut those into pieces.
  3. Add the cut drumstick leaves into the dal mixture. Add 1.5 tbsp of salt to the adai mixture.
  4. On medium heat, keep the dosa frying pan and put 1 tsp of oil. After its heated uniformly on all sides, spread the adai batter into a big round shaped adai.
  5. Put little oil on the edges of the adai. When its cooked and fried to your satisfaction, flip it to the other side.
  6. When its cooked and fried on both sides completely, take it out of the pan.
  7. Continue the process for the rest of the batter and serve the adais with aviyal, fresh curd, pickle of your choice.
Variations
You can add finely cut onions into the adai mixture if you like the taste of  adai  with onions in it.
You can add more salt or red chilly based on your taste buds.

Tips
Before the frying pan gets heated uniformly, if you spread your adai on the pan, it will totally spoil the crispyness, taste of the adai. Wait till it gets heated and then spread the batter slowly on a very low flame. After you spread the adai, increase the flame to medium.
Also, you should flip it onto the next side only if the first side is done completely. Otherwise, you will end up having a soggy adai.

Wednesday, April 27, 2011

Veg Semiya Upma

Vegetable Semiya Upma is liked by my both kids and they call it as "Noodles Uppuma".  If you add some good , colourful veggies to this upma, it will be delicious and yummy with a nice chutney of your choice.


Ingredients
Vermicelli Semiya - 2 Cups
Olive Oil - 4 tbsp.
Salt - To Taste
Asafoetida - 1/2 tsp
Mustard Seeds - 1 tbsp
Jeera - 1 tbsp
Urad Dal ( Ullutham Paruppu ) - 2 tsp
Channa Dal ( Kadalai Paruppu / Senagalu ) - 2 tsp
Curry leaves - 1 Stem ( if you have )
Red Chilly Dry - 1
Carrot - 1/2 Carrot nicely cut into fine small pieces / cubes.
Potato - 1 small one cut into fine small cubes.
Beans - 5 medium size beans nicely cut into small pieces.
Peas - 1 handful
Onion - 1 medium size nicely cut into small pieces.
Tomato - 1 ripe medium size cut into small cubes.
Green Chillies - 2 Big Ones or 3 Medium Ones ( Depending upon your spicy taste).
Ghee - 1 tsp ( just to add some rich flavour at the end )
Sugar - 1 small pinch.
Method
  1. First, wash the vegetables and cut it into desired shapes. Keep things ready for making the Upma.
  2. On the kadai , add Olive oil first. When its heated, add mustard seeds, jeera, asafoetida, urad dal ( Ullutham Paruppu ), channa dal ( kadalai Paruppu/senaga pappu) , red chilly, curry leaves, hing ( asafoetida) one by one.
  3. After tempering is done, add the cut onions into the mixture. Slightly fry the onions with a pinch of salt to quicken the process.
  4. Then, add the green chillies and tomato pieces into the kadai. Let the mixture cooks on a medium flame till the tomato pieces fully cooked and mashed.
  5. Add all the cut vegetables into the kadai. Fry all the ingredients on medium heat till the vegetables get slowly fried, cooked and reduce little bit in its quantity.
  6. Don't add any water while frying the vegetables. Cover the lid and let it cook slowly.
  7. After 4-5 minutes, add 2 cups of water into the kadai.
  8. Add salt to taste and a pinch of sugar into the kadai and close it. Let the vegetables get cooked and when the water boils, add the roasted vermicelli into the boiling water slowly.
  9. Keep the heat on low flame while adding the vermicelli / semiya to the boiling water.
  10. Mix everything in the kadai thoroughly and close the lid for the semiya to cook.
  11. After 3-4 minutes, open the kadai and stir it nicely and check if the vermicelli / semiya is cooked uniformly.
  12. Stir it for 2 more minutes and switch off the heat. Let it cools down for couple of minutes and it will be ready to serve.
Tips
Don't add more water while making this upma. It will make the upma very pasty and spoil it.
Allow the tomatoes to get cooked and mashed fully so that the tangyness of the tomatoes spread equally in the upma.

Variations
You can add any other vegetables you like into this upma. ( Only the ones which we use for Veg Biryani).
You can even substitute peas with groundnuts in this upma. ( Depends on availability and your taste ).

Monday, April 25, 2011

Brinjal Mor Kuzhambu ( Buttermilk Stew / Majjiga Pulusu ) / Mor Kuzhambu


Mor Kuzhambu is one of the most important gravy in any South Indian Meal. Especially in Tamil Nadu, Mor Kuzhambu is widely seen during all special occasions.  We always prefer to have a side of Mor Kuzhambu in any form in our meal at home as its our alltime favourite. There are so many ways to make this Mor Kuzhambu/Buttermilk Stew/Majjiga Pulusu). You can add any vegetables like Brinjal, Drumsticks, White Pumpkin, Chow Chow ( or any watery vegetable), even zuccini, paruppu urundai,etc.,

Ingredients
Brinjals - 2 Medium
Turmeric Powder - 1 tsp.
Hing ( Asafoetida ) - 1 tsp.
Thick Curd - 2 Cups.
Olive Oil - 1 tbsp.
Salt - To Taste.

For tempering
Mustard Seeds - 1 tbsp
Jeera - 1 tbsp
Urad Dal - 1 tbsp
Channa Dal - 1 tbsp
Curry Leaves - 5 or 6 ( if you have)
Red Chillies Dry - 2 Medium

For Grinding
Fresh Coconut - 1/2 Cup
Jeera - 2 tsp
Ginger - 1 small cube
Green Chillies - 3 Medium Ones
Coriander Seeds - 2 tsp


Method
  1. Grind the ingredients as mentioned above with little curd and keep it aside.
  2. Wash the brinjals and cut it into small pieces.
  3. On a vessel, add the cut brinjals, turmeric powder, Hing ( Asafoetida ), little salt for the vegetables in water and let it cooks till its softer.
  4. When its fully cooked, add the grounded mixture into the vessel. Add required amount of salt, remaining curd into the kuzhambu vessel.
  5. Mix it properly. Check to see if there are any bubbles coming out on the top layer of the kuzhambu.
  6. If you see those, immediately switch off the heat. Keep the Mor Kuzhambu vessel out of heat totally.
  7. Meantime, add the ingredients for tempering. When tempering is done, pour them over the Kuzhambu.
  8. Mix everything once again. Mor Kuzhambu is now ready for serving. It goes well with any Paruppu Usili, Mint Thogayal or any thogayals, any spicy powder rice.
Tips
Switch off the heat at the right time when you notice small bubbles coming out on the top layer. If you miss that, Mor Kuzhambu becomes watery in consistency and it spoils the yummy taste of it.

Murungai keerai Paruppu Usiliyal ( Drumstick Leaves Dal Fry )


Murungai Keerai ( Drumstick Leaves ) is a significant source of  beta-carotene, Vitamin C, protein, iron and Potassium. Its widely used in the Siddha Medicine in India. So, a combination of this rich drumstick leaves and high protein dals ( Paruppu) will be one healthy side in a meal.
Looking at these drumstick leaves in one of the Indian groceries in California, i decided to buy more and try out different dishes here at home. First I tried the "Murungai Keerai Paruppu Usiliyal" , a recipe from my Mom.
Ingredients
Drumstick Leaves  -  1 Big Bunch. ( Leaves would come for 4-5 cups fully ).
Toor Dal ( Thuvaram Paruppu / Kandhi Pappu ) -  1/2 cup
Moong Dal (  Payatham Paruppu / Pesara Pappu ) - 1/3 cup
Channa Dal - 2 tbsp
Urad Dal - 2 tbsp
Red Chillies Dry - 5 Medium Size
Hing ( Asafoetida ) - 2 tsp
Olive Oil - 4-5 tbsp.
Salt - To Taste.
Turmeric Powder - 2 tsp.

For tempering
Mustard Seeds - 1 tbsp
Jeera - 1 tbsp
Urad Dal - 2 tsp
Curry Leaves - 7-8 ( if you have )
Red Chilly Dry - 1 Medium

Method
  1. Soak the Dals ( all paruppu/pappu) in water for 40 mts first. After 40 mts, drain all the water from the dal. Grind it with red chillies , little hing , very little water to make it pasty.  Keep the paste aside.
  2. Remove the drumstick leaves from the stem carefully. Wash the leaves and cook it in the microwave for 3-4 minutes till its cooked.
  3. On medium heat, add oil first. When its heated , start adding the ingredients for tempering one by one.
  4. First add the grinded dal mixture into the kadai. Mix it in the tempered oil slowly.
  5. Add 2 tsp of turmeric powder and some salt into the dal mixture now.
  6. Stir the dal mixture from top to bottom for 1-2 minute and close the lid. Let it cook on medium heat for few minutes.
  7. During this process, keep stirring the dal mixture so that it does not stick to the bottom of the kadai. Generally due to steam it wont stick to the bottom.
  8. When you feel that the dal mixture is cooked three fourth, add the cooked drumstick leaves into it. Mix the leaves and paruppu mixture thoroughly.
  9. Add some more salt and close the lid for 3-4 minutes on medium heat.
  10. Then, keep the lid open and fry for few more minutes ( 5-6 minutes ). Keep stirring the mixture constantly and patiently.
  11. Switch off the heat when you feel that the veg-dal mixture is cooked and slightly fried. You can make out easily as the leaves and the dals become separate and wont be that pasty. It will look like a sundal.
Variations
You can also steam the Dal Mixture ( Grinded Paruppu Mixture ) in Idli cooker and add it while making the vegetable. In this way, the dish will get done quickly and also with less oil, less effort. But today i wanted to try it in this way.
You can choose the Paruppu / Pappu / Dals in the Usiliyal Mixture. We always try to avoid having more channa dal in this mixture.

Tips
You can add some red chilly powder if you feel that the usili is not spicy enough.
You can steam the Dal Mixture instead of slowly cooking the Dal Mixture in the kadai itself.

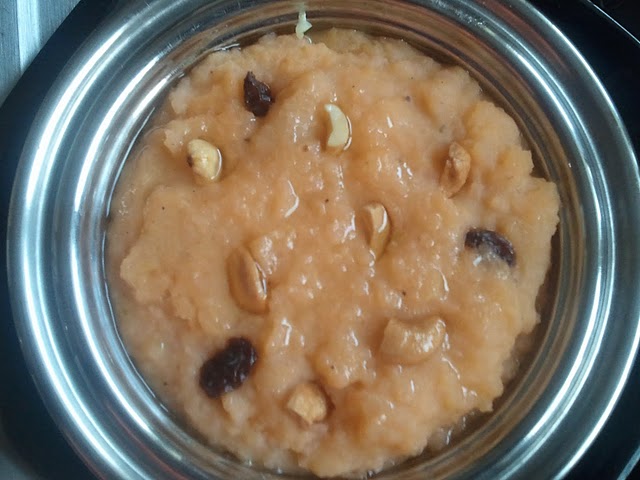
Ashoka Halwa

After having an enjoyable, relaxing, sweet week in california with one of our best friends family, back to the blog again. Thanks friends, visitors again for visiting this blog and your comments are highly appreciated.
Today I am going to write about "Ashoka Halwa". Its the first food i made in my lifetime!!! ( Not even coffee or tea and I made it in 9th std with my friend after bunking school for half a day). A small hot packet of Ashoka Halwa which my mom used to bring for us from tiruvaiyuru really took my heart. It became my most favourite sweet since childhood. Tiruvaiyaru ashoka halwa is known for its unique taste and nothing can beat the originality of it. You would have come across this sweet if you have attended any marriages around thanjavur district.
Here comes my version of Ashoka Halwa to you.

Ingredients
Moong Dhal ( Payatham Paruppu / Pesara Pappu) - 1 Cup
Wheat Flour - 1/4 cup.
Sugar - 1 Cup ( More or less depending on your taste).
Elachi Powder - 2 tsp.
Kesar food colour - 1/2 tsp.
Ghee - 1/2 cup. ( For low calorie, add only 1/4 cup).
Milk - 1/2 cup.
Method
  1. Cook the Moong dhal ( Payatham Paruppu / Pesara pappu) with milk and water in a pressure cooker for 4-5 whistles till it becomes tender and softer.
  2. Slightly fry the whole wheat flour on a kadai with very little ghee and keep it aside.
  3. Open the cooker now and mash the dhal perfectly without any lumps. Add powdered sugar and food colour to the dhal, stir it continously.
  4. Slowly add spoons of ghee on the sides while stirring.
  5. After it melts, add the elachi powder for good flavour.
  6. Also, add the light fried wheat flour into the kadai and stir everything continously.
  7. Keep adding spoons of ghee in the middle and stir the mixture till it comes to a thicker consistency like a halwa.
  8. Add the remaining ghee and decorate it with cashew nuts. Let it cool for sometime and then taste it.
Variations
Generally i add milk while cooking moong dhal, you can avoid it if you dont like the taste of it. Amounts of sugar and ghee can vary depending upon your taste, weight, calorie counts.
Tips
Switch off the heat when the halwa mixture is almost nearing the halwa consistency. Dont stir the halwa mix till it becomes hard. When it gets cooled, automatically it gets little thicker. If you have a good quality dal / Paruppu, it tastes very good.

Friday, April 15, 2011

Kesar Pongal

Kesar Pongal is a pongal with good flavour, colour and taste. It reminds me of the pongal which was served in one of the perumal temples in NY state.
Ingredients
Rice - 1 Cup
Moong Dhal / Payatham Paruppu / Pesara Pappu - 3/4th of a cup
Kesar food Powder - 1 pinch ( If you have saffron, add 1 tsp of saffron)
Sugar- 3/4 th of a cup.
Elachi powder - 1 tsp
Crushed Pista Powder - 1 tbsp.
Pacha Karpooram / Borneo camphor in english - 1 pinch.
Ghee - 2 tbsp.
Cashew Nuts - 1 tbsp.
Method
1. Wash the dal and rice and cook in a pressure cooker for 3-4 whistles. Add 5 cups of water and cook it on a medium flame. Add a pinch of kesar food powder or 1 tsp of saffron to the mix before cooking.
2. After it cools down completely, open and mix it thoroughly.
3. Add powdered sugar, elachi powder, crushed pista powder,pacha karpooram at this point. Stir continously so that no lumps are formed, it does not get stick to the bottom.
4. Cook everything on a low flame at this point.
5. Add ghee and roasted cashew nuts to the pongal now.
6. Mix again and the kesar pongal is now read for neivedhyam.
7. Before serving, just pour little ghee on top of the kesar pongal.

Variations
I prefer not to add milk in this pongal, as it already has heavy dal in it.
You can add milk in your process if you like it that way.

Also, amount of ghee and sugar can vary based on your sweet tooth.

Thursday, April 14, 2011

Iniya Puthandu Nal Vaazhthukkal - Happy Tamil New Years Day

Anaivarukkum En Iniya Puthaandu Nal Vaazhthukkal.

Venn Pongal

I can only think of the hot Venn Pongal which I got it on my hand during the Maargazhi Month when we went to sing "tirupaavai/tiruvempaavai" songs in one of our temples in my hometown Thanjavur. It was very hot, tasty even without ghee and cashewnuts. Early in the morning ( before 6 am!!!), we used to go there, sang and got these prasadams. Apart from that,I can only relish and enjoy the pongal which my grandma and mom made for us. My grandma was an expert in this and I remember her making this pongal even at her 86th age.

Ingredients
Rice - 1.5 Cups.
Moong dal / Payatham Paruppu/ Pesara Pappu - 3/4 th of a cup.
Asafoetida - 1 tsp.
Mustard Seeds - 2 tsp.
Jeera - 3 tbsp.
Black Pepper - 2 tsp.
Black Pepper crushed - 1 tbsp.
Curry Leaves - 4 or 5 ( if you have...)
Salt - 1 tbsp.
Ghee - 2 tbsp.
Olive Oil - 2 tbsp.
Cashew Nuts - 2 tbsp.

Method
1. On a thick bottomed pressure pan, add 1 tbsp of ghee first and heat it on a medium flame.
2. Then, add the washed Moong dal / Paruppu into the ghee and fry it till you get a mild aroma.
3. Immediately add the washed rice, 2 tbsp of jeera seeds, asafoetida little and enough salt to the vessel.
4. For 1.5 cup of rice, 3/4 th of a cup of Moong dal, add 5.5 cups of water to the pressure pan.
5. Mix everything thoroughly and let it cook for 4-5 whistles on medium flame.
6. Swtich it off and let it cools down completely.
7. In the meantime, in a small tadka pan, add the remaining 1 tbsp of ghee now.
8. Add 2 tbsp of oil too and heat it. When its heated add mustard seeds, remaining jeera seeds, black pepper seeds, crushed black pepper, curry leaves, cashew nuts slowly into the oil.
9. Saute everything for 1-2 minutes and after they sputter, switch off the stove.
10. Add the grated ginger into the tadka mix.
11. Open the pressure pan and see if the rice-dal mixture is cooked completely.
12. Add the tadka into the pongal and mix everything thoroughly.
13. Now the pongal is ready for Neivedhyam and also for your tiffin. It can be served with a good sides like tomato chutney, Brinjal Kotsu, coconut chutney, Plain Sambar.

Variations
You can add little more ghee in place of oil if you are making it for kids.
I prefer to add enough water to cook in the beginning itself. In that way, pongal is moist and texture of the pongal is not very hard to swallow. It tastes closer to temple pongal i feel.

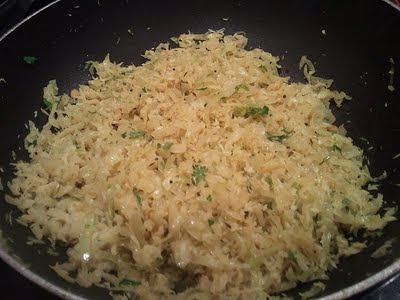
Cabbage Poriyal / Cabbage Fry


Cabbage being an excellent source of Vitamin C, is also a low calorie food. Also, cabbage is highly recommended for slowing down growing cancer cells.

Many people does not show interest in this curry. They even show their disappointment if its included during any special meal or parties. But if
the curry is made with good care, it can be made more attractive and tastier
too.

Ingredients
Cabbage - 4 cups nicely cut into thin slices.
Shredded coconut - 1/4 cup.
Mustard seeds - 2 tsp.
Jeera - 1 tsp
Urad dhal - 1/2 tbsp
Channa Dhal - 1/2 tbsp
Curry leaves - 4 or 5.
Coriander leaves - 1 tbsp.
Turmeric Powder - 1/2 tsp.
Salt - To taste.
Green chilli Paste - 1 tsp.
Ginger - 1/2 tsp ( nicely grated)
Olive Oil - 1 tbsp.
Asafoetida / Hing - 1/2 tsp

Method
1. Cut the cabbage into thin slices or in any shape you desire.
2. Wash and drain the cut cabbage and keep it separately.
3. On the kadai, add olive oil and heat it. Add asafoetida/hing, mustard seeds, jeera into the heated oil.
4. When it sputter, add urad dal, channa dal, green chilli paste, curry leaves ( if you have) to the oil.
5. After sauting for a minute, add some turmeric powder into the oil itself.
6. Finally add the cabbage into the kadai. Mix it thoroughly and sprinkle some water into the kadai and close it.
7. Let the veggie mix cook for 3-4 minutes on a low flame.
8. Sprinkle some more water in the middle if its not fully cooked. But dont overcook cabbage, dont make it mashy like a halwa. This will ruin the taste and texture of the cabbage curry.
9. Add salt and grated ginger at the end and mix it. Let it remain in the stove for another minute.
10. Open the lid and see if you are able to see the cabbage slices separately. If so, then add the shredded coconut to the veggie mix and (As curry leaves are rare here, i added coriander leaves to the curry.)
12. Now the cabbage curry is ready to be served in a meal.

Variations
You can add fresh peas or grated carrots to the curry for better taste, for better colour. It will make it look richer on special occasions.

Wednesday, April 13, 2011

Pasta in Spinach Almond Gravy

Instead of having the regular food for lunch, I made a healthy, wholesome pasta which is an all time favourite for my kids. With some nutrient vegetables and with a tasty supporting gravy, we can enjoy pasta anytime during the day. It would be heavenly if you have this wholesome pasta with a side of a yummy smoothie.

Pasta in Spinach Almond Gravy with mixed fruit smoothie - Lunch on a spring day.


Ingredients
Mini farfalle Pasta - 2 Cups
Yellow Onion - 1/4 cup
Broccoli florets - 12 small florets
Peas - 1/4 cup
Carrots - 1/4 finely cut into cubes
Olive Oil - 4 tbsp.
Salt - To Taste.
Italian Seasoning Powder - 2 tsp.
Shredded Cheese - 2 tbsp.
Gouda Cheese - 1 tbsp.

For Grinding
Spinach - 1 cup.
Tomato - 1 medium.
Black pepper - 1 1/2 tbsp.
Garlic Pods - 3
Almonds - 8.

Method
1. Cook the pasta with little Olive oil and salt in a separate vessel and keep it ready.
2. Similarly cook the vegetables ( broccoli,peas,carrots ) in microwave separately and keep it ready.
3. In the kadai, on a medium flame, start adding onions, cooked vegetables and saute it in Olive Oil for 2-3 minutes.
4. Add the grounded mixture onto the kadai and add salt, Italian seasoning powder and mix it perfectly.
5. Stir the mixture for another 4-5 minutes till the raw smell of the gravy goes off.
6. Add shredded cheese to the pasta and switch off the stove.
7. On top of the pasta, grate some Gouda cheese if you have and mix it perfectly.
8. While serving, add some Parmesan cheese on top of the pasta.

Variations
You can add more pepper powder if you want it little more spicy. Sometimes, after adding cheese it might reduce the spiciness of the pasta.

Tuesday, April 12, 2011

Healthy Soya Beans Sundal

Soy beans are considered to be a good source of complete protein. Consuming Soy reduces the rish of having colon cancer. Benefits of this tiny soyabean is countless. So, to have a healthy evening snack as well as a good neivedhyam for RamaNavami, I prepared the Soya bean Sundal.

Happy RamaNavami Day.

Ingredients
Soya Beans - 1 Cup.
Mustard Seeds - 1 tbsp.
Jeera Seeds - 1 tbsp.
Asafoetida ( Hing) - 2 tsp.
Red Chilly - 2 Medium Size.
Salt - To Taste
Olive Oil - 1 tbsp.
Curry Leaves - 3 or 4.
Coriander Leaves - Little to garnish.
Coconut Shredded - 4 tbsp.
Grated Ginger - 1/2 tbsp.
Green Chilli Paste - 1 tsp.

Method
1. Soak the Soya Beans in water for 2-3 hours.
2. Cook the soya Beans with little salt in the pressure cooker for 3-4 whistles. Let it cools completely.
3. To the kadai, add mustard seeds, jeera to the Olive Oil. After it sputter, add
red chillies,curry leaves, asafoetida to the oil. Then add green chilli paste, grated ginger to the oil mix.
4. After few seconds, add the cooked soya beans into the kadai. Add little more salt to the soya beans and mix it thoroughly.
5. After 2-3 minutes, add the shredded coconut into the mixture and mix it.
6. Switch off the stove and a healthy neivedhyam is ready now.

Mushroom Mutter Paneer Masala


Mutter Paneer is one of the favourite side dishes for chappathi at home and my daughter loves that even if its given separately. But introducing mushroom into her paneer dish is difficult but still i was very firm to made her eat Mushroom too as it has very high protein in it. At the end, the dish came out very tasty and she was unable to filter the mushrooms from the dish.

Ingredients
Paneer - 12 oz Bar cut into cubes.
Jeera Seeds - 1 tbsp
Cinnamon Sticks - 1 medium
Kasuri Methi ( Dry Methi Leaves ) - 1 tsp
Ginger Garlic Paste - 2 tbsp.
Mushroom - 15 medium size ( Cut into halves)
Peas - 1 Cup.
Oil - 4 tbsp.
Salt - To Taste.
Sugar - 1 Pinch.
Turmeric Powder - 2 tsp.
Red Chilli Powder - 1 tbsp.
Coriander Powder - 1 tbsp.
Garam Masala Powder - 1 tbsp.

For Grinding
Tomatoes - 2 Medium size
Onion ( Yellow or Red) - 1 Big One
Coriander Leaves - 4 or 5 stems.
Lavang( Cloves ) - 2
Cinnamon Sticks - 2 Medium ones.
Green Chilly - 1 Medium.
Dry Almonds ( Badam ) - 7 or 8.
Cardamom Seeds ( Elachi ) - 1.


Method
1. On the stove, add olive oil and slowly add the ingredients one by one to the kadai for sauting before grinding it.
2. I prefer to slightly fry the ingredients before actually grinding them as it gets cooked quickly and the gravy comes out of the raw smell quickly.
3. Next, add the cubed paneer into the kadai and shallow fry the paneer cubes and keep it separately.
4. On the kadai, then add jeera seeds, cinnamon stick, ginger garlic paste and fry nicely till the raw smell completely goes off.
5. Add the mushroom and peas to the kadai and fry for 1-2 minutes.
5. Then add the grinded mixture into the kadai.
6. Add the turmeric powder, chilli powder, coriander powder, garam masala powder into the gravy now.
7. Add salt and pinch of sugar to the gravy. Mix all the contents thoroughly and let it simmer for 5-6 minutes on a low flame.
8. Open the lid and let the dish cook on a medium flame openly till you get a very nice aroma of Mushroom and the gravy together.
9. Finally add the paneer cubes into the kadai.
10. Cover it with the lid and let it cook for 1-2 minutes. Then, switch it off.

Tips
Generally I substitute coriander leaves with the preserved coriander stems for grinding which gives a nice aroma to any gravy.
Keep the pudina stems, coriander stems even the methi stems in the fridge. While grinding for a gravy, we can add those stems along with other ingredients. Surely the gravy tastes good and with an excellent flavour.

Variations
For making a very rich tasty gravy for parties, get-togethers, you can substitute almonds with cashewnuts as the grinding ingredient.
To have a restaurant finish, add 1 tbsp of low fat fresh cream into the kadai at the end.

Monday, April 11, 2011

Kathirikai Kalyana Curry / Brinjal fry / Vankaya Fry


Brinjal ( Kathirikai/Vankaya) is one of the special vegetables and is mostly made on special occasions in a very delicious way. I like this special type of Brinjal fry which is served in marriages mainly in "Maapillai Azhaippu".

Ingredients
Brinjal - 12 ( Small or Medium size)
Turmeric Powder - 1 tsp
Asafoetida - 1 tsp
Salt - 1 tbsp ( Enough to taste).
For grinding
Channa Dal ( Kadalai Paruppu / Senaga Pappu) - 4 tbsp
Coriander Seeds - 3 tbsp
Red Chillies - 5 or 6 ( Medium ).
Coconut Shredded - 2 tbsp.
For tadka
Mustard Seeds - 2 tsp
Jeera - 1 tsp
Urad dal - 2 tsp
Curry Leaves - 1 bunch ( 7 or 8 ).
Method
1. Wash the brinjals and cut each brinjal into 4 halves and put it in a bowl of water.
2. On the stove, put the oil and add the ingredients one by one for tadka.
3. Then, add the brinjal on the oil and fry for 1-2 minutes.
4. Add the turmeric powder and salt to the brinjal.
5. Add little water and cook the brinjals till its cooked nicely. Make sure that the brinjals do not become too soft or mashy.
6. Meantime, grind the powder and keep it ready.
7. To the cooked brinjal, add the grinded powder and fry the curry for 5-6 minutes.
8. This brinjal curry serves as a good side dish with rice, chappathi.
Variations
You can add some chilly powder separately if you want to have more spicyness ( karam) in the curry. But I prefer to have the karam in moderation so that the curry shows all the tastes and flavours equally.

Friday, April 8, 2011

Corn Cheese Quesadilla


Ingredients
2 Corn Tortillas or 2 Whole wheat chappathis.
4 tbsp low fat shredded chesse ( depending on the size of tortilla/chappathi).

Method
Fry the corn tortillas on both sides. Or make two normal whole wheat chappathis and keep it. On the stove, keep one tortilla/chappathi first. On top of it, spread the shredded cheese uniformly on the surface. Then keep the other tortilla or chappathi and stick the corners of both the tortillas/chappathis together. Naturally the cheese would slightly melt in the corners and get sticked automatically. Turn both sides equally for 1-2 minutes till the cheese inside gets melted. All this process should take place on a very low flame only. Cut the quesadilla into four equal parts and serve it with a healthy vegetable sidedish.

Broccoli Cheese Melt

Broccoli, the green colour cauliflower also called as the "flowering top of a cabbage" is high in Vitamin C and dietary fiber. It also contains multiple nutrients with lots of anti-cancer properties in it. Kids generally refuse this vegetable if given separately or as a curry. Some kids love broccoli in any form you give. My daughter aditi loves this vegetable in any form. But I like to make some delicious dish out of broccoli for her. So, i decided to try this out.
Today I served this side dish with Corn Cheese Quesadilla for lunch.


Ingredients
Broccoli Florets - 20 or 25 small florets.
Salt - 1 pinch
Black Pepper Powder - 1 small pinch
Low fat shredded cheese - 5 tbsp.

Method
1. Wash the broccoli and spread it on a small plate nicely after its dried.
2. Cover the broccoli tray with another plate.
3. Steam or cook the broccoli in the microwave for 4-5 minutes.
4. Take it out of the microwave and sprinkle salt,pepper powder on the broccoli.
5. Finally sprinkle shredded cheese on top of the broccoli florets.
6. Keep the plate in the microwave for 50-60 seconds till the cheese gets
completely melted on the top and look like a broccoli pizza.
7. Let it cool and serve as a healthy side dish to your kids.

Spicy Tomato Rasam / Chaaru

In winter, most of the time we try to have this Spicy tomato rasam in our meal. Flavour of ripe tomatoes with the mix of spices gives us a special treat to the throat and makes us stay away from unnecessary cold.
During my childhood, no meal was complete without rasam in the menu.

Ingredients
Cooked Toor Dal - 4 tbsp.
Tamarind Juice - 1/2 Cup.
Turmeric Powder - 1/4 tsp.
Asafoetida - 1 tsp ( for excellent flavour).
Salt - 1 tbsp.( Add to your taste, i generally add little less in my dishes.)
Sugar - 1 pinch.
Sambar Powder - 1.5 tbsp
(I have a luxury of getting this sambar powder from my mom from India).
Good Ripe Tomatoes - 2 medium sized.
Coriander Leaves - Little to spread it on top of rasam.

For grinding :
Black Pepper Seeds - 1.5 tbsp.
Jeera - 2 tbsp.
Coriander Seeds - 1 tbsp.
Red Chilly - 1 Medium size.

For Tadka :
Mustard Seeds - 1 tbsp
Jeera - 1 tsp
Asafoetida - Little
Curry Leaves - 5 or 6.
Red Chilly - 1.

Method :
1. Cook the toor dal, mash it and keep it separately.
2. On a thick bottomed vessel, add the tamarind juice extract without any dust or pieces.
3. Add turmeric powder, asafoetida, sambar powder, salt, sugar to the juice.
4. Add some water to this mixture and cover it.
5. Let it boil for sometime till the rawness of tamarind goes away.
6. Add the cut tomatoes into the mixute and also the add the grinded powder.
7. Let it cook on a medium flame for five minutes.
7. Add the cooked dal water into the rasam mixture.
8. Close the lid and reduce the flame greatly so that a layer of foam forms at the top layer of the rasam.
9. Switch it off and add the tadka to the rasam mixture.
10. Finally add the crushed coriander leaves into the rasam.

It can be given in a small glass as an appetizer in get-togethers, parties.

Tips
My Mom always says that the rasam has to be taken out of the stove after a complete layer of foam is formed. It tastes great with that and I experienced that personally.

Thursday, April 7, 2011

Ugadi Pachidi

On the day of Ugadi,after we all pray to god, the first prasad we take is the Ugadi Pachidi. Ugadi Pachidi is made out of things that are of different tastes. I always like the freshness of Neem leaves, flowers while making the Ugadi Pachidi. Here in US, we dont get the fresh flowers, so we finally end up using the dried neem flowers for the pachidi.
Ugadi pachidi has 6 tastes ( Sweet, Salt, Spicy, Bitter, Tangy, Sour) in it which in turn signifies the different emotions in human life.
In our house, we add the following ingredients for our ugadi pachidi. It might differ slightly in other households but the pachidi will definitely have all the different tastes in it.


Ingredients
1 Raw Mango - Finely cut into very very small thin cubes.
1/4 Cup Jaggery - Finely Crushed or grated.
1 pinch - Chilly Powder
1 pinch - Salt
2 Medium Size ripe Bananas - Nicely cut into small small cubes.
1/4 cup - Putnalu Pappu / Pottu kadalai / Roasted gram.
( Soak the Roasted gram in water for few minutes before adding).
1 Cup - Tamarind Juice. ( With mild tamarind flavour).
4 tbsp - Fresh Neem Flowers or Dried Neem Flowers

Procedure
Soak Tamarind in water first. Simultaneously, cut the raw mango and bananas. Soak the Roasted gram into water for sometime. Start adding the ingredients into a medium sized vessel easy to stir and mix. Add the banana cuts, raw mango cuts, jaggery followed by the tamarind juice, salt, chilly powder, roasted gram. Mix everything thoroughly so that the jaggery gets totally dissolved in the juice. Finally add the Neam flowers into the pachidi. Our ugadi pachidi is now ready for Neivedhyam.

Tuesday, April 5, 2011

Ugadi Bhojanam - 2011

Good Bhojanam always fills your stomach and melts your heart. We too had an awesome, yummy bhojanam at our house on Ugadi Day. I will post the recipes of the Ugadi dishes which i made in my next posts.


Menu in Order : Methi Tomato Pappu, Spicy Tomato Charu, Vankaya Masala, Aratikaya Aavalupettina Koora, Puliodara with Aavalu Flavour, Maamidikai Cobbari Pachi Pachidi, Spicy Tomato Pachidi, Bobbatu, Garelu ( Vada), Paramannam, Ugadi Pachidi.

Ugadi Shubakankshalu


Wish you all bloggers a very Happy Ugadi.

Sunday, April 3, 2011

Coriander Rice \ Kothamalli Sadam - With Onions


Ingredients:

Sona Masoori Rice - 2 Cups
Fresh Coriander Leaves - 1 Bunch
Tomato - 1 medium Size.
Onion - 1/2 medium size finely chopped
Green chillies - 1 Medium
Garlic - 4 big Ones finely crushed and pasted
Turmeric Powder - 1 tsp
Chilli Powder - 1/2 tsp
Coriander Powder - 1 tsp
Asafoetida - 1 pinch
Peas - 1/4 cup
Salt - To taste
Sugar - 1 small pinch. ( To enhance the taste ).
Olive Oil - 4 tbsp.
Mustard Seeds - 1 tsp
Jeera - 1 tsp
Urad dal - 1/2 tsp

Procedure :

First grind the washed coriander leaves, 1 green chilli, 1 tomato into a fine paste and keep it separately.( I added few pudina leaves too as it was in my fridge for more time.)

On the kadai, add olive oil first. Add mustard seeds, jeera, asafoetida, urad dal one by one. After it starts spluttering, add crushed garlic. Fry properly so that the raw smell of garlic completely goes off. Then, add onion and fry for 2 minutes.
Add the coriander paste from the mixie jar now to the kadai. Mix everything and fry for 2-3 minutes. Then, finally start adding the powders, salt, sugar. Mix everything and add the washed sona masoori rice into the kadai and mix everything together. Transfer it to a big rice cooker if you have. For 2 cups of rice, add 4.5 cups of water. If the coriander paste is too watery, then the coriander rice will be too pasty. So, add water accordingly. Keep it on the stove for 2 whistles. Let it cool down completely.

Open it after it cools down completely. Serve it with raita and little potato chips.

There are so many methods to prepare coriander rice. You can add a powder made out of 1 red chilli, coriander seeds, little coconut, channa dal to the rice finally and cook it with that powder, this in turn will make the rice little more spicy. This method is purely easier and no extra powders are added. In my next recipe, i will write down how to make coriander pulav.

Tips : Dont make the coriander paste too watery. Add water appropriately so that the rice comes out separately and not pasty.

Friday, April 1, 2011

Tomato Thokku/Tomato Pachidi

Ingredients:

Big Ripe Tomatoes - 20 or 15
Tamarind juice - 1/4 cup ( thick )
Fenugreek Powder - 1/4 teaspoon
Chilly Powder - 1/4 Cup
Asafoetida - 1/2 tbsp.
Sesame Oil ( Nalla Yennai) - 2 tbsp.
Olive Oil - 4 tbsp.
Salt - To Taste ( Use 5 tbsp ).
Sugar - 1 pinch for taste.
Mustard Seeds - 1tsp

Method
I was tempted to see big ripe tomatoes on sale yesterday in one of my favourite farmer's market. Wanted to try out my most favourite tomato thokku pachidi. First, wash the tomatoes nicely and wipe the skin with a tissue, making it dry. I followed the pot stove simmering method for doing this thokku. Cut all the tomatoes into small pieces. On the stove, add the oil. Add the mustard seeds first to oil and then add tomato pieces, asafoetida, all the powders, tomato extract and mix it properly. Cover the lid and let it cook in medium. After 10 minutes, open the lid and see of the tomatoes are totally cooked and it would come to a mashed pasty stuff with all the powders. Stir it again and continue the process until it gets to one third of its quantity. Trust me, if you do the procedure with little patience and interest, it will come out very tasty. After its done totally, let the thokku cools down completely. Then store it in a dry glass jar.


It will go with plain rice,as a good side dish for Idly, Dosas, chappathi.

LinkWithin

Related Posts Plugin for WordPress, Blogger...