Friday, January 27, 2012

Celery Thogayal / Celery Pachidi / Celery Chutney


Celery Chutney/Thogayal/Pachidi was made only due to the unavailability of my regular chutney items like coconut, tomato, groundnuts, onion..at home. .All I had was only few bunches of Celery and Coriander stems which i stored in the refrigerator..And I very badly need to make some good healthy chutney for my Pongal and Dosa for the day..So, I decided to make use of  these Celery Sticks which have very less calories and more dietary fiber and they are highly recommended for weight loss. Though its best to eat raw Celery Sticks, this time I used them in our regular cuisine. The Chutney was really tasty but it would be an excellent side for our Idlies. Try to substitute this chutney during breakfast time with your regular chutney and enjoy this healthy chutney with any South Indian Tiffin items. Your comments and suggestions are welcome.
Ingredients
Celery Sticks - 1 Full Bunch ( Cut Celery Sticks come up to 3-4 Cups )
Coriander Stems - 1 Cup
Green Chillies - 2
Ginger - 1 Small Square
Red Chilli - 1
Tamarind - 1 small square
Jaggery - 1 tsp
Salt - To Taste
Hing / Asafoetida - 1 Dash
Mustard Powder - 2 tsp
Gingelly Oil - 1 tbsp
Mustard Seeds - 2 tsp
Urad Dal - 1 tsp
Curry Leaves - 4 or 5.
Method
  1. Wash the coriander stem, celery sticks and cut them into pieces.
  2. Grind them raw with green chillies, red chilli, ginger, tamarind and make a coarse paste.
  3. In the frying pan, add oil first. Finish the tempering by adding little Hing,Mustard seeds and Urad dal.
  4. Pour the grounded paste and add required amount of salt to the chutney.
  5. Fry them in the pan till it becomes little thicker and comes to the chutney consistency.
  6. Good to enjoy with hot idlies, dosa, Pongal or even with Hot rice alone.
Tips/Variations
  1. As its my first trial on Celery, I don't find any tips or any variations which I could suggest at this time.You can customize in your style and try this out...But Celery is definitely an ideal choice for any cooking.

Monday, January 23, 2012

Green Capsicum Rice / Capsicum Rice

Fresh Green Capsicums sitting on the fridge was really tempting me since two days..Felt like making a spicy mixed rice for lunch as the weather was too cold and snowing..a bit. Definitely no mood to make an elaborate meal. Three fresh capsicums, little red onion and a tomato was quite enough to make this spicy rice. With a side of fresh raita or just chips or papad, this rice tastes good. We can confidently deviate from our regular menu and try this out for lunch or dinner...Also, its a good Lunchbox menu item for all ages. Try this yummy rice and let me know your feedback...
Ingredients
Fresh Green Capsicums - 2 Big or 3 Medium
Red Onion Shredded - 1/2 cup
Ripe Tomato - 1 Big
Oil - 2 tbsp
Hing/Asafoetida - 1 Dash
Mustard Seeds - 2 tsp
Cumin Seeds - 1 tsp
Urad Dal - 1 tsp
Channa Dal - 2 tsp
Curry Leaves - 1 stem
Groundnuts / Peanuts - 1 Handful
Turmeric Powder - 3 tsp
Sugar - 1 Small Pinch
Salt - To Taste
Basmati Rice - 1.5 cups
For the Grounded Powder
Channa Dal / Senaga Pappu / Kadalai Paruppu - 2 tbsp
Urad Dal / Minna Pappu / Ulutham Paruppu - 1 tbsp
Coriander Seeds - 1 tbsp
Dry Red Chillies - 4 to 5 ( Depending on your taste buds)
Dry Coconut Powder - 1 tbsp
Cinnamon Sticks - 1 medium
Black Pepper Seeds - 5 or 6
Method
  1. Wash and cook the Basmati Rice separately and keep it ready.
  2. Meantime, cut all the vegetables into smaller size and keep them ready.
  3. Roast the ingredients for making the grounded powder and grind them after they get cooled and keep the grounded powder also ready.
  4. In the cooking pan, add oil first. When its heated, add Hing, Mustard Seeds, channa dal, urad dal, groundnuts, curry leaves and fry them till they all get roasted. Do this process on a low flame and care to see that the dals and groundnuts don't turn black.
  5. After this, add shredded onion pieces into the pan and fry them for a minute with a pinch of little salt.
  6. Then, add the finely sliced green capsicums into the pan and allow them to cook for two minutes with the lid closed. Add a pinch of sugar and fry them for two minutes.
  7. Then add the tomato pieces and fry them till they get mashed.
  8. Finally add the powder and fry them well with all other contents for nearly 3-4 minutes.
  9. Add the cooked rice into the cooking pan now and add required amount of salt into the pan. Mix everything together so that the rice get coated well.
  10. Close the lid and allow the contents to get cooked on a very low flame for another 3-4 minutes.
  11. Switch off the flame. Garnish with fresh coriander leaves and serve this hot spicy rice with some raita or chips, papad.
Tips/Variations
  1. You can adjust the spice level while grinding the powder according to your taste buds.
  2. I specifically add at least one tomato while making this rice in order to get a little tangy taste and to obtain some moistness in the rice. Without tomato, the rice turned out to be little dry and the taste was also not satisfactory for me when I made it earlier. You can try with/ without tomato and decide later.
  3. Instead of dry coconut powder, you can even add some fresh coconut flakes which in turn would enhance the flavour and taste.

Friday, January 20, 2012

Cauliflower Curry / Cauliflower Poriyal - Type 2


This version of Cauliflower curry is spicy and its similar to the ones served in a vegetarian thali in restaurants.  This spicy curry / poriyal is a good choice to be considered on any special meal.
Ingredients
Cauliflower - 1 medium
Red Onion - 1 Small or 1/2 medium
Tomato - 1 Big
Grated Ginger - 2 tsp
Crushed Garlic Paste - 3 tsp
Finely cut Green Chilli pieces - 1 tsp
Oil - 1 tbsp
Hing/Asafoetida - 1 Dash
Mustard Seeds / 2 tsp
Sombu / Fennel Seeds - 1 tsp
Urad Dal - 2 tsp
Channa Dal - 1 tsp
Curry Leaves - 5 or 6
Coriander leaves - To Garnish
Turmeric Powder - 2 tsp
Red Chilli Powder - 3 tsp
Coriander Powder - 1 tsp
Salt - To Taste
Method
  1. Wash and Clean the Cauliflower florets thoroughly and keep them aside.
  2. In the cooking pan, add oil first. Finish the tempering process by adding Hing, Mustard Seeds, Sombu, Urad Dal, Channa Dal, Curry Leaves first.
  3. When its done, add the Garlic Paste, crushed ginger, onion into the Pan. Fry them till the raw smell vanishes off completely.
  4. Add the tomato pieces into the pan and allow them to cook for a minute with the lid closed.
  5. Mash them when its done and finally add the cauliflower florets into the kadai.
  6. Add the turmeric powder to the florets and allow them to cook for few minutes with the lid closed on a medium flame.
  7. When the florets are cooked enough, add all the powders and required amount of salt into the pan and mix them well.
  8. Fry the contents of the pan uniformly on all sides for another 4-5 minutes.
  9. Switch off the flame and garnish with coriander leaves and serve.
Tips / Variations
  1. You can microwave the cauliflower florets and add them into the pan to fasten the cooking process.
  2. You can customize the spicy powder quantity according to your taste buds.
  3. You can omit the Garlic, Ginger ingredients too while making this curry if you don't want to.

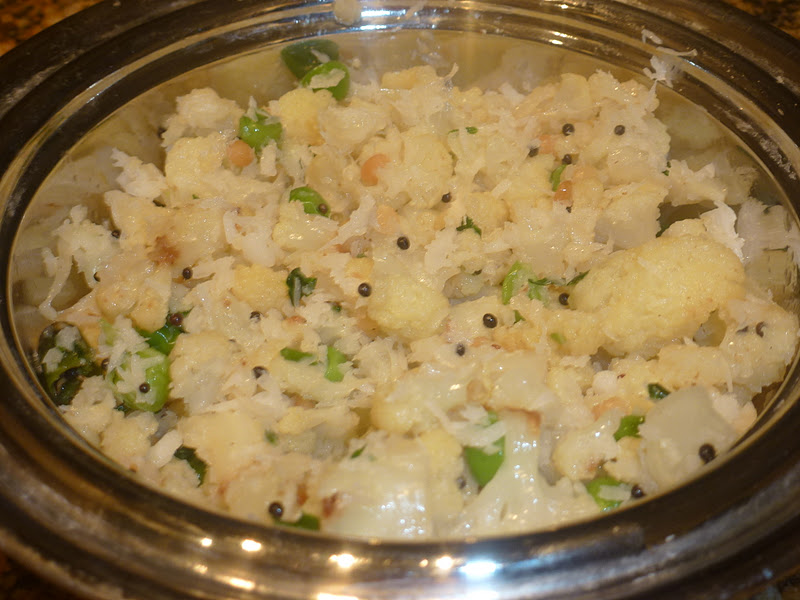
Cauliflower Curry / Cauliflower Poriyal - Type 1


Cauliflower is low-fat, low-carb but high in dietary fiber and also loaded with folate, water, vitamin C and reduced the risk of Prostate Cancer. When I got introduced to this vegetable, my mom used to make this version of Cauliflower Poriyal. We loved to grab the small trees / florets of this Cauliflower and imagine eating a small tree. Though I have been making different versions of Cauliflower Curry, Gravy and Fry, this first version always have a unique place in my favourites list. Its a simpler version but it retains the taste of the vegetable perfectly and it goes well with the meals.
Ingredients
Fresh Cauliflower - 1 medium
Green Chillies - 2 or 3  ( cut into small squares )
Fresh Coconut Flakes - 2 tbsp or 1 handful
Oil - 3-4 tsp
Hing/Asafoetida - 1 Dash
Mustard Seeds - 2 tsp
Urad Dal / Ulutham Paruppu - 2 tsp
Curry Leaves - 4 or 5
Salt - To Taste
Coriander Leaves - For Garnishing
Method
  1. Take out the Cauliflower florets from the stem and wash them thoroughly with warm water just to kill any germs or insects if present.
  2. Drain the florets and keep them ready.
  3. In a kadai / pan, add oil first. When it gets heated up, add Hing, Mustard seeds, urad dal, curry leaves, green chili pieces and fry them.
  4. Add the Cauliflower florets, peas into the pan and sprinkle very little water on its top. Cover the lid and allow them to cook for 3-4 minutes.
  5. After the cauliflower florets and peas are cooked thoroughly, add required amount of salt to it and fry them for another 2-3 minutes. Add the fresh coconut flakes and mix them well.
  6. Switch off the flame and garnish the Curry with some coriander leaves.
  7. Serve this simple and nutritious cauliflower curry along with hot rice and Sambar.
Tips/Variations
You can microwave the Cauliflower florets and Peas and then add them into the kadai to quicken the preparation process.

Paneer Mutter / Paneer Peas in creamy tomato gravy / Paneer Matar / Paneer Peas Masala

 Decided to make some yummy paneer dish for the chappathis last night but I had in mind that it should not be a high caloric dish too...Also, after burning good amount of calories in the fitness center, its not a wise decision to have more calories for dinner. So, I made this Paneer Mutter in rich creamy tomato gravy using a Low Fat Paneer Cubes, less oil and with no ghee or butter, no cream at all...Initially I thought that I might have to compromise on its taste due to my customizations but the taste was amazingly good and tempted us to grab more chappathis. I also could enjoy the dish with no guilt at all. Please see my preparations and I am sure, my friends, you would also enjoy the same and eat with no guilt.
Ingredients
Low fat Paneer Cubes - around 20-25
Frozen Peas / Fresh Peas - 3 handful
Finely shredded Onion - 3/4th of a cup
Oil - 1 tbsp
Cumin Seeds - 2 tsp
Ginger Paste - 2 tsp
Garlic Paste - 1 tbsp
Turmeric Powder - 2 tsp
Red Chilli Powder - 2 tsp
Garam Masala Powder - 3 tsp
Coriander Powder - 2 tsp
Sugar - 1 Pinch
Salt - To Taste
Kasoori Methi / Dried Methi leaves - 2 tsp
Cinnamon Stick - 1
Cardamom Powder - 1 tsp

For the Tomato Gravy
Fresh Tomato - 4 Medium
Green Chilli - 1 Big

For the Cream Gravy
Almonds - 6
Pista - Just 1 ( For good flavour )
Cashew Nuts - Just 2.
Method
  1. Make the tomato gravy paste first by grinding fresh tomatoes with a green chili and keep the puree separately.
  2. Make the creamy gravy paste ready by grinding the nuts as mentioned above with little water.
  3. In the non-stick kadai or any thick bottomed cooking vessel, add oil first. When it gets heated up, add cumin seeds followed by a cinnamon stick.
  4. Add the Garlic paste, Ginger Paste and fry them till the raw smell completely vanishes.
  5. Add the shredded onion pieces and fry along with them. When its fried enough, add the peas and all the powders except salt and fry them in the oil on medium heat for a minute.
  6. Add the tomato gravy paste into the pan and mix them well. Allow them to cook with the lid covered for about 3-4 minutes.
  7. Add required amount of salt, creamy gravy paste ( Nutty paste ) now and mix them well.
  8. Allow them to cook for another 3-4 minutes on low flame.
  9. Finally add the low fat paneer cubes into the pan and mix them uniformly.
  10. Let them to cook with the lid convered for another 1-2 minutes. Switch off the flame.
  11. Serve them after couple of minutes with hot chappathis.
Tips
  1. NO NEED to fry the Paneer cubes.
  2. NO NEED to add any ghee or Butter.
  3. NO NEED to add any cream as you substitute them with a nutty creamy paste.
  4. As we are making with less oil, keep in mind that all the contents need to be fried and cooked properly to get the desired consistency and taste.

Sunday, January 15, 2012

Sankranti / Pongal Festival Celebrations

Sankranti / Pongal Festival is one of the grand Hindu festivals celebrated during mid-January in India. Lord Surya Bhagawan ( Sun God ) is mainly worshipped on this day thanking him during the harvest time. This Harvest festival is celebrated all over India in different style and tradition but the main concept remains the same. Generally this festival is celebrated for three days starting with "Bhogi" on the first day followed by "Sankranthi" and "Kanu" on the following days.

I remember the Sankranti / Pongal which we celebrated in our hometown very well. I used to put a colourful rangoli on the open space and my father used to chant the manthras to Sun God. We ( myself and my 2 sisters )would be impatiently waiting for the prasadams which my mom made. We really enjoyed on the Kanu day with our cousins while keeping the "Kanu Pidi" on the open terrace of our house. All these memories would definitely make us happier any time.

All my dear blogger friends, you also would have celebrated Sankranti happily with your family and would be remembering all good old memories of yours too...
Bogi Pandalu Bomma Golu Decoration
On the first day of Bhogi, we set a bonfire and throw all the unwanted old things from the house which represents warding off the evil things from ourselves and welcoming good things in our lives. On the day of Bhogi, in various parts of Andhra Pradesh, they perform a special ritual called "Bogi Pandlu" for small kids. Small Kids are dressed up in their new dresses and they will be given a Aarthi and Bogi Pallu ( a mixture of Regi Pandu (goose berries), Senagalu, flowers, coins, sugarcane/sweet potato pieces) are showered on their heads in order to protect them from evil forces.  The main reason for this ritual is to get the kids good health and more prosperity.

On the second day of Sankranthi / Pongal, women would decorate the houses with flowers and put kolam/rangoli in front of the home entrance and decorate it with different colours. We offer sweet pongal / paramannam ( made out of rice and jaggery ) to the Sun God and perform a special puja. Sugarcanes are mostly used during this festival and piles of sugarcanes in the shops clearly denote the arrival of Sankranti festival.  We prepare a very huge meal on this special day using the freshly harvested vegetables.

The last day of Pongal is Kanu, which is also called as "Mattu Pongal" or "Kanum Pongal". This is the special day for girls and ladies. On this special day, sisters would perform a special ritual called "Kanu Pidi" and pray for the welfare of their brothers.  Early in the morning, they perform a special ritual called "Kanu Pidi" without taking any food. They arrange small balls of mixed rice varieties on turmeric leaves in open space..Later, the crows are expected to come and eat the food kept on those turmeric leaves. Varieties of rice would be made on this day with a side of mixed vegetable Kootu.

For Sankranti recipes, please see the link below and click on them.

Kesar Pongal

Venn Pongal

Andhra Style Pulagam
To be added soon...

Paramannam / Sweet Pongal
To be added soon...

Lemon Rice

Tamarind Rice

Coconut Rice

Sesame Rice

Wednesday, January 11, 2012

Saag Paneer / Mustard Greens Paneer Gravy


"Saag", the green leafy vegetable, also called as "Mustard Greens" is one of the healthiest choice in regular cooking. This contains more anti-oxidants and anticancer effects. Its low in calorie and an excellent source of Calcium, folic acid, vitamins and other minerals. Using this vegetable, there is a famous Punjabi dish called "Sarson Ka Saag" which is generally eaten with Corn Roti ( Makki ki Roti). I added Paneer to this dish and made "Saag Paneer" to attract my kids. Recipe is simpler with less ingredients and the process is also much simpler. As I used less oil, its bit thicker. You can customize the dish and make it in your style.
Ingredients
Saag / Mustard Greens - 1 Fresh Bunch
Tomato - 1 Medium
Red Onion - 1/2 Medium
Ginger Garlic Paste - 1 tbsp
Oil - 1 tbsp
Butter - 2 tsp
Cumin Seeds / Jeera - 2 tsp
Turmeric Powder - 1 tsp
Sugar - 1 Pinch
Salt - To Taste
Green Chillies - 3 or 4.
Garam Masala Powder - 2 tsp
Method
  1. Wash the Mustard Greens thoroughly for three times and drain the sand and other dust particles.
  2. Cut the Mustard Greens, tomato in bigger size and steam cook them in a kadai with no water.
  3. Grind them along with green chillies and keep the paste ready.
  4. On a medium flame, add oil to the cooking vessel / non-stick pan. When its heated up, add cumin seeds followed by cut red onion, ginger garlic paste. Fry them for few minutes till you completely come out of the raw smell...
  5. Add the turmeric powder, garam masala powder, pinch of sugar and stir them for another 2 minutes.
  6. Add the grounded saag paste to the vessel now and add required amount of salt to the vessel.
  7. Mix them well and allow them to cook on a low flame for 4-5 minutes. Finally add the paneer cubes into the saag and mix it well with the cooked saag masala. Cover the lid and allow the saag paneer to remain in the flame for another 2-3 minutes.
  8. Switch off the flame and add little butter or ghee on top just before serving.
Tips / Variations
  • You can shallow fry the paneer cubes instead of adding the raw cubes into the saag.
  • You can add make it in any consistency you want by adding little more water / oil.
  • In place of paneer, you can even add potato cubes and make it attractive for the kids.

LinkWithin

Related Posts Plugin for WordPress, Blogger...