Showing posts with label Soups and Salads. Show all posts

Friday, February 19, 2021

Orange Neem flower Rasam / Orange Vephampoo Rasam


I have not planned to make this rasam. Mandarin oranges which I bought from the grocery store were too sour and we were able to enjoy those little ones. Initially I thought of making orange marmalade but I dropped that idea as I did not want to use any sugar. Finally I decided to make a spicy healthy rasam using these oranges.  The sourness of these oranges perfectly substituted in this rasam and I didnt need to use any tamarind at all.  Addition of neem flowers to this rasam makes it even more balanced in taste. Nowadays, I like to add neem flowers in all my rasams as they are very good for treating stomach related problems, for treating intestinal worms, etc.,  Totally, this rasam contains the mixed taste of all the healthy ingredients and its an excellent Vitamin C booster.

Our family enjoys a cup of rasam daily as an appetizer, including my kids which in turn triggers me to try out different varieties of rasam. After I tasted, I see a slight resemblance between this rasam and pineapple rasam. With a side of  potato fry or hot rice, it tasted heavenly. Try this rasam in your kitchen and let me know your feedback. 

Ingredients

Orange Juice of  15 little Mandarins
Tomato - 2 medium
Turmeric powder - 1/2 tsp
Rasam powder - 2 tsp
Salt - As required
Water - As required
Toor dal water - 1/2 cup ( Optional )
Coriander leaves - To Garnish

For Seasoning 

Ghee - 1/2 tbsp
Hing - 1 Dash
Mustard Seeds - 1 tsp
Cumin seeds / jeera - 1 tsp
Dry red chili - 1
Black pepper powder - 1 tsp
Cumin powder - 1 tsp
Curry leaves - 3 or 4
Dried neem flower - 1 tbsp

Preparation Process

  • Peel the Mandarin oranges and extract the juice using a blender. Filter the pulp and keep the orange juice ready. Crush the tomatoes in the blender and keep the tomato pulp ready.
  • In the cooking vessel, add half a cup of water,tomato pulp, turmeric powder,rasam powder,salt and little hing. Close the lid and allow them to cook for few minutes till the raw smell goes off.
  • Add the orange juice into the vessel and allow them to cook for a minute on low flame. Add required amount of water as per your consistency. Do not boil the rasam after you add the orange juice.
  • Start the seasoning on a separate tadka pan on its side. Add all the ingredients for seasoning in the tadka pan. When its done, pour the tadka over the rasam.
  • Garnish it with coriander leaves.
  • Switch off the flame.
  • Enjoy with hot rice and a nice veggie fry of your choice. 

Tips

  • Do not boil the rasam after you add the orange juice. Switch off the flame after a minute and let the orange juice gets cooked with the existing heat.
  • I prefer to add little black pepper powder, cumin powder in the tadka. This definitely adds more flavour and punch to the rasam. This is my mom's method of seasoning especially for rasams.

Monday, February 24, 2020

Kandathippili Rasam / Long Pepper Rasam


Kandathippili Rasam / Long Pepper Rasam is one of the traditional rasam recipes of Tamil Nadu. This rasam has numerous health benefits. It helps to cure severe cold, soothes cough and it is used to cure stomach related problems and good for digestion. It increases the appetite, removes toxins from your body and boosts immunity.

My mom used to make this rasam whenever we complained of any body aches, especially after coming back home from a long trip. 

In our household, rasam is enjoyed by everyone and they all love to drink the rasam as an Appetizer.

Ingredients

For Rasam Base :

Thick Tamarind Water - 1 cup 
Hing / Asafoetida - 1 Dash
Turmeric Powder - 1 tsp
Sambar Powder - 2 tsp
Salt - As Required
Jaggery - 1 pinch
Crushed Tomatoes - 1.5 Cup
Water - As Required
Corainder Leaves - To Garnish 
Cooked Toor Dal Water - 1 cup

For Seasoning:

Ghee - 2 tsp
Hing - 1 pinch
Mustard Seeds - 1 tsp
Cumin Seeds - 1 tsp
Curry Leaves - Few


For Grinding :

Coriander Seeds - 3 tsp
Black Peppercorn - 2 tsp
Cumin Seeds - 4 tsp
Dry Red Chilli - 1
Kandathippili ( Long Pepper ) - 6 sticks


Preparation :

  • Soak tamarind in hot water for 10 minutes and extract the tamarind juice and keep it ready.
  • Roast the ingredients for making the Kandathippili powder and grind them in the mixer.
  • Add all the ingredients for making the rasam in the cooking vessel. 
  • Adjust the consistency by adding required amount of water.
  • Close the vessel and allow the rasam to boil for 4 or 5 minutes.
  • When the raw smell of the tamarind completely goes away, add the kandathippili powder, toor dal water and mix them well.
  • Allow the rasam to cook for few more minutes on medium flame till you see a frothy layer on top of the rasam.
  • Switch off the flame and do the seasoning separately.
  • Pour the tadka over the rasam vessel.
  • Garnish with crushed coriander leaves and enjoy this healthy homemade rasam with hot rice and ghee.

Tips

Try to make rasam always in "Eeya Sombu" , a pure tin vessel and enjoy. 

Sunday, February 23, 2020

Healthy Salad for Weightloss


Earlier, I was not a big fan of raw salads. I found it really difficult to pick them and chew little by little, I totally did not enjoy it. Slowly, few salads that I had at outside restaurants triggered my tongue and I discovered the way of enjoying the salad in my own terms. Its always good to eat raw vegetables and fruits daily. If you like to reduce your weight or fat from your body, consumption of raw vegetables helps you to achieve the results quickly. This is one of the salads I make often. I don't follow any rule or formula specifically while making a salad for myself. I fix my salad with any leftover veggies and if I like the combo, I will record it and follow the same pattern sometimes.  This salad was also recorded in the same way. 

Ingredients

For the Salad :

Romaine Lettuce - 1 cup roughly chopped
Cucumber - 1/2 cup chopped 
Grated Carrot - 1/2 cup
Steamed Corn - 1/2 cup
Cherry tomatoes - 1/2 cup ( Cut the cherry tomato in half )
Mixed Bell Pepper chopped - 1/2 cup ( I used red bell pepper, orange bell pepper and green bell pepper ).
Salt - As required
Coriander Leaves - 1 tbsp ( Shredded Leaves )

For the Dressing:

Lemon Juice - 1 tbsp
Salt - As required
Black Pepper powder - 1 tsp
Mexican Seasoning Powder - 2 tsp
( If you don't have this, you can add 2 tsp of crushed red chili flakes and cumin powder )


Preparation

Wash all the vegetables and cut into desired shapes.
Assemble them in your salad mixing bowl.
Meantime, make the dressing and keep it ready.
Add required amount of salt and pour the dressing into the bowl.
Mix it thoroughly and enjoy.

Tips 

You can add any chopped nuts of your choice into this salad and enjoy. Nuts like Walnuts, pumpkin seeds, sunflower seeds and almonds are best suited.

Wednesday, May 4, 2016

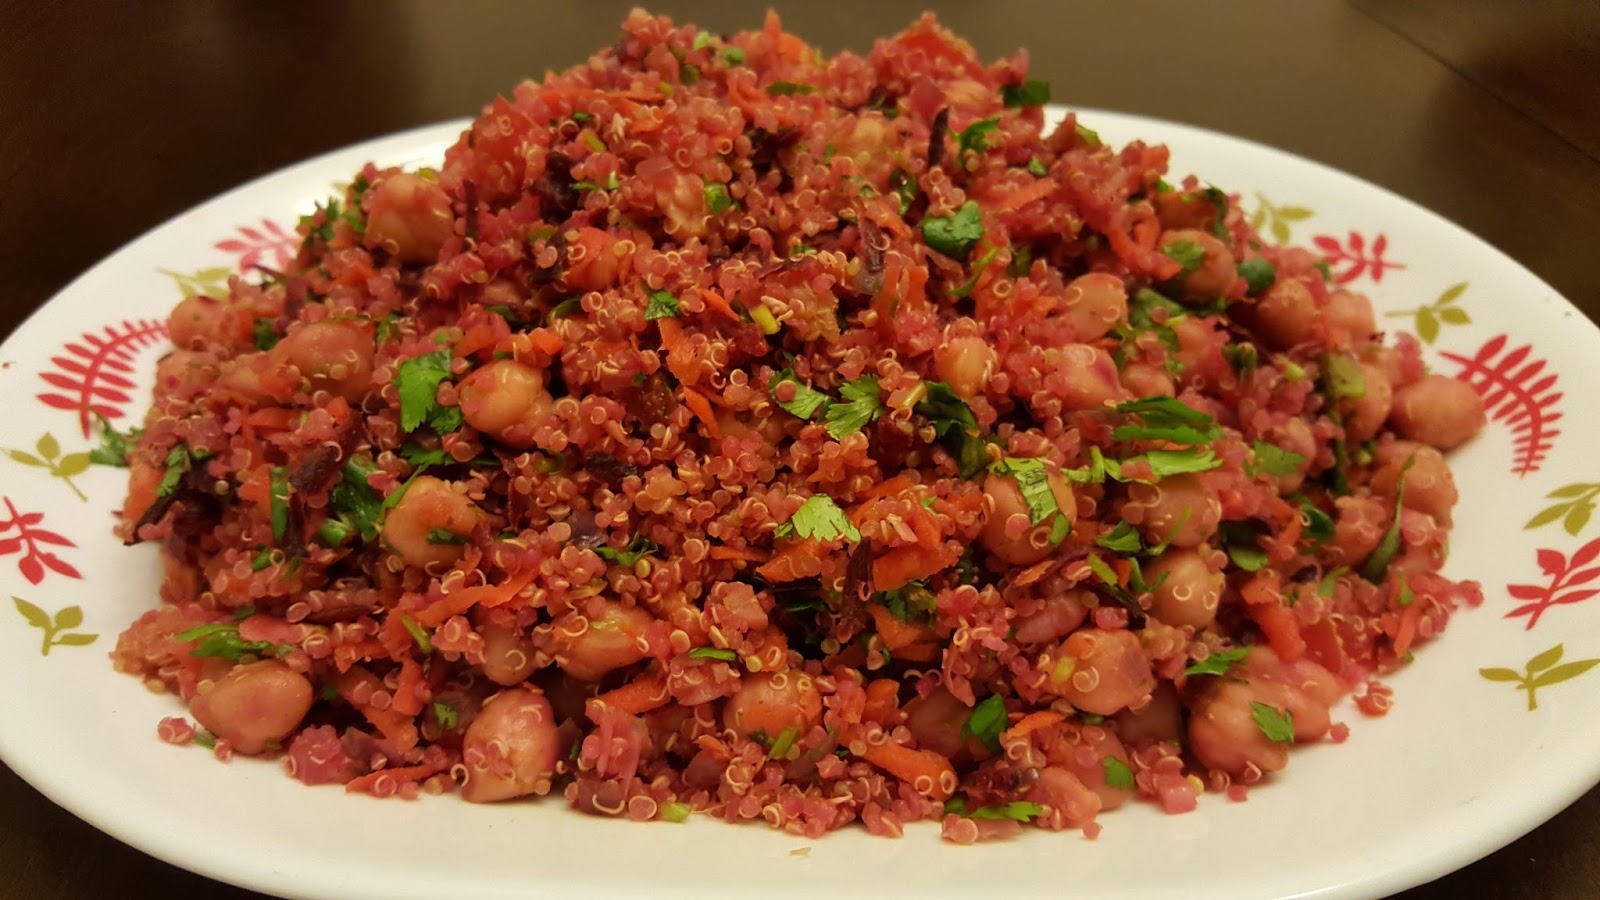
Quinoa Chickpea Salad


Quinoa , a tiny high protein grain from South America  is seen in many Indian Kitchens nowadays. Though I don't use it regularly in my kitchen, I try to make some attractive dishes using this grain. One of my favourite quinoa recipe is this colourful quinoa salad. To add to its richness, I have added some chick peas to the salad.

It can be a perfect meal for any time of the day with a side of Masala Chas / Buttermilk. Due to its crunchy, spicy taste and excellent aroma, even salad haters could have a plate of this salad as it swings away from the blandness side. Also its not cold like a regular green salad. 

Ingredients

Cooked Quinoa -   2 Cups
Cooked Chickpeas -  1 Cup
Shredded Red Onion - 1/2 cup
Finely Shredded Green Chillies - 1 tbsp
Finely crushed garlic - 2 tsp
Grated Carrot - 1/2 cup
Grated Beetroot - 1/2 cup
Tiny tomato pieces - 1/2 cup
Red chili powder / Paprika - 1 tsp
Cumin Powder - 2 tsp
Lemon Juice - 2 tsp
Salt - To Taste
Shredded Coriander leaves - 1/2 cup
Oil - 3 tsp


Method
  • Cook the quinoa, chickpeas using the regular cooking method. For cooking a cup of quinoa, add 2 cups of water. On medium heat, cook the quinoa for around 15 minutes till it gets fluffy.
  • For cooking the chickpeas, soak the chickpeas overnight and pressure cook them for 4-5 whistles. 
  • Grate the vegetables and keep all the ingredients ready.
  • In the cooking pan / kadai, add oil first. Then, add the crushed garlic, onion, green chillies one by one and fry them till the raw smell goes away.
  • To the pan, add the cooked chickpeas and the powders and mix them well.
  • Add the cooked quinoa along with the grated vegetables. Add required amount of salt into the pan.
  • Switch off the flame. Turn the salad upside down and squeeze little lemon juice over the top.
  • Mix them well and transfer the salad into the serving bowl.


Tips / Suggestions

Do not overcook the chickpeas as it gets mushy, making it difficult to be added in the salad.Similarly, cook the quinoa till they get fluffy. You can customize the spice level to your taste. Do customize as you like and enjoy in the summer.

Monday, June 2, 2014

Mango Salsa


Having Grown up with lots of good mango memories, I was quite interested in trying out the sweet, tangy also spicy Mango Salsa in my kitchen. Sweetness from the mangoes blends well with the spicy jalapenos and with the sourness from tomatoes and lime juice. Scoopful of this colourful salsa with a tortilla chip satisfies the tummy and its certainly not easy to resist the temptation of grabbing more and more...

Ingredients
Ripe Mango but firm diced into tiny squares - Between 1 cup to 1.5 cups depending upon its sweetness
Red Bell Pepper shredded - 1/4 cup
Yellow Bell Pepper shredded - 1/4 cup
Orange Bell Pepper shredded - 1/4 cup
Green Bell Pepper shredded - 1/4 cup
Jalapeno seeded and diced - 1/2 cup 
Coriander Leaves chopped - To Garnish 
Red Onion shredded - 1/4 cup
Lime Juice - 1 tbsp
Salt - To Taste
Spice Powder - 1/2 tbsp ( Dry roast 2 tsp of jeera( cumin seeds) and make a fine powder ) I like to add this in my mango salsa as it enhances the flavour and taste.

Method
In a big mixing bowl, add all the veggies, lime juice, spice powder and salt and mix them well. Add mango pieces at the end and mix once again. Leave the salsa to stay for few hours before serving for the real taste to set. Enjoy this salsa on a sunny day with a full bag of tortilla corn chips.!!

Wednesday, May 21, 2014

Chickpeas Bell Peppers Salad / Chickpeas Salad / Garbanzo Salad - With Garlic Sesame Dressing


Chickpeas Salad with colourful bell peppers tossed with some garlic sesame dressing is a very delicious,colourful and flavourful salad. If i could bring out the real flavour of this salad to the blog right now, I would be more than happy. Wonderful flavour emanating from the salad bowl while tossing the salad with the sesame garlic dressing was absolutely great and it was quite difficult for me to control the temptation of grabbing some salad during the preparation process itself. I am ardent lover of Chickpeas / Garbanzo since childhood and no wonder this salad made me happier. For the dressing, I decided to make my own version using white sesame seeds, garlic and extra virgin olive oil. To me, chickpeas and sesame seeds could get along well and uplifts the taste too which proved to be true. So, my dear friends, make this delicious aromatic salad in your kitchen and enjoy summer.

Ingredients

Cooked Chickpeas - 4-5 cups
Cucumber - 1 Medium
Red Bell Pepper - 1/2 cup chopped
Orange Bell Pepper - 1/2 cup chopped
Yellow Bell Pepper - 1/2 cup chopped
Green Bell Pepper - 1/2 cup chopped
Tomato - 1 Medium chopped 
Jalapeno Peppers - 1 medium chopped into tiny bits ( with no seeds )
Salt - As Required
Lime Juice - 1/2 tbsp
Black Pepper Powder - 1/2 tsp
Fresh coriander Leaves - 1/2 cup chopped
Dressing 
White Sesame Seeds - 1/4 cup
Garlic Pods - 2 Medium
Extra virgin olive oil - 1/2 tbsp

Method

Toast the sesame seeds and garlic pods in microwave for about 40 seconds. You might get a nice aroma from the microwave and then grind them with extra virgin olive oil in a blender and keep the dressing ready. In a salad mixing bowl, add all the ingredients as mentioned above and pour the dressing slowly over the salad and toss them well so that the salad gets coated with the dressing perfectly. Garnish with coriander leaves on its top and enjoy the refreshing summer salad. 

Thursday, May 15, 2014

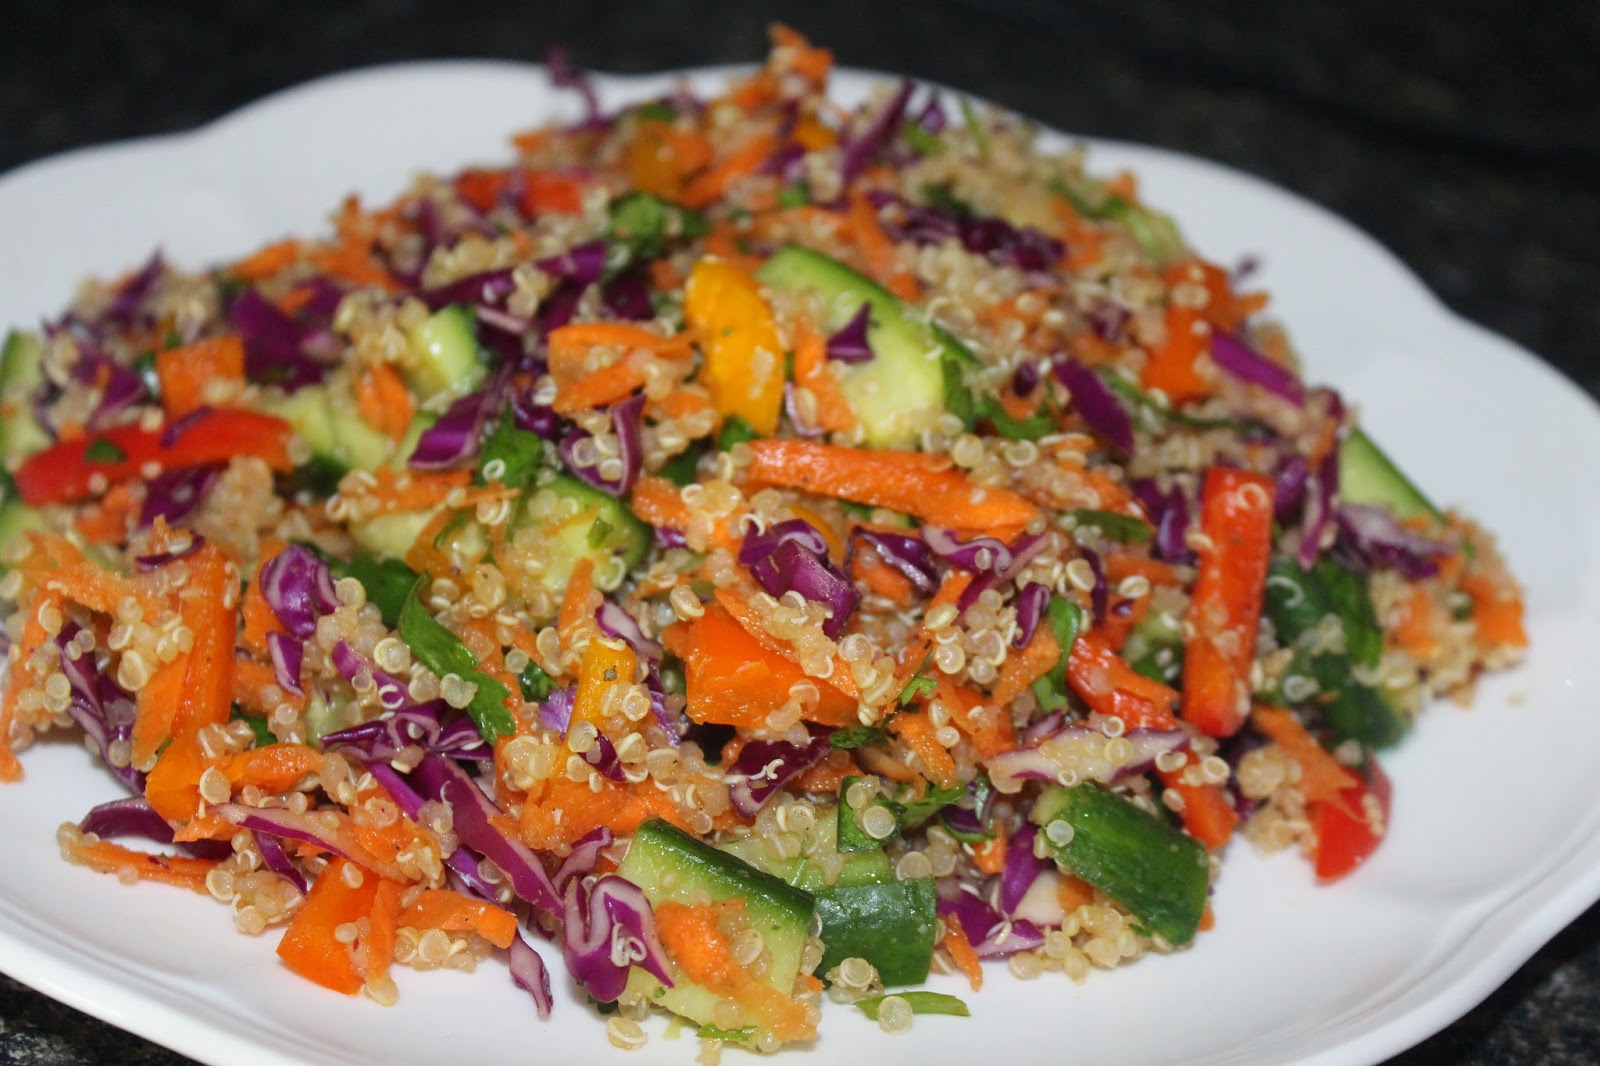
Rainbow Salad with Quinoa / Rainbow Salad


"Rainbow Salad", the name I gave to the salad I made yesterday for lunch. While making the salad, I was astonished to see the amazing colours emerging out of all the veggies and the warm quinoa. It was kind of making a beautiful rainbow to my eyes and giving a colourful message to my mind. Wonderful lunch with lots of colour and tons of goodness to the body. Not to forget, the crunchy veggies perfectly blended with the warm, fluffy quinoa and completely upgrades the taste. Quinoa, as we all know, is called as the "SuperGrain" which is rich in proteins, contains double the amount of fibre than other grains and other numerous health benefits. 
I opt to make this as my after workout lunch as it contains all the fresh vegetables plus the protein rich quinoa which gives good punch to the salad. We can even pack this salad and enjoy in outdoors too. Kids will also love the colourful salad and it proved to be true in my case.!!
Ingredients
Quinoa - 3/4 cup
Purple Cabbage - 2 cups chopped into thin slices
Cucumber - 2 small ( cut into thin stripes of finger size )
Carrots - 1 Big ( cut into thin striped of finger size )
Zucchini - 1/2 cup ( shredded like carrot )
Green Bell Pepper - 1/4 cup ( thin slices of finger size )
Red Bell Pepper - 1/2 cup ( thin slices of finger size )
Yellow Bell Pepper - 1/2 cup ( thin slices of finger size )
Coriander Leaves or Parsley Leaves - 2 tbsp ( chopped )
Lemon Juice - 1/2 tbsp 
Salt - As Required

Dressing For the Salad :
Extra Virgin Olive Oil - 3 tsp
Black Pepper Powder - 2 tsp
Garlic Salt - 1 tsp

Method
  • Cook the quinoa in a separate cooking vessel by adding 2 cups of water. Meantime cut all the veggies as mentioned above. In a big mixing bowl, add all the colourful veggies followed by the cooked fluffy quinoa and the dressing. Toss them carefully till everything gets blended well.
  • Serve on a plate and enjoy with a side of Honey Green Tea.

Monday, October 21, 2013

Grape Tomatoes Salad with Black Olives, Cucumber and Mozzarella Cheese


Couple of weeks back, we harvested few buckets of red grape tomatoes and yellow pear tomatoes from our home garden. Also, our kind neighbour showered us with more of the same varieties. Really wanted to consume those tiny tomatoes before they start to spoil. I decided to make a wonderful and a very colourful salad with homegrown tomatoes, fresh green cucumbers, Olives, red onion and fresh Mozzarella cheese. Because of the richness in its colour, it got attracted by the kids and its a very good accompaniment to any pasta or sandwich. I made a combo of this rainbow salad and a healthy sandwich ( Cucumber and Sprouts Sandwich) for lunch. Needless to say, my family welcomed the combo and enjoyed the lunch. Try this combo at your home and make some twists to your sandwich / pasta according to your family tastes and enjoy.

Ingredients 
Red Grape Tomatoes -  Around 30 tomatoes.
Yellow Pear Tomatoes - Around 30 tomatoes.
Black Olives -  1 cup ( Cut into thin rounds )
Cucumbers - 1 Medium Size
Shredded Red Onion - 1/4 cup
Grated Fresh Mozzarella Cheese - Between 2-3 cups ( Adjust according to your taste ).
Salt - As Desired
Black Pepper Powder - As Desired
Extra Virgin Olive Oil - 1 tbsp
Dried Basil  - 1 tsp ( For Flavour )
Dried Oregano  - 1 tsp ( For Flavour ).

Method 
In a big mixing bowl, add all the ingredients in order. Gently mix them so that the tomatoes get coated with the cheese and spices perfectly. Leave it for 5-10 minutes and enjoy this salad along with a warm pasta or sandwich.  Customize the salad with your own imagination.

Saturday, September 7, 2013

Cucumber Kosambari / Cucumber Kosambir / Vellarikai Kosambari


Kosambari also called as "Koshimbir" or "Kosambir" in other parts of India is made generally using soaked Moong dal, fresh coconut flakes and any preferred vegetables like cucumber, carrot, etc., Mostly its served as one of the side dishes in an elaborate festive meal and its also offered as prasadam to God during festivals.
Above all, I like this cucumber kosambari mainly due to its low calorie value. And its an excellent choice for weight reduction.

Ingredients
Fresh Cucumber - 1
Fresh coconut flakes - 1 tbsp
Soaked Moong Dal - 1/4 cup
Salt - As required
Fresh coriander Leaves - To Garnish
Oil - 1 tsp
Hing - 1 dash
Mustard Seeds - 1 tsp

Procedure
Cut the cucumber into small pieces. You can either peel off the skin if its too thick or cut the cucumber with the skin if its tender. Add all the ingredients into a mixing bowl. In the frying  pan, add the oil. When its heated, add the hing and mustard seeds. When it starts sputtering, pour it over the bowl. Mix everything thoroughly and garnish with the crushed coriander leaves at the end. 

Tips / Variations
Try to add salt just before serving the Kosambari as it might get watery. 
Care should be taken while adding salt as even an extra pinch would ruin the entire Kosambari.
Tempering process is totally optional.


Tuesday, March 5, 2013

Indo Mexican Chaat / Mexican Chat / Mexican Chaat


A Big Bag of Baked Tortilla chips in the pantry was disturbing me quite a bit. Though we enjoy those chips with our favourite salsas and guacamole during snack time,still the quantity is more..Being an ardent fan of chaat varieties, I really wanted to make an excellent chaat using the tortilla chips. Well, this chaat was a fusion of Mexican and Indian as it contained the ingredients of both the cuisines. I loved the final output and the chaat was so delicious, nutritious and full of flavour. Definitely try this out and enjoy this healthy snack with a side of hot chai.

Ingredients

Baked Tortilla Chips / Baked Corn Chips - 2 Cups
Cooked Black Beans or Cooked Pink Beans - 1/2 cup
Sweet Yellow Corn - 1/2 Cup
Cooked Potato Cubes - 3/4 cup
Tomato Pieces - 1/2 cup
Fresh Jalapeno Peppers - 2 ( cut into tiny bits without seeds )
Red Onion shredded - 1/2 cup
Coriander Leaves - To Garnish
Fresh Lime Juice - 2 tsp
Avocado - 2 Big ( Cut into medium squares )
Salt - To Taste
Black Pepper Powder - To Taste
Chat Masala Powder - 1 tsp
Green Chutney - 2 tsp  ( Homemade chutney made of coriander, mint leaves and green chillies ).

Method

  • Keep all the ingredients that are required for making this Mexican Chaat ready.
  • Cut the veggies into desired shapes and keep them ready.
  • Add all the ingredients except the baked tortilla chips into the chaat plate. Mix all the ingredients uniformly and keep the plate ready.
  • Add the baked tortilla chips just before serving and mix gently. 
  • Garnish with coriander leaves and enjoy this mouth watering chaat with a side of hot tea.

Tips / Variations 
  • Add the tortilla chips just before serving so that they don't lose the crispness and get soggy.
  • I did not add the tamarind date chutney in this chat variety mainly to avoid the tangy taste of tamarind and to enjoy the real freshness of Avocado and Jalapeno Peppers. But its purely up to your taste buds.
  • Use your own imagination to improve the chaat in your own way and enjoy...

Wednesday, February 27, 2013

South Western Three Bean Soup / 3 Bean Soup / Cheesy Three Bean Soup


World around us was turning white, could see the formation of icicles around the corners, trees everywhere and the weather was below freezing. Irrespective of whatever changes happen in the world, our stomach follows only one routine with no change. Yes, it was dinner time again, and the bell started ringing inside. Obviously, our mind would run towards any hot soup, rasam or spicy stuff. Oh no, we cannot spend more time in the kitchen but still want a one pot meal. It was Oscar time..!! Made a yummy, healthy South Western style three bean soup with loads of veggies ( as usual!!). Enjoyed the dinner with a side of guacamole, baked tortilla chips and a Spicy Soup. Try making this soup in your kitchen and let me know your feedback.

Ingredients
Green Beans - 1/2 cup ( cut into small finger size )
Celery - 1 cup  ( cut into small size )
Sweet Potato cubes - 1/2 cup
Green Bell Pepper / Green Capsicum - 1/2 cup ( cut into small size )
Carrot squares - 1/2 cup
White Onion - 1 cup ( finely shredded )
Garlic Pods - 2 tbsp ( finely shredded )
Cooked Rajma Beans / Pink Beans - 1 cup
Cooked White Navy Beans - 1 Cup
Cooked Black Beans - 1 Cup
Tomato Puree - 4 tbsp ( Or take the puree from 2 big tomatoes and add )
Oil - 1.5 tbsp
Vegetable Stock - 4 Cups
Water - As Desired
All Purpose Flour - 1 tbsp
Milk - 1/2 cup
Finely cut Jalapeno Peppers - 2 tbsp
Cumin Powder - 2 tsp
Dried Oregano - 1/4 tsp
Black Pepper Powder - To Taste ( I added more than 1 tbsp definitely)
Crushed Red Chili Flakes - 3 to 4 tsp ( Not Red Chili Powder. You can also use the packets which we get along with Pizza, in case if you don't make the red chili flakes powder ).
Salt - To Taste
Coriander Leaves - 1 tbsp ( For Flavour )
Cheddar Cheese ( shredded ) - 1 Cup

Garnish the Soup on its top with a layer of Shredded cheese, a round slice of jalapeno pepper and little greek yogurt. ( 1/4 tsp )

I generally substitute Sour Cream with greek yogurt in all my mexican recipes. So if you prefer, crown your soup with Sour Cream instead of Greek Yogurt.

Method
  • Soak the three beans overnight and cook them in a pressure cooker for 4 whistles and keep it ready.
  • Cut all the veggies into any desired shapes you prefer and keep them separately in a big plate.
  • In the Soup making pot, add oil first. When its heated enough, add the garlic and saute for 2 minutes.
  • Add white onion, capsicum ( bell peppers ) and saute them again with a pinch of salt for another 2-3 minutes.
  • Add all the other vegetables into the soup pot and saute them for a minute. Then, add 4 cups of the vegetable stock along with 2 cups of water into the Soup Pot.
  • Allow the veggies to get cooked completely. When they are cooked well, add all the powders, tomato puree and required amount of salt into the Soup Pot. 
  • Mix them and allow them to cook with the lid on for another 3-4 minutes.
  • Finally add the cooked beans, grated cheddar cheese, coriander leaves into the Soup Pot. 
  • Let them cook on a low flame for 4-5 minutes. Switch off the flame.
  • Serve the hot soup with a side of toasted Garlic Bread or with some baked corn chips. 
  • Decorate the soup with few grated cheddar cheese on its top while serving.
Variations / Tips
  • Its ideal to make this soup in a Slow cooker.
  • Combination of the three beans is at your discretion totally. You can select kind of beans of three types and make the soup.
  • Likewise, amount of the spices totally depend on your taste buds.
  • Use as many vegetables as you like in this soup and enjoy the freshness.
  • As this soup should be in thicker version, avoid adding more water. It might spoil the consistency of the soup.

Sunday, July 15, 2012

Tomato Basil Pasta Salad


We've been growing vegetables and herbs in our small vegetable garden this summer and we are quite happy with the results too. Upon looking at the freshness, we get tempted to make some good healthy recipes using these home grown vegetables. Out of those, we decided to make a healthy pasta salad using our organic, home grown heirloom tomatoes, basil leaves, Green Pepper ( Capsicum ) and few red cherry tomatoes and pearl yellow tomatoes ( heirloom variety) as well. We included few black olives, Smoked cheese cubes ( as we like ) in our preparation too..Freshly made pasta salad tossed with olive oil, black pepper powder and Parmesan cheese was an ultimate dinner for us last night. Of course, we had few pita chips and red bell pepper home made hummus ( which i will post separately ) as sides and our favourite raspberry smoothie for our yummy dessert.

This menu would be best suited for lunch. As we could hardly feel a perfect dinner time during this summer due to very late sunset, we are fine with this dinner menu.!!!!

This is a good and easy option for picnic as its mostly liked by kids. Try this in your home and let me know your feedback.

I will post our favorites "Raspberry Smoothie" and "Red Bell pepper Hummus" in my following posts.

Home grown fresh vegetables except olives and smoked cheese
Ingredients
Tomatoes  - 2 Medium
Fresh Basil Leaves - 2 Cups ( finely crushed )
Red Cherry Tomatoes - 1 cup
Green Bell Pepper -- 1 Medium
Pitted Black Olives cut into halves - 3/4 cup
Salt - To Taste
Black Pepper Powder - As required.
Olive Oil - 1 tbsp
Lemon Juice - 3 tsp
Smoked Cheese cubes - 1/2 cup
Shell Pasta ( Small size ) - 2 cups uncooked.
Parmesan Cheese - To garnish.
Method
  • Wash all the vegetables and keep them ready. Keep all the ingredients handy with a big salad mixing bowl.
  • Cook the shell pasta in a separate container and keep the drained cooked pasta ready. In the mixing bowl, first add a layer of pasta and add the chopped green bell pepper. Follow this method till you add all the bell pepper into the bowl. Mix them gently.
  • Secondly add all the cut tomatoes and the whole cherry tomatoes , crushed basil leaves, cheese cubes and the cut olives.
  • Add Olive oil, required amount of salt,black pepper powder, lemon juice and mix the salad uniformly.
  • Add Parmesan cheese at the end and mix gently. Now its ready to be served in your meal.


Tips / Variations
  • You can add other cheese varieties of your choice in your salad. As we all like smoked cheese cubes, I added them in my salad. You can omit the cheese cubes too if you dont want to include cheese in your salad.
  • I don't prefer to add other vegetables in this version of pasta salad. This is mainly to enjoy the freshness of basil and tomatoes and to retain its original flavour.
  • Try to use small size pasta in your salad as it easily blends with the rest of the ingredients and looks good too in the salad.

Wednesday, February 22, 2012

Dal Shorba - Healthy Indian Soup

Dal Shorba is a very tasty, healthy, lentil based soup in Indian Cuisine flavoured with Indian spices. This soup is an excellent appetizer for a gathering. I never tried making this soup before. So I am just presenting my Husband's recipe through this post. This is totally made by him with his own customizations. So all plus and minus should go to him.!!! As he always try to upgrade any existing version with his own healthy customization, he did the same for this soup too..He chose three lentils that are pink, red based..( like Red Masoor Dal, Red Moth, Brown Masoor..) for the base and other vegetables like Carrot, Celery, White onion, Broccoli, beans, butternut squash as an addition. He started making the soup from scratch and the soup was awesome for that cold wintery night. Needless to say that he is an excellent foodie who enjoys cooking and always gives right feedback (!!) to my food too. We all enjoyed the soup with a side of few toasted multigrain bread. ( An Appetizer item turned out to be a wholesome meal with a slice of bread for all of us.!!!! ). Recipe follows as described by him....
Ingredients
Masoor Dal ( Red Lentils ) - 1 Handful
Brown Masoor Dal  ( Brown Lentils)- 1 Handful
Red Moth Dal ( Moth Beans )- 1 Handful
Lavang / Cloves - 2
Cinnamon Stick - 1 Small
Bay Leaves - 2
Oil - 4 tsp
Salt - To Taste
Sugar - 1/2 teaspoon

Powders to be added :
Turmeric Powder - 1 tsp
Cumin / Jeera Powder - 1 tsp
Black Pepper Powder - 2-3 tsp ( He added more for his portion..)
Red Chili Powder - 1/2 tsp ( Optional )
Vegetables
Garlic crushed / shredded - 1 tbsp
White onion - 1/2 finely shredded
Carrot - 1 Medium
Broccoli - 12-15 florets
Tomato - 3 Big ripe
Butternut Squash - 1/2 cup cut into small cubes
Celery - 5 Sticks
Peas - 1 Handful
Coriander Leaves - 1 handful finely shredded
Grated Ginger - 1 tbsp
Lemon Juice - 2-3 tsp


Method
  • Wash the lentils / Dals and pressure cook them separately or cook them in an electric cooker. Keep the cooked lentils paste and the dal water if any separately.
  • Wash all the vegetables and cut them into different size as desired and keep them ready.
  • Meantime, dry roast the cumin seeds, black pepper seeds and powder them nicely and keep it ready.
  • In a big thick bottomed soup pot, first add the oil. When its heated, add the crushed garlic and onion first. Fry them well with a pinch of salt till the onion pieces get translucent.
  • Add the Bay leaves, cinnamon stick, cloves, turmeric powder into the pot now and fry them.
  • Next add the other vegetables like carrots, broccoli, butternut squash, peas, tomatoes into the pot and cook them with some water. At this time, you can even add the remaining cooked dal water into the pot.
  • When they are cooked enough, add the cumin/black pepper powder, red chili powder and crushed ginger into the pot. Add the other watery vegetables like celery into the pot now.
  • Add the cooked dal paste into the pot and required amount of salt, 1/2 tsp of sugar and water into the soup pot. Stir them well and allow them to get cooked for about 3-4 minutes on a medium flame.
  • When the soup is boiled well enough, remove the Bay Leaves, cinnamon stick and cloves from the pot carefully. Using a masher or hand blender, gently mash the soup for few seconds just to set it to the right consistency.
  • Switch off the flame. Finally add the lemon juice and mix it well.
  • Before serving, garnish with coriander leaves and few drops of melted butter on its top.
  • A Healthy and tasty appetizer loaded with protein and good amount of other vitamins is an ideal choice before a healthy meal.
Tips / Variations 
You can include your favorite vegetables in this soup but try to include atleast two watery vegetables in your choice.

Thursday, February 16, 2012

Minestrone Soup


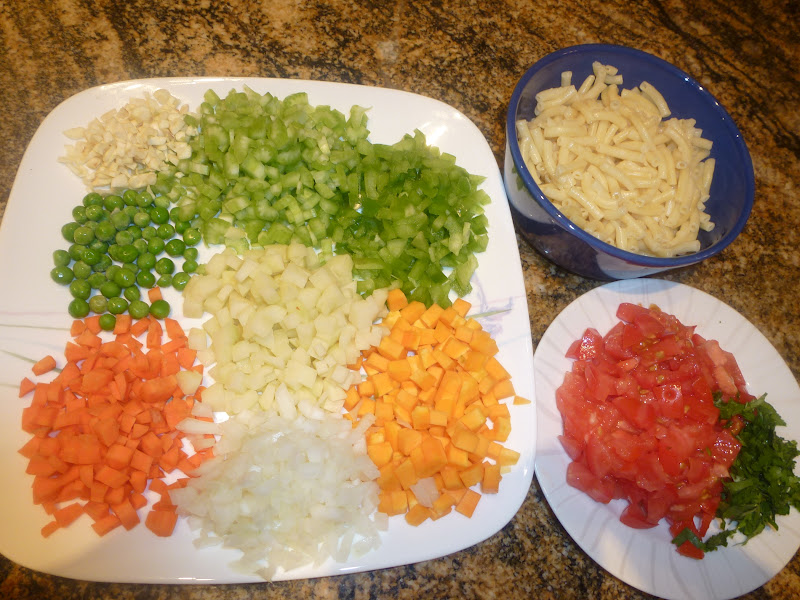
Minestrone Soup, is a thick Italian Soup which is made with vegetable stock, tomatoes, onion, celery, carrots and other vegetables with an addition of some pasta and beans. If you wish to have a wholesome meal at nights, you can very well go for this soup. It fills the stomach and the soup contains everything needed for an one time meal. Happy to mention that some leftover soup was totally enjoyed by my daughter and she requested me to make this often.!!!

Ingredients
Tomato - 3 Big or 32 Oz Tomato Puree Can
Carrot -- 1 Medium
Potato - 1 Medium
Butternut Squash - 1 Cup cubed
Zucchini - 1 Medium
Green Pepper / Capsicum - 1/2 Medium
Celery Sticks - 2
Green Peas - 1 handful
White Onion - 1/2 Medium
Cooked Pasta - 1 Cup ( preferably mini size pasta )
Coriander Leaves or  Parsley  - 2 tbsp
Crushed Garlic - 2 tbsp
White beans / Red Beans cooked - 1/2 cup
Beans - 7 to 8 Medium
Vegetable Stock - 4 to 5 cups
Salt - To Taste
Dried Oregano Seasoning - 1 tsp
Dried Thyme Seasoning - 1 tsp
Dried Basil Seasoning - 1 tsp
Black Pepper Powder - As required
Olive oil - 1 tbsp
Parmesan Romano Cheese - To Garnish on its top before serving


Method
  • Wash and cut all the vegetables into tiny cubes. Keep them ready.
  • In a thick bottomed soup pot or vessel, add the Olive Oil first. When its heated, add the crushed garlic and onion and fry them till golden brown. Then, add the other vegetables and fry them for 2-3 minutes. Cover the lid for a while tilll the tomatoes get mashy and cooked. Cook all the vegetables for another 3-4 minutes on a low flame.
  • Add the vegetable stock now and if required, add some water into the pot and cook everything on a medium flame till the vegetables get cooked completely.
  • Finally add the italian seasoning powder, required amount of salt, black pepper powder into it and allow them to get blended well for few more minutes.
  • Garnish with parmesan cheese and shredded coriander leaves or Parsley ( of your choice ) and serve in a soup bowl. Serve with a side of toasted garlic bread.

Tips / Variations
You can add any seasonal vegetables of your choice while making this soup. I have not added few due to unavailability. In addition to Italian seasoning powder, we can add crushed basil leaves to make it more flavourful.

Monday, May 23, 2011

Dal Makhani - Creamy Soup of Lentils / Lentils Soup

We had a Potluck on Saturday night with a full course of North Indian Menu starting from chat...I made Dal Makhani as one of the side dishes..This time I made it with Rajma ( Dark Red Beans ), Kali Masoor Dal ( Black Lentils ), Red Chori ( Red karamani ) not with black urad dal. This brownish bowl of lentil soup fills the stomach of the family greatly and fills my heart with great satisfaction as it contains high amount of protein, folate,vitamins, energy ,etc. Its great for parties as its very easier to prepare this Dal Makhani and the process is also quicker. Did not add the fresh cream at the end as we liked to taste the Makhani with its mild spicyness..
Ingredients
Red Beans ( Rajma ) - 1/2 Cup
Red Chori ( Red Karamani ) - 3/4 Cup
Kala Masoor ( Black Lentils ) - 3/4 Cup
Jeera - 2 tsp
Cloves / Lavang - 4 or 5
Cinnamon Sticks / Pattai - 3 Medium Size
Olive Oil - 1 tbsp
Onion - 1 Medium
Ripe Tomato - 1 Big
Green Chilli - 1 Medium
Ginger Garlic Paste - 1 tbsp
Turmeric Powder - 2 tsp
Garam Masala Powder - 1 tbsp
Coriander Powder - 1 tbsp
Red Chilli Powder -  0.5 tbsp
Salt - To Taste
Sugar - 1 Pinch
Coriander Leaves - To Garnish
Method
  1. Wash the Red Beans ( Rajma ), Kala Masoor, Red Chori ( Karamani ) first thoroughly and soak it in water for 3 - 4 hours.
  2. After its soaked, pressure cook the Lentils with 1 tsp of turmeric powder, 1 cinnamon stick, 1 tsp of salt for 4-5 whistles.
  3. Meantime, cut the tomato, onion,green chilli into desired shapes, keep the other ingredients ready on the side.
  4. On a thick bottomed kadai, add Olive Oil first for tempering. When its heated, add the jeera, cinnamon stick, cloves first. Then, add the finely cut onion, green chilli pieces and fry them for a minute.
  5. Add ginger garlic paste next to the mix and fry till the raw smell goes off.
  6. Add the tomato pieces next to the mix and fry them till they all get mashed and pasty.
  7. Then, add all the powders as mentioned above and fry them nicely till all the powders get mixed with the tomato paste and fried little bit.
  8. Add a pinch of sugar and pour the cooked dal from the pressure cooker directly onto the kadai with the remaining cooked water in the pressure cooker.
  9. Add required amount of salt into the kadai and mix all the contents well. Allow them to cook for 4-5 minutes for the Makhani to get settled with all the powders and flavours.
  10. After its cooked, switch off the flame and garnish with coriander leaves. It can be well served with a combination of Ghee rice, Jeera Rice, Peas Pulao or with plain chappathi / rotis.
Tips
Soak the Lentils for more time if they are too dry and cook them very well to get a creamy texture of the Dal Makhani.
Add few tsp of ghee or melted butter at the end if its made for a potluck or a party.

Variations
You can add fresh cream at the end on top of the Dal Makhani.
You can add or reduce red chilli powder to fine tune the spicyness of the Makhani.
You can substitute different lentils like Black Urad Dal in this dish with the ones I used.

LinkWithin

Related Posts Plugin for WordPress, Blogger...