Showing posts with label Snack Varieties. Show all posts

Monday, March 1, 2021

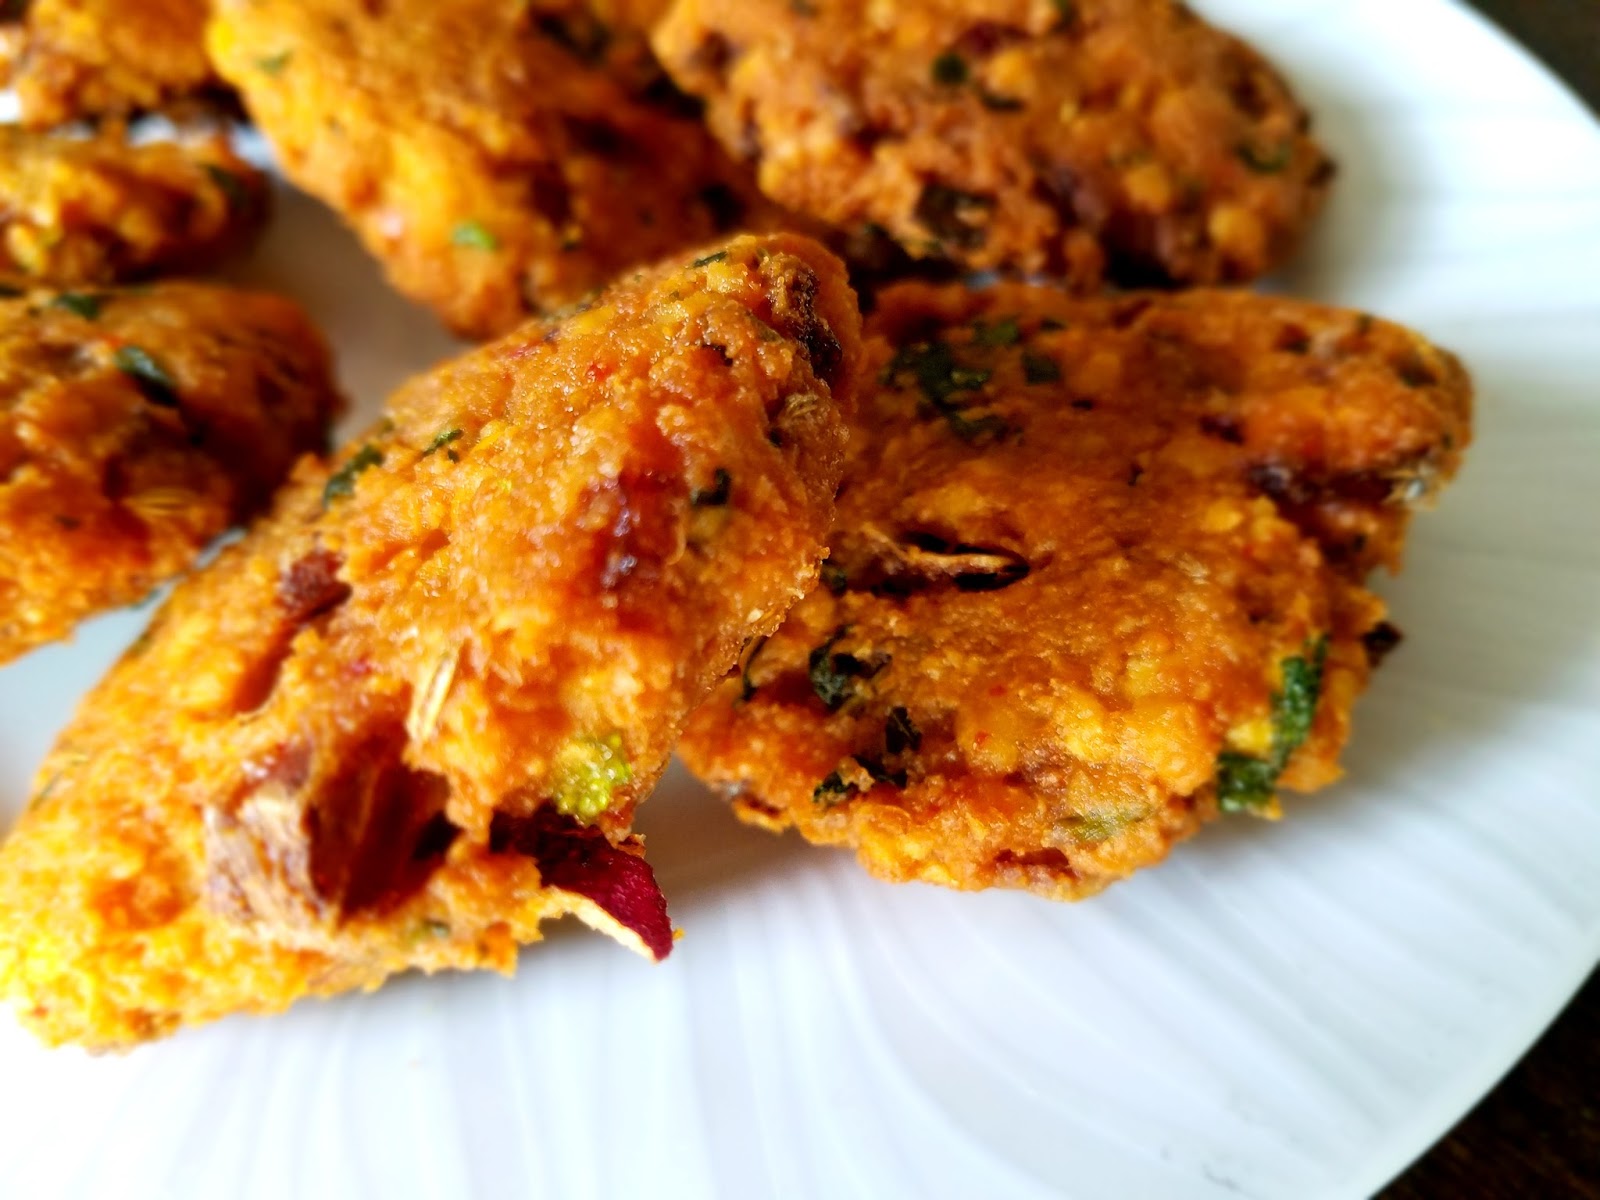
Banana Flower Vadai / Vaazhaipoo Vadai / Arati puvvu Vada


Banana Flower / Vaazhaipoo in Tamil / Arati Pavvu in Telugu is one of the Superfoods which is easily available in markets. This banana flower blossom has many medicinal properties and is highly nutritious. In TamilNadu, they widely use this flower to make many dishes in the kitchen. Though cleaning the banana flower florets is little tedious, my mom never failed to make this curry or Usili using this flower. During childhood, we often saw either banana flower curry or banana stem kootu in our meal.  Vaazhaipoo vadai / banana flower vada is one of the delicacies of Tamil Nadu. You can either fry this lentil based vadai in oil or cook them in air fryer too. 

Ingredients 

Channa Dal / Bengal Gram Lentil - 2 Cups
Fennel Seeds / Sombu - 1 tsp
Rice Flour - 1/4 tbsp
Garlic - 2 Pods
Ginger - 1 small cube
Green chillies - 4 Medium
Dry Red Chilli - 1 
Chopped coriander leaves - 1 handful
Crushed curry leaves - 1 stick
Hing / Asafoetida - 1 Dash
Salt - To Taste
Oil - Enough to fry the vadas
Water - Enough to grind the batter coarsely. 
Banana Flower florets of 1 flower thoroughly cleaned and chopped.

Preparation

Cleaning Banana flower 

Cleaning the Banana flower seems to be a little time consuming job initially. Once you know the technique of it, its a matter of few minutes and you will nail it easily everytime you buy.
  • Rub your hands with little oil while doing this job as your hands might turn sticky and black during this process.
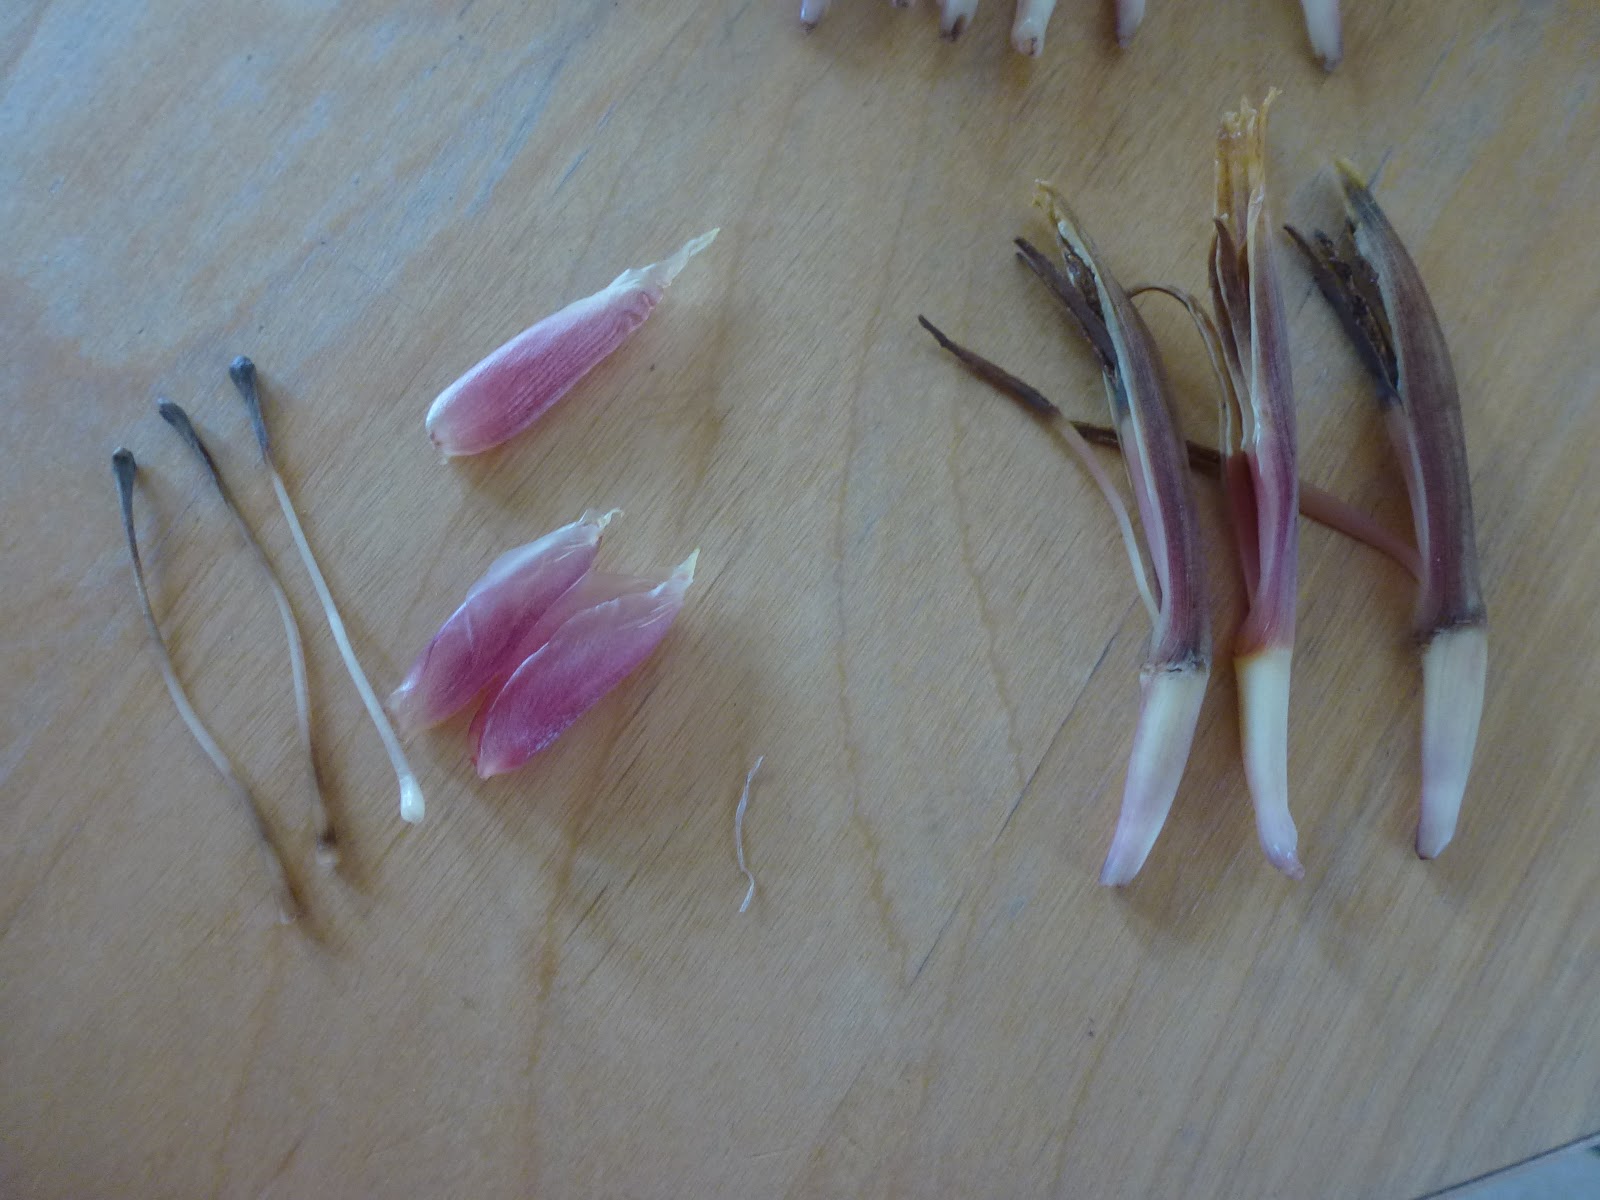
  • Open the purple petals one by one and take out the yellow colour florets carefully.
  • Remove the two parts from every floret carefully.
  • In the picture I added, I showed the two parts that are to be taken out from each floret. One part looks like a plastic ear phone and the other part is a thick long stem with a thick dot on its top.
  • Chop the cleaned florets under each petal and immediately put them in a diluted buttermilk in a vessel. This is mainly to prevent colour changing.
  • Follow the same process for all the petals till you notice a small cone shaped yellow tender bud. As this tender yellow cone is also highly nutritious, chop them too finely and add it to the vessel. Keep the chopped florets ready.

Vada Batter Preparation

  • Wash the dal thoroughly and soak them in warm water for an hour.
  • Meantime, clean the banana flower florets and keep the chopped florets ready. 
  • Grind the dal along with garlic, ginger, dry red chilli, fennel seeds to a coarse paste. Transfer the dal batter into the mixing bowl.
  • Add required amount of salt, hing, little rice flour, chopped coriander leaves and curry leaves, finely chopped green chillies, banana flower florets into the vada batter. Drain the chopped banana flower florets from the buttermilk mix and use the diluted water later. 
  • Simultaneously keep the kadai with oil on medium flame. When you notice slight smoke on top, then the oil is ready for frying.
  • Grease the palms with little oil and take a small portion of the batter and make a round pattie shaped  vada.
  • Gently drop them one by one into the heated oil. Fry them on both sides till they turn golden brown on medium heat. 
  • Serve the crispy banana flower vada / Vaazhaipoo vadai with a cup of coffee or tea.!!

Tips / Suggestions

  • Don't add too much water while grinding. Sprinkle little water which is just enough for grinding.
  • Don't fry the vadas on high flame as it will not help in getting golden vadas. It might turn them darker and also the inner part of the vadas might not get cooked perfectly.
  • Adjust the number of chillies as per your spice level.

Tuesday, February 9, 2021

Patnam Pakoda / Pattanam Pakoda / Medhu Pakoda


Patnam Pakoda also called as Medhu Pakoda is a famous street food in Tamil Nadu and is mostly available in many tea shops. These pakodas should be enjoyed with a cup of hot coffee or tea. Once you start enjoying these crunchy pakodas, you cannot hold your hands taking more and more. Generally pakodas are made with Besan Flour or Kadalaimaavu. But this pattnam pakoda is made with Pottukadalai Maavu ( Roasted Gram Dal / Chutney Dal ).  I made these pakodas during lockdown thinking that these would last for a week so that we could enjoy during our tea time with a nice snack for a week. On the Contrary, the bowl got emptied on the same day of preparation. These pakodas are deep fried in oil to get the delicious crunchy bite. If you have an Air fryer, you can try with few pakodas and compare both the versions. I have not ventured it out yet.

Ingredients

Chutney Dal / Roasted Gram Dal / Pottukadalai Flour  - 2 Cups
Rice Flour - 1 Cup
Green Chilli - 4 
Ginger - 1 small cube
Garlic - 2 pods
Fennel Seeds - 1 tsp
Salt - As Required
Red Onion - 1 Big or 2 Medium
Curry Leaves crushed - 1 stem
Coriander Leaves - 1 tbsp
Red chilli powder - 1/2 tsp
Hing / Asafoetida - 1 Dash
Oil - Enough for frying
Ghee - 1 tbsp
Baking Soda - 1 pinch

Preparation

  • First prepare the Pottukadalai Maavu / Roasted Gram dal flour by grinding them in a mixie smoothly and keep it aside.
  • Crush the green chilli, fennel seeds, curry leaves, garlic, ginger in a mortar or in a mixie gently. Keep it ready. Chop the onions and keep it aside.
  • In a mixing bowl, add the ghee and a pinch of baking soda. Gently mix them using the tip of the fingers in order to mix the soda with the ghee completely. This process keeps the inner part of the pakoda softer and enhances the taste as well.
  • To the bowl, add the Roasted gram flour / Pottukadalai Maavu,rice flour,chopped onions,crushed green chili mix, red chilli powder, hing and mix them thoroughly. Add water little by little to the bowl and make a dough like a roti dough. 
  • Once the dough is ready, make lemon sized balls of the dough and keep them ready for frying.
  • While preparing the pakoda dough, you can start heating the oil for frying process.
  • On low-medium heat, fry all the pakoda balls in the oil and drain them out once they turn golden brown and crispy.
  • Enjoy the delicious Pakoda with hot tea / coffee.

Tips / Suggestions

It tastes best when its slowly fried on low-medium flame. Cooking on high flame might yield half cooked inner part and dark coloured pakodas.

Monday, December 11, 2017

Masala Vadai / Crunchy Masala Vadai / Masala Vada


During rain, our mind instantly thinks about enjoying a cup of chai / tea with few hot masala vadais on its side. Somehow I cannot forget the taste of the newspaper wrapped masala vadais that I and my sisters enjoyed during childhood.  Especially after school, we used to buy few crunchy masala vadais from a nearby stall where they made fresh vadas daily. Just to reminisce, still I wrap atleast 2 or 3 vadas in newspaper and have it with my tea. Though I rarely make fried vadas at home nowadays, we thoroughly enjoy each and every vadas we make. Absolutely no vadas will be left untouched.!!!

While making masala vadas , I am sticking on to this version firmly. Its mainly due to the crisp and crunch vadas it yields. Somehow in my home, they don't enjoy soggy vadas, especially soggy masala vadas.

Ingredients

Split Pea Lentil -  1 Cup
Channa Dal / Bengal Gram Lentil - 1 Cup
Fennel Seeds / Sombu crushed - 2 tsp
Hing / Asafoetida - 1 Dash
Salt - To Taste
Rice Flour - 1/2 tbsp
Crushed Garlic - 2 Pods
Crushed Ginger - 1/2 tbsp
Green chillies - 4 Medium
Dry Red Chilli - 1 
Chopped coriander leaves - 1 handful
Crushed curry leaves - 1 stick
Finely chopped red onion - 3 medium
Oil - Enough to fry the vadas
Water - Enough to grind the batter coarsely. 

Method 
  • Wash the dals thoroughly and soak them in warm water for an hour.
  • Grind them along with crushed garlic, green chillies, dry red chilli to a coarse paste.
  • Add the rest of the ingredients into the mixing bowl. Add required amount of salt and a dash of Hing into the vada batter. 
  • Simultaneously keep the kadai with oil on medium flame. When you notice flames on top, then the oil is ready for frying.
  • Grease the palms with little oil and take a small portion of the batter and make a round Pattie shaped  vada.
  • Gently drop them one by one into the heated oil. Fry them on both sides till they turn golden brown and look crunchy.
  • Serve them with a side of spicy kara chutney. Enjoy with a cup of coffee or tea.!!

Tips
  • Don't add too much water while grinding. Sprinkle little water which is just enough for grinding.
  • Don't fry the vadas on high flame as it will not help in getting golden vadas. It might turn them darker and also the inner part of the vadas might not get cooked perfectly.
  • If possible, try to keep the vada batter in the refrigerator for 15 minutes before frying. It helps in getting golden crispy vadas with inside part perfectly cooked.
  • Adjust the number of chillies as per your spice level.

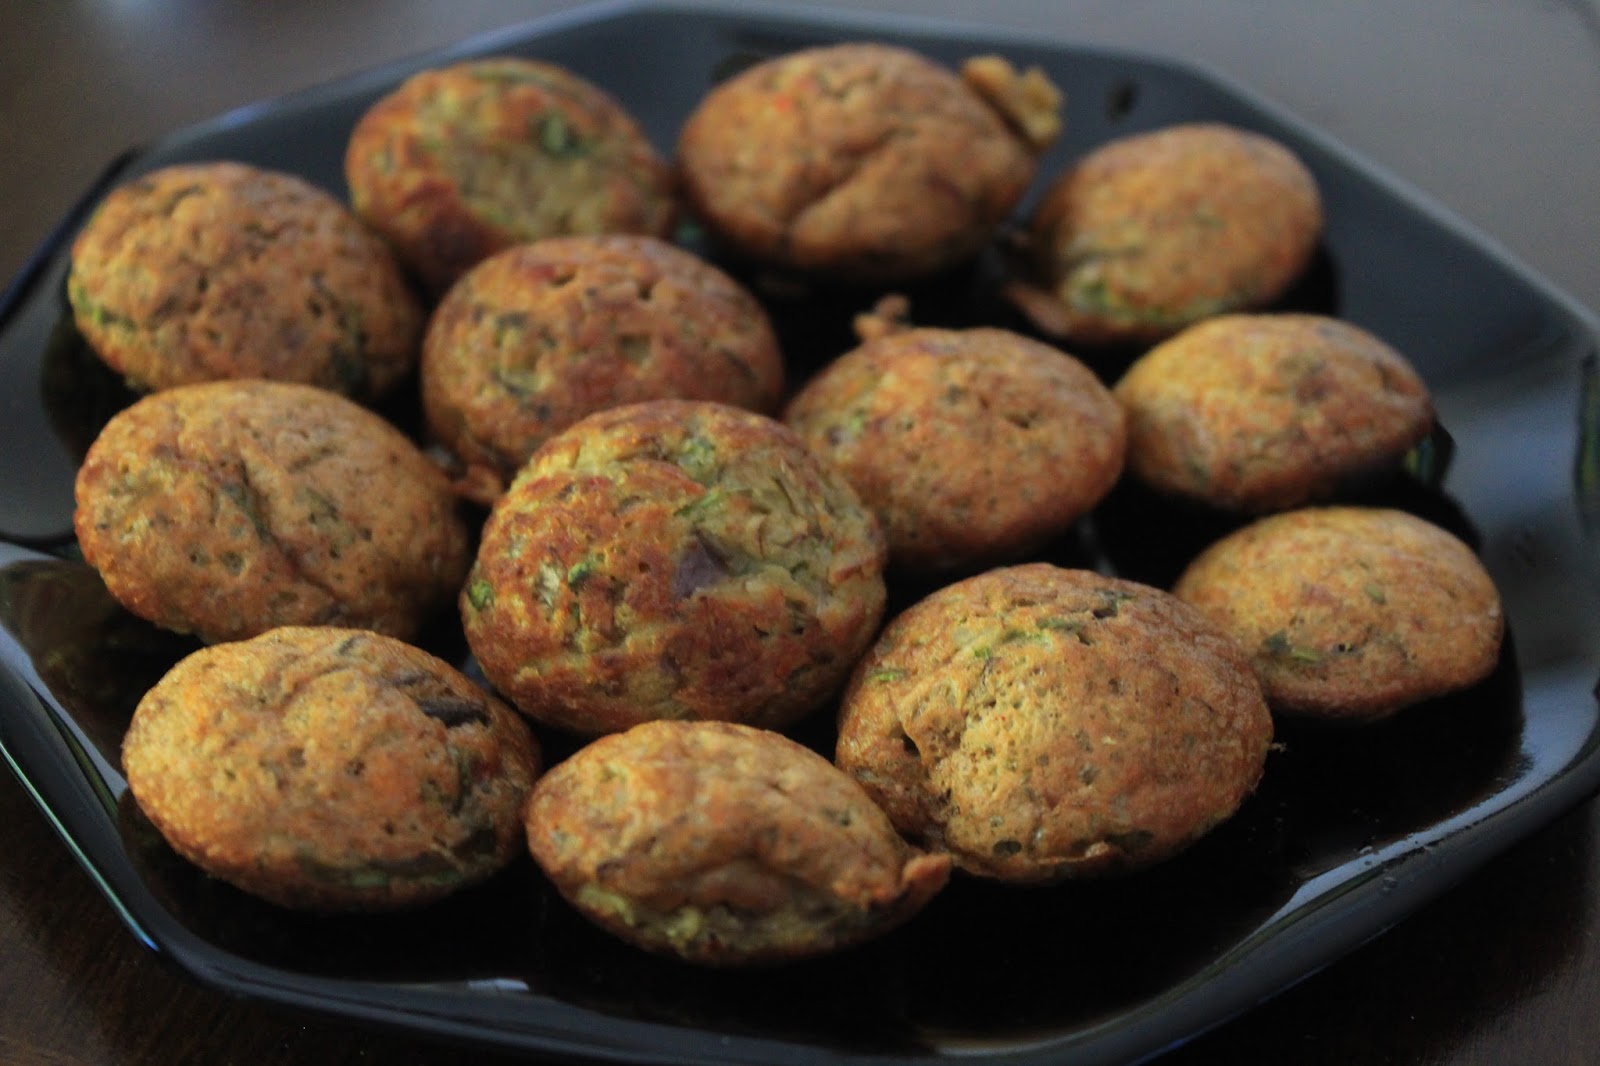
Banana Flower Paniyarams / Vaazhaipoo Paniyarams - Using Leftover Adai Batter


Banana flower / Vazhaipoo also called as Banana Blossom is an incredible, edible flower which is highly nutritious. It is considered as a Super food for women especially during the menstruating period. I wanted to make some delicious breakfast with coconut chutney but not idly or dosa. I had only some leftover Adai batter. Also, I had a full bowl of pre cleaned / pre cut cut banana flower florets soaked in diluted buttermilk sitting on my counter top. So I decided to make Paniyarams with banana flower and adai batter. As the Adai batter is salted and spicy, just add the chopped banana flower, few coriander leaves and mix them well. 

 Ingredients

Leftover Adai Batter - 5 Cups
Chopped Banana flower florets - 2 Cups
You can adjust as per the availability and your taste.

Method

  • For making the paniyarams, keep the paniyaram plate on the stove.
  • On medium flame, add drops of oil into the paniyaram moulds first. Then fill the moulds with the batter not upto the rim of the mould. Just pour only 3/4th of the mould. Fill all the moulds with the rest of the batter. 
  • Add drops of oil towards the sides of the Paniyarams.
  • Steam cook them with the lid closed on medium flame for 3 to 4 minutes.
  • Open the lid and flip the paniyarams carefully to the other side. Close the lid again.
  • Steam cook again for another 3 minutes. Turn both sides and check if they turn golden brown.
  • As the banana flower is added to the batter, its better to cook them for more minutes if not golden brown. 
  • Enjoy the Paniyarams with a side of coconut chutney or any spicy chutney.

Tips

  • Don't overcook the Paniyarams as they might turn black. 
  • Don't steam cook the Paniyarams on high flame.

Thursday, October 24, 2013

Moong Dal Sundal / Payatham Paruppu Sundal / Navarathri Sundal


Payatham Paruppu sundal is one of my favourites which i mom make generally on the first day of Navarathri.
Easy to make and little care should be taken in order to get the right consistency. If you add more water while cooking this dal, it becomes soggy and you will end up eating a moong dal pasty sundal. Right amount of water and cook time determines the taste and consistency. No need to soak this Moong dal overnight and all. 

Ingredients
Moong Dhal / Payatham Paruppu / Pesara Pappu - 1 Cup
Hing / Asafoetida - 1 Dash
Oil - 3 tsp
Mustard Seeds - 1 tsp
Curry Leaves - 1 stick
Green Chillies - 1 Big
Dry Red Chili - 1
Grated Ginger - 1/2 tsp
Salt - To Taste
Crushed Coriander Leaves - To Garnish ( Optional )
Fresh Coconut Flakes - 1 tbsp

Method
  • Pressure cook the Moong Dhal up to 1 whistle. Just add water just for the dal to get immersed. Don't add more water during this process. After the cooker gets cooled down, drain the excess water from the dal and keep the cooked and drained dal ready. 
  • In a cooking pan, add oil first. When its heated up, add hing, mustard seeds, dry red chili, green chili, curry leaves, grated ginger in order. Finally add the cooked dal and required amount of salt into the pan. Gently turn few times so that the salt gets mixed up well.
  • Cover the lid and allow them to cook for just 2 minutes on a medium flame. Switch off the flame.
  • Sprinkle fresh coconut flake, coriander leaves ( if you like ) on top of the sundal. 
  • Navarathri neivedhyam is ready.


Suggestions 
  • Cook the dal to the right consistency. 
  • If you wish to increase the sundal quantity suddenly, add some grated carrots into the sundal and serve. 
  • If you have some leftover sundal, you can make any kootu out of it during the next meal.

Tuesday, October 22, 2013

Cucumber and Sprouts Sandwich - Cool Sandwich


Though I crave for a hot grilled sandwiches always, somehow this cool sandwich with tons of cucumber freshness and crunchy sprouts stole my heart. Its undoubtedly a healthy lunch or brunch or snack at any time. We enjoyed this healthy treat along with our rainbow salad ( Grape tomatoes salad ) and no after cleaning was required.!!! Easy and quick fix lunch with minimal efforts and maximum richness in nutrients.
Ingredients
Multi grain Bread or Whole Wheat Bread - 2 Big Sandwich Slices.
Few Lettuce Leaves
Fresh Cucumber - 1
Ripe Tomato - 1
Red Onion Rings - Few
Alfalfa Sprouts or Sprouts of your choice - 1 Small Bunch
Laughing Cow Swiss Cheese Spread ( LIGHT ) - 1 Slice
Stone Ground Grainy Mustard ( Preferable Grainy ) - 1 tsp
Salt and Black Pepper Powder - To Taste

Method
  • Keep all the ingredients ready. Slightly toast the bread and spread them on a foil.
  • Spread the cheese on one side of the bread. On top of the cheese, layer them with Lettuce Leaves, tomato rounds, sliced red onion rings, cucumber rounds. Press them gently and put some fresh alfalfa sprouts on its top. Similarly, on the other bread, layer it with stone ground mustard followed by the same pattern.
  • Sprinkle some salt and pepper on the top of the bread slices. Carefully place one side on the other bread and cut them into halves and enjoy.
Suggestions
White bread will not be suited for this kind of sandwich. You will definitely enjoy the freshness with grainy brown breads.

Monday, May 20, 2013

Crunchy Mint Vadai / Pudina Vadai


Made these crunchy and flavourful mint vadas on the day of Tamil New Year 2013. Have been trying to post the recipe of this vadai since then but it got materialised only today. What is different from the regular paruppu vadai? A question may arise in your mind. I made this mint vadai only with Split Pea Lentil and little bit of Moong Dal and with a cup of fresh mint / pudina leaves.  Thanks to my efforts on grinding, the vadas came out pretty much dry and crispy. Needless to say that there were none left in the serving plate for me to munch while cleaning the leftovers.!!!
 
Ingredients
Split Pea Lentil - 1.5 cups
Moong Dal / Payatham Paruppu - 1 Handful
Green Chili - 1 Big
Dry Red Chillies - 2 Medium
Fresh Pudina Leaves chopped - 3/4 th of a cup.
Cumin Seeds - 1 tsp
Salt - To Taste
Hing / Asafoetida - 1 Dash
Grated Ginger - 2 tsp
Sombu / Fennel Seeds - 1 tsp
Oil - Enough for frying the vadas.
 
Method
  • Soak the Split Pea Lentil and Moong Dal together for 2 hours. Add a handful of Split Pea lentil just before grinding into the soaked lentils.
  • Grind them coarsely along with all the other ingredients except pudina / mint leaves. Add salt only during the last grinding cycle.
  • Add little water while grinding enough to grind the mixture coarsely. Add the fresh pudina leaves to the grounded dal mixture.
  • Heat the oil under medium flame. When its heated, fry the vadas till they become golden brown on medium flame.
  • Complete the process for the remaining vada batter and enjoy the crispy, mint flavoured vadas.
Tips / Variations
  • Don't grind the vada batter to a fine paste.
  • Do not add coriander leaves or curry leaves while making these vadas. Somehow I prefer to enjoy only the unique mint flavour in this vadai.
  • Handful of split pea lentils that are added just before grinding makes it even more tastier.

Tuesday, August 21, 2012

Cauliflower Manchurian / Gobi Manchurian / Gobi 65

Ever since i stepped into Bangalore after my college days, I fell in love deeply with this yummy appetizer or snack..Due to my great love towards this manchurian, I tasted this yummy dish in street side, mediocre hotel, good restaurants and in five star hotels. Out of all, my love looks beautiful and tastes terrible in one small fast food joint in Jayanagar, Bangalore. Its my tendency to try out things which I love so much at home since my childhood. Likewise, I tried and made some manchurian in my kitchen too. With trial and error, initial versions were ok...but not satisfactory. After trying out different versions, I arrived at one final recipe which is simpler and tastier. My friends and dear bloggers, try this version in your kitchen and enjoy this mouthwatering appetizer along with some Chinese veg fried rice / noodles and a suitable side dish.

There are two methods to make this Manchurian. You can either fry the Gobi / Cauliflower florets or bake them in the oven. In both the cases, coat every cauliflower florets with the batter and fry or bake them as you like. I made Manchurians using both the methods earlier and they tasted equally good in both the cases. If you are deciding to fry, please follow the method as described below.

I will append the Baking Method version at the end of this post very soon with corresponding pictures.
Ingredients
Gobi / Cauliflower - 1 Big
Oil - To Fry the Manchurian
For the Batter :
All Purpose Flour - 3/4 cup
Corn Flour - 2 tbsp
Salt - Little
Ginger Garlic Paste - 2 tsp
Food colour ( Orange or Red Orange) - 1 pinch ( Optional )
Chilli powder - 1 tsp
 
Gobi Manchurian - Final Process
Red Onion shredded - 1/2 cup
Spring Onion - 3
Garlic Pods finely shredded - 5 or 6
Spicy Tomato Ketchup / Tomato Sauce - 1 tbsp
Soy Sauce - 1 tbsp
Salt - To Taste
Black Pepper Powder - 3 tsp
Green Chilli shredded finely - 1 tbsp
 
 Method
 
  • Take out the cauliflower florets and wash them thoroughly. Drain the water completely and cook the cauliflower florets in a microwave and keep them ready.
  • Meantime, make a batter using the ingredients as mentioned above ( just like bajji batter) and keep the batter ready.
  • In a frying pan, add oil and heat the pan. When you see light fumes emerging out of the oil surface, take a cooked cauliflower floret and coat the floret with the manchurian batter on all sides and gently drop the floret into the heated oil.
  • Fry them to golden brown and fry all the other florets using the same method and finish the entire process. Keep all the fried cauliflower florets on a flat plate openly.
  • In a cooking pan / vessel, add oil first. When its heated, add finely shredded garlic, red onion pieces into the vessel and fry them for a minute.
  • Then, add the tomato ketchup, soy sauce, black pepper powder, shredded green chilli, required amount of salt into the cooking vessel / pan and stir them nicely for nearly 3-4 minutes on a medium flame.
  • Add all the fried manchurian into the manchurian sauce and fry them gently. Add the spring onion into the vessel and stir them again for a minute and switch off the flame.
  • Transfer the Gobi Manchurian into a serving plate and place small toothpicks on the side or on top of the Manchurian pieces individually.

Monday, February 6, 2012

Plain Medhu Vadai / Urad Dal Vadai

Medhu Vadai, the soft spongy and crispy rounds are always special and great to enjoy them during tiffin time, great prasadam during festival time and perfect on any occasions. I made this medhu vadai on several occasions but everytime failed to take pictures as they would disappear quickly from the serving plate. That's the main reason for the delay in posting this recipe. There are so many varieties of Vadai we could make using the same batter. I would append those varieties whenever I make in future.. These vadas can be an excellent breakfast treat with a side of cocnut chutney and sambar too....
Ingredients
Urad Dal / Minna Pappu / Ulutham Paruppu - 2 Cups
Rice Flour - 1 tbsp
Salt - To Taste
Curry Leaves - 7 or 8 crushed
Hing / Asafoetida - 1 Dash
Method
Soak the Urad Dal in warm water for 1-2 hours. Grind them in a wet grinder by sprinkling very little water while grinding. Do not pour more water while grinding. Try to get a fluffy batter and keep it aside. If you are using a mixie, then try to use the whipper for grinding which gives a very fluffy batter.(In my experience). To that batter, add all the other ingredients and make a small round shape with a hole in the middle ( like a mini donut ). Drop them carefully into the heated oil in the pan. Fry them on both sides till golden colour and keep doing the same for the rest of the batter. Now the golden crispy vadais are ready for Neivedhyam.

Tuesday, January 3, 2012

Black Eyed Beans Vada / Vellai Karamani Vengaya Vadai / Alasanda Ullipaya Vadai

During this vacation, I felt like making some healthy snack for the kids. Meantime, I did not want to spend more time too. Black Eyed beans vadai suddenly flashed in my mind which I made couple of times before. As black eyed beans is a good source of protein, dietary fiber, its a good choice for making the vadas. Taste of these crispy vadais is unique and to me, it has a mix of both Dal Vada and Medhu Vada. I added a bunch of spinach leaves to add more nutrient value to the snack. Try this out and serve this delicious crispy, tasty vadas to the kids..

Ingredients
Black Eyed Beans /  Alasanda / Vellai Karamani / Lobia-- 2 Cups
Urad Dal / Ulutham Paruppu / Minna Pappu - 1 tbsp
Rice Flour - 1 tbsp
Red Onion shredded - 1 to 2 cups depending on your taste.
Spinach Leaves shredded - 1.5 cups
Salt - To Taste
Hing \ Asafoetida - 1 Dash
Ginger - 1 small square
Green Chillies - 3 or 4
For Extra Punch to Adults
Crushed Garlic - 2 tbsp
Sombu / fennel seeds / Somfu - 1 tbsp
Fine cut green chillies - 5 or 6 big ones
Method
Soak the Black eyed beans and urad dal in warm water for 3 to 4 hours. Drain the water and grind the black eyed beans along with urad dal, ginger, green chillies to a coarse paste. Add rice flour, salt, red onion pieces, shredded spinach leaves , hing to the vadai mixture and mix everything together.  Meantime, heat oil in the frying pan. When you see some slight fumes on top of the oil, start dropping the vadas into the oil carefully. Fry them equally on both sides and drain them out of the oil when they turn into golden brown. Serve hot with hot chutneys.
Variations / Tips
No need to add water at all while grinding. If required, just sprinkle some water on its top and grind.
For adults, add the extra ingredients to the vadai mixture and make them. The vadais would exactly taste like street side hot vadas...

Tuesday, October 18, 2011

Madras Mixture with less oil


Mixture is one of the most common snacks made in different regions of India in their own traditional way.  Few varieties are slightly sweeter and most of the varieties are spicy only. Though I love all kinds of mixture I have tasted so far, I often prepare the Madras Mixture which is a common variety made in South India. It might look more complicated and bit oily, but its very easier to make with less oil. Also, it yields more quantity too....And I am happy to share with you all the madras mixture recipe...There's no diwali at home without the mixture. Enjoy making lots of Diwali Sweets and Snacks...and share your experience.
Method of preparation
Groundnuts   -    1 Cup
In a big kadai or big round pan, roast the groundnuts / peanuts patiently on medium heat till they get crispy and fried well. Add very little oil , may be 2 tsp of oil to the groundnuts while frying... Transfer them to a big basin / vessel where you could mix all the contents upside down well.
Cashew Nuts  -   1 Cup
On the same frying pan / kadai, add the Cashew Nuts and roast them in the same manner till they get golden brown and crunchy. Transfer them to the big basin where you transferred the groundnuts before.
Pottukadalai / Dalia - 1 Cup
Roast the Pottukadalai also in the same manner with little bit of oil. After sometime, they get roasted with a nice aroma and get more crispy. Transfer them to the big vessel on top of the Cashew nuts.
Aval / Poha / Avalakki - 1 Cup
Roast the thin Poha variety with little bit of oil on medium heat. While roasting the Aval, add some turmeric powder to them and roast it. After sometime, the aval get fried nicely and if required, add little bit of oil in the middle and fry them. After its done, transfer them to the big vessel on top of the Pottukadalai.
Curry Leaves / Karuvepillai - 1/2 Cup
Roast them in the same heated kadai with a tsp of oil and keep them separately. This needs to be added to the mixture at the end.
Boondhi  -    4 Cups
In a small frying pan / vessel keep oil for making Boondhi and Sev for the mixture and heat it. For preparing Boondhi, first make the Boondhi Maavu / batter with 2 cups of kadalai Maavu / Besan Flour, 1/2 tsp of turmeric powder, required salt, 1 tsp of red chilli powder, required amount of water. The consistency of the Boondhi batter should be like Dosa Batter. Take a Boondhi making spoon or a regular big karandi  ( spotted big spoon )  with holes in it. Wipe it with a tissue and keep it ready. Put some Boondhi Batter onto the karandi and gently shake the karandi on top of the heated oil. You could see rounds of Boondhi batter falling into the heated oil. Gently shake the Boondi karandi so that you get nice round Boondhis. Likewise, make boondhis with the rest of the Boondhi Batter too. Drain all the Boondhis separately and let them get dried for sometime. After its completely drained and cooled, transfer them to the big vessel on top of the nuts.
Thick Sev - 3 Cups
Make the Sev dough first by mixing 2 cups of Kadalai Maavu / Besan Flour, 1 tbsp of rice flour, 1/2 tsp of turmeric powder, required salt, 1/2 tsp of omam powder / ajwain powder, 1 tsp of dry red chilli powder and little water. The consistency of the Sev dough should not be very loose , should be thick like a Murukku dough. Then using the Murukku / Sevai maker, make some big thenguzhal in the heated oil. Fry the thenguzhal till they are golden brown. Complete the same procedure and finish the process. Drain all the Thenguzhals separately and break them into Sev. After its cooled and dried, transfer all the Sevs on top of the Boondhis in the big vessel.

Mixing Process
Add little salt , 2 tsp of dry red chilli powder, 1 dash of Hing / Asafoetida to the mixture.  Using a clean dry flat karandi / spoon , mix everything upside down till all of them get mixed uniformly. Finally add the fried curry leaves and mix them one more time carefully. Now the Mixture is ready for Diwali.!!!


Variations
You can increase the spice level by adding more red chilli powder to the mixture.
You can add sweet diamond shaped biscuits made with Maida to the mixture if you like some sweetness in your mixture.
You can add small sweet rice mittais into the mixture if you like.
You can add fried green peas to the mixture if you like.
Also, you can modify the dough / batter while making the Sev / Boondi according to your taste and spice level.
You can add plain Corn flakes instead of Aval.

Note
As we don't fry the Nuts in this version, its somehow made with very less oil. Only the Boondis and Sev are fried in oil. The taste of this mixture with roasted nuts is amazing.

Monday, October 10, 2011

Paruppu Vadai / Ama Vadai / Pappu Vada / Dal Vada


Paruppu Vadais also called as Aama vadais are more commonly made during the festival days and its a South Indian speciality snack. As they are made out of different kinds of Dal / lentil, they are rich in protein. There are different versions of Dal Vadas and every variety depends on the kind of Dals and the proportion they use to make them. I used thuvar Dal ( Thuvaram paruppu / Kandhi pappu ), Channa Dal ( Kadalai Paruppu / Sena pappu ), Urad Dal ( Ulutham paruppu / Mina pappu ) and Moong Dal ( Pesara pappu / Payatham paruppu ) in my preparation.
Ingredients
Thuvar Dal - 1 Cup
Channa Dal - 1/2 Cup
Urad Dal - 1/2 Cup
Moong Dal - 1/4 Cup
Hing / Asafoetida - 1 Dash
Curry leaves - 1 or 2 stems
Dry Red Chillies - 3 or 4.
Oil - For Frying
Salt - To Taste
Method
  • Soak all the Dals in the water for an hour. Then, grind them coarsely with red chillies, hing and some salt. Add the crushed curry leaves into the vadai batter and mix it.
  • Meantime, heat the oil in the frying pan. When the oil gets heated up, take a small ball of the vadai batter and make a small round and drop it slowly into the heated oil. Continue the process for the rest of the batter.
  • Fry the vadas till they become golden brown and crispy. Drain all the vadas from the pan carefully and put them on a plate with a paper tissue on its top to soak the excess oil from the vadas.
  • Now the parppu / Dal Vadas are ready for Neivedhyam.
Tips / Variations
You can add crushed coriander leaves, onion pieces into the batter too and fry them during non-festival days.

Godhumai Vazhaipazha Appam / Wheat Banana Appam


Wheat Appams, Godhumai Appams are easier to make during festival days. My mom used to make these Godhumai Appams on Saraswathi Puja day. I added a big ripe banana into the appam batter and made it. Appams tasted almost like a banana walnut muffins..
Ingredients
Wheat Flour - 1.5 Cups
Rice Flour - 2 tbsp
Jaggery Syrup - 1 Cup
Elachi / Cardamom Powder - 2 tsp
Bananas - 1 big ripe banana mashed
Oil - Enough to fry the Appams
Method
  1. Make a Jaggery Sryup with 1 Cup of Jaggery in a separate vessel. The Syrup should be little thick and should drop down but not too watery.
  2. Meantime, in a vessel add all the ingredients for making the Appam Batter and keep it ready.
  3. After the Jaggery syrup is done and cools down little bit, pour them slowly over the appam batter and mix it thoroughly without any lumps.
  4. In the frying pan, add some oil and heat it. When the oil gets heated up, drop small rounds of appam batter into the oil carefully.
  5. Flip them on both sides and fry them till they become golden brown in colour. Drain them all in a flat vessel with a paper tissue on it to soak the extra oil from the appams.
  6. Likewise, continue the same for the rest of the batter. Mostly these appams wont drink that much oil. Arrange all the appams on a plate after they are drained completely and its ready for Neivedhyam.
Tips
Consistency of the appam batter is very important here. If the batter is little loose and thin, it drinks lot of oil. Try to make the appam batter mostly with the Jaggery Syrup itself. Still if the batter is too thick, you can add some water into it and make the batter like the Idly batter.
Variations
You can add crushed nuts like almonds, cashew nuts, pistas into the batter.
You can add few fresh coconut flakes into the batter too and try them out.

Bajji Platter


Bajjis are the mostly served snacks on Jaanavasam, the day before marriage in South India. On a snowy, wintery day, it will be an ideal choice to have some hot bajjis with a side of hot tea. Though bajjis are fried snacks and made with besan flour and are highly caloric, still they are tasty and mouth watering.....Well, my daughter has been asking me to make her favourite potato bajji since few weeks....and somehow it was not working out...Finally her dream came true..I made her more potato bajjis and few..chilli bajjis for my husband too. Believe me, its really difficult to resist our feelings and we did not care so much about our calorie counts on that day.!!!!
Ingredients
Potato - 3 or 4 Medium
Green Peppers - 3 or 4.
Besan Flour / Kadalai Maavu / Senapindi - 1 cup.
Rice Flour - 3 tbsp.
Red Chilli Powder - 1 tsp
Jeera powder - 1/2 tsp
Salt - To Taste
Hing / Asafoetida - 1 Dash
Omum Seeds / Ajwain Seeds - 1 tsp
Oil - Enough to fry the Bajjis.
Method
  • Wash and peel the skin of potatoes and slice them into thin rounds and put them in a bowl of hot water with some salt.
  • Likewise, cut or slice the hot peppers as per your choice and put them into a separate bowl of hot water with little salt. I mainly did these steps to half cook the veggies inside and its easier for the kids to have them.
  • In a vessel, add the besan flour, salt, required powders and make a smooth paste enough to coat the veggies with some water. Let the paste be not too watery..
  • In a frying kadai, add some oil and heat it. When the oil gets heated up, dip the potato rounds into the bajji batter and drop them carefully into the heated oil one by one. While dropping the bajjis, reduce the flame to a low level and after dropping all the bajjis, increase the flame to a medium.
  • When the bajjis turn golden brown on both sides, take them out and drain them on a flat plate with a paper tissue on it to soak the oil coming out of the bajjis...
  • Similarly, soak the Hot peppers too into the batter and make Mirchi Bajjis and drain them out on a plate.
  • Now the bajji platter is ready to eat with a side of tea.
Tips / Variations
You can make bajjis with any kind of vegetables like Brinjal, Onions, Zucchini, Raw banana, Paneer.
You can increase the quantity of chilli powder as per your spice level.

Tuesday, October 4, 2011

Green Cutlet - Spinach Potato Cutlet


Really got bored with the regular spinach pappu or Palak Paneer , wanted to try out something different with the Spinach..Spinach with some potatoes, peas, yellow corn powder and with some spices, the appetizer was made with less effort and time. We can even substitute this Cutlet as Spinach pattie in burger and could even be used in the preparation of Cutlet chat or a pattie in our regular Ragada Patties.
Ingredients
Potatoes Boiled - 6 or 7 Medium Sized
Frozen Peas or cooked peas - 1 Handful
Spinach finely chopped - 2 cups
Yellow Corn Flour - 2 tbsp
Salt - To Taste
Jeera Powder - 1 tsp
Garam Masala Powder - 1 tsp
Green Chilli Paste - 1 tsp
Red Chilli Powder - 1/2 tsp ( optional )
Turmeric Powder - 1/2 tsp
Sugar - 1 Pinch
Oil - To Shallow fry the Cutlets
Method
  • Cook the Potatoes, Peas and mash them and keep it ready.
  • Cut the Spinach leaves and keep it ready too...
  • In the kadai on medium heat, add 2 tsp of oil first. Then, add the spinach leaves and fry them till they get soggy and half cooked. Then, add all the powders and fry them for few seconds.
  • Finally add the mashed potatoes, peas and the yellow corn flour. Add required amount of salt and a pinch of sugar and mix them thoroughly.
  • Fry them for a minute and switch off the flame.
  • After it gets cooled, take a ball size of the mix from the kadai. With little oil in hand, make a small flat pattie. Similarly make other patties too with the kadai mix and keep it ready.
  • In a non stick pan or dosa pan, add little oil and shallow fry them at one shot with very less oil. Turn them both sides and fry every pattie / cutlet uniformly.
  • Keep the fried cutlets on a plate and serve with a side of Tomato Ketchup.
Tips
Don't mash the potatoes and peas too much. Leave few small potato pieces so that the cutlet tastes good.
Variations
You can customize the spice level according to your taste..I prefer this to be milder as i made it for my kids.

Saturday, May 28, 2011

Onion Pakoda - With Wheat Rava Leftover Idly batter

It was very breezy, cloudy and slightly drizzling since afternoon. Its a perfect weather in all aspects to have some crunchy pakodas on the side of hot chai. We have been avoiding oil fried pakoda or any snacks as we have been trying to lose weight and be more conscious about what we eat. But today we have got a nice excuse. Yes.!!! Our friends family was visiting us this evening, and I decided to make crunchy pakodas with my leftover wheat rava idly batter. I added few extra ingredients to the leftover batter and finally the pakodas came out well.
Ingredients
Wheat Rava Idly Batter ( Leftover ) - 3 Cups
Besan \ Kadalai Maavu \ Senaga Pindi - 3 tbsp
Rice Flour \ Biyam Pindi \ Arisi Maavu - 3 tbsp
Red Chilli Powder - 3 tsp
Salt - To Taste
Hing \ Asafoetida - 1 Dash
Green chilli - 3 Medium finely cut into tiny pieces
Sombu \ Fennel - 1 tbsp
Coriander Leaves chopped - 2 tbsp
Curry Leaves - 5 or 6 crushed into tiny pieces
Red Onion - 1 medium cut into small pieces
Method
  1. Take the left over wheat rava idly batter in a big bowl. Add the other ingredients as mentioned above to the left over idly batter and mix everything in the bowl thoroughly without adding any water.
  2. Heat oil in a small pan. When you start noticing flames coming out of the oil, simmer the heat and small dropping the pakoda batter by hand into different small shapes. 
  3. Now increase the heat to medium level and allow the pakodas to get fried uniformly.
  4. When its golden brown, take out the pakodas and spread them on a plate covered with a tissue paper.
  5. As noticed, there is not much oil in these type of pakodas. Unnoticed extra oil from the pakodas would be absorbed in the tissue paper.
  6. Continue the process till you finish the whole pakoda batter.
Tips
Try to make the pakodas into very smaller shapes to get more crunchy ones.
Try to use red onion instead of yellow or white onions in this batter as its more tastier with red onions.

Monday, May 2, 2011

Avacado Dip - Indian Style

Avocado fruit is a native of Mexico, mostly grown in the tropical climates. Avocado is one of the nutrient dense foods which is loaded with good mono saturated fats,  Vitamin K, folate, Potassium and lots of other good Vitamins. So, to make our snack time a bit healthy one, I made this Indian Style Avocado Dip ( or chutney ) to go with Lijjat pappad, little corn chips with a cup of  Hot Chai on the side.
Ingredients
Avocado - 2 Medium Size
Onion - 1/2 Medium Size finely shredded
Ripe Tomato - 1 Medium Size
Coriander Leaves - 1 Handful
Lemon Juice - 1 tbsp
Black Pepper Powder - 1 tsp ( Depends on your taste bud )
Salt - To taste
Method
  1. Take few Lijjad Papads and fry it in the microwave without oil and keep it aside.
  2. Cut the onions and tomatoes into tiny pieces, finely shredded and keep it ready.
  3. Wash and cut the coriander leaves and keep it ready too.
  4. Take the 2 avocados and scoop the avocado from inside and put it in a round bottom vessel easy to mix.
  5. Add the onions, tomatoes, coriander leaves, pepper powder, salt, lemon juice on top of the avocado and mix everything thoroughly.
  6. Mash it as much as possible so that it looks pasty.
  7. Now the Avocado Dip ( Chutney ) is ready to eat with pappads or corn chips.
Variations
Instead of black pepper powder, you can add finely crushed green chillies to the Avocado Dip if you like the taste of green chillies.
You can grind the Avocado for just few seconds before serving if you feel the pieces of onions, tomatoes are visible and not pasty. This makes the Dip more perfect.

LinkWithin

Related Posts Plugin for WordPress, Blogger...