Monday, June 16, 2014

Healthy Ladoo / Nutty Ladoo / Ladoo - With No Sugar / Sugarless

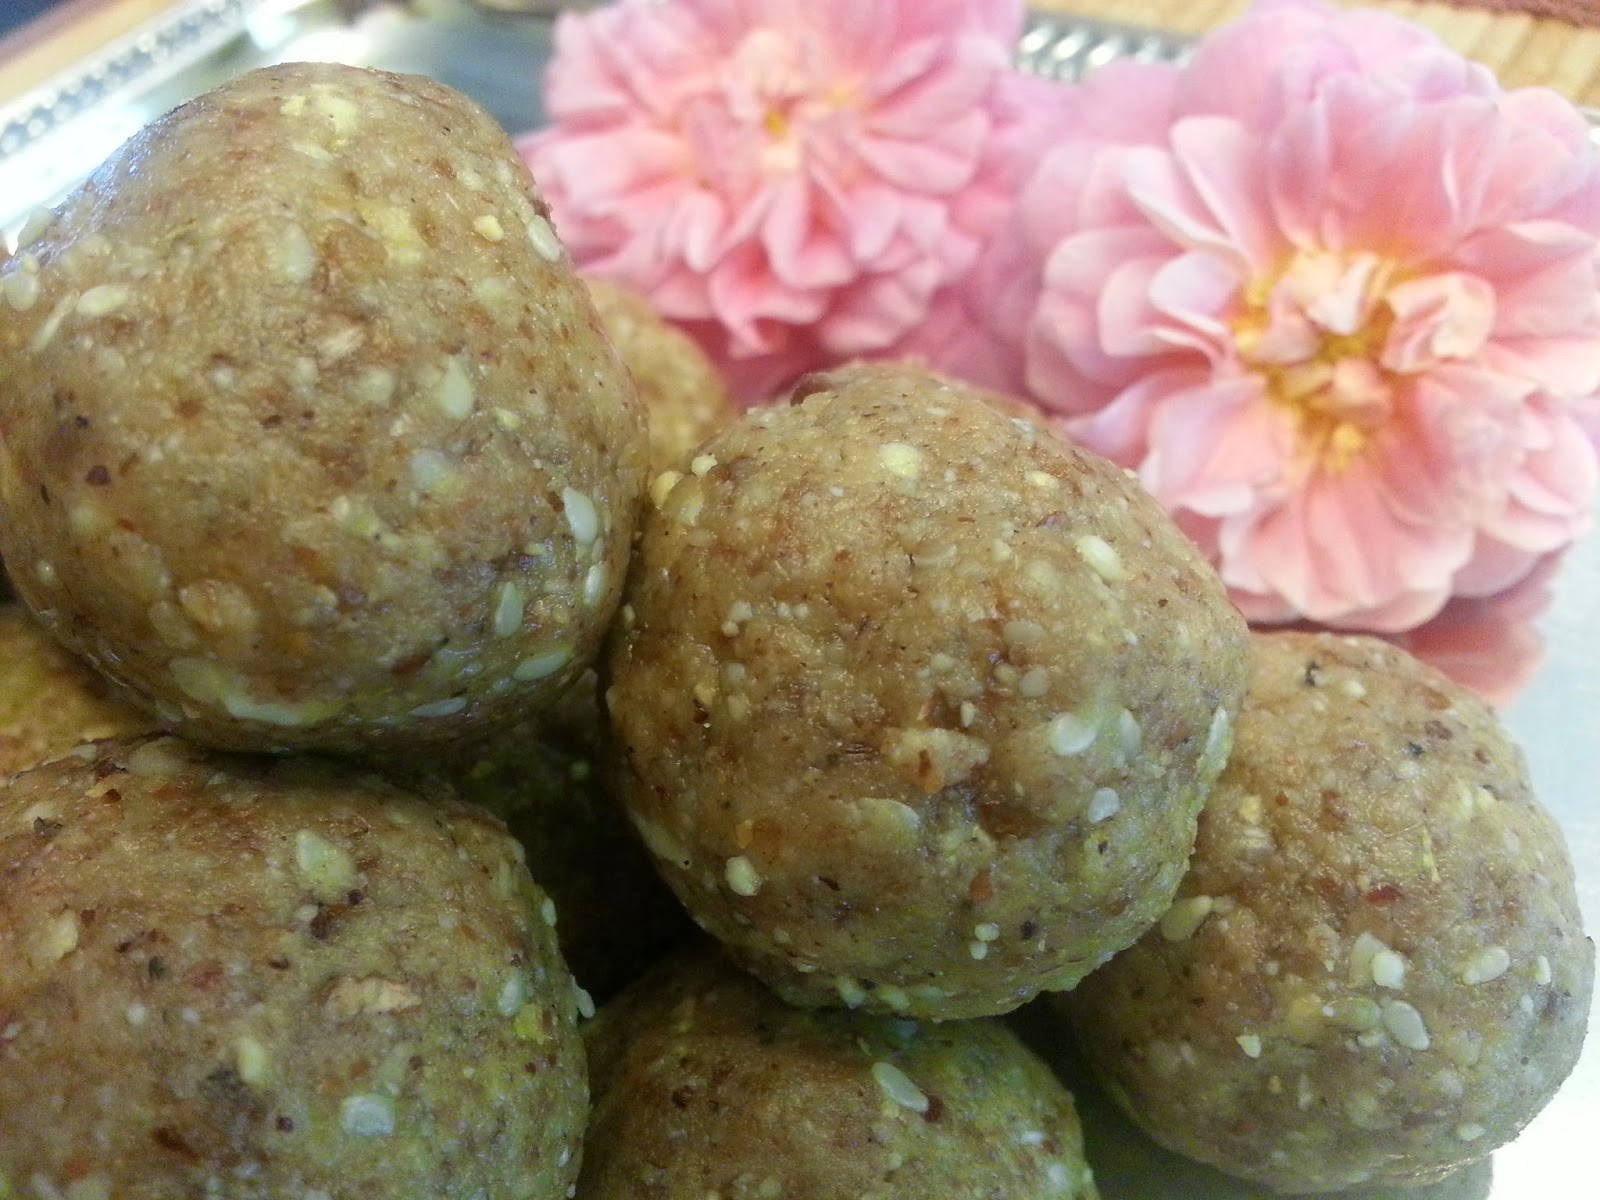
On a sunny hot afternoon, my little one was asking for a dessert and wanted a yummy one. I was breaking my head and did not have an idea of what to offer. I had dates, dry grapes, jaggery as sweety things in my kitchen except multi vitamin gummy vites. Then I realized that i did not have any sweety things in my kitchen at all. ( In a way, its good!!)  I offered the dates but the demand was for a dessert only. So, in minutes, a nutty ladoo was made with all the available ingredients. Brownish nutty ladoo was made in a quick fashion with the goodness of almonds, pistachios, walnuts, peanuts, white sesame seeds, dates and little jaggery. No need to add ghee to make these ladoos as the dates itself act as a good binding agent while forming them.. But for good flavour, add a tsp of ghee and cardamom powder to the nutty mix. This ladoo can be made in minutes and its highly nutritious too...Its definitely a healthy dessert to the kids at any time.
Ingredients
Almonds - 1/2 cup
Walnuts - 1/4 cup
Pistachios - 1/4 cup
Sesame seeds - 1/2 cup
Peanuts - 1/2 cup
Dry Grapes - 1/2 cup
Cardamom Powder - 2 tsp
Jaggery - 1/4 cup
Dates seedless chopped into pieces - 1 cup
Ghee - 1 or 2 tsp
Note : You can adjust the ratio of the ingredients as you like and enjoy.!!
Method
Dry roast the nut ingredients except dry grapes,dates,jaggery for 2-3 minutes on medium flame till a nice aroma emanates.Grind all the roasted ingredients as mentioned in the list except ghee to a fine powder in a good blender. Transfer them into a mixing bowl and add ghee. Mix them well and form laddoos of small lemon size. 

Colourful Bell Pepper Besan Fry / Capsicum Besan Fry / Capsicum Subzi with Besan

 Bell Peppers generally sit in my refrigerator all the time and I wish to include them in most of my side dishes. Nowadays I am so obsessed with the colourful yellow, orange, red and green bell peppers. Especially these colourful glories are found abundant in farm markets during summer season. Out of special interests, whenever I pick bell peppers, I cannot compromise on few picks. So, to exhaust all the remaining colourful ones before I hunt for the next vegetable purchase, I made a easy side dish just with these colourful peppers for the rotis. Bell peppers coated with besan flour, flavoured with other spices slightly fried is an excellent accompaniment to rotis / chappathis. Its an easy to make side dish and it can never go wrong. As its colourful and flavourful, you will never have to worry about leftover!!!

Ingredients
Bell Peppers of any kind ( Yellow , Orange, Green, Red ) - 6 or 7
Onion chopped into 1 inch squares - 3/4 cup
Oil - 1/2 tbsp
Turmeric Powder - 1 tsp
Dry Red chili Powder - 3 tsp
Garam Masala Powder - 1 tsp ( I used Kitchen King Garam masala )
Coriander Cumin Powder - 1 tsp
Cumin Seeds - 2 tsp
Besan Flour / Bengal Gram Flour - 2 tbsp
Salt - To Taste
Coriander Leaves - To Garnish

Method
  • In a cooking pan, add oil first. When its heated, add cumin seeds first.
  • Next fry the onions till they get translucent. Then, add all the bell peppers and fry them on high flame till they get cooked and crunchy. I love to fry them on high flame in order to have them crunchy. 
  • After they get cooked and fried to a satisfactory level, reduce the flame and add all the spices, besan flour and salt and fry them again till the raw smell of the besan flour completely goes off.
  • Make sure that the fry does not turn black at the bottom. You would get a nice aroma from the bell pepper fry after the raw smell goes off. That's the point to switch off.
  • Enjoy your rotis with the bell pepper fry and some fresh raita.

Thursday, June 12, 2014

Pesarapappu Uppuma / Pesarapappu Upma / Biyam Pesarapappu Upma / Andhra Pesarapappu Upma


Biyyam Pesarapappu Upma is one of Andhra's tradiitional tiffin, which is made with lentils and broken rice steam cooked and tempered with seasonings. Its a healthy heavy tiffin packed with proteins and carbs. With a side of a spicy ginger chutney / allam pachidi and some fresh curd, its heavenly and can be a best option for tiffin night. I tasted this tiffin first at my in-laws home days after marriage. Initially I thought i was going to have pongal upon looking at the ingredients which they took. But what I saw in my plate was some tasty upma in puttu texture and I absolutely loved it. Without having any embarassment or shyness ( especially after marriage ), I finished the whole plate in few minutes and went for the next round. It showed my interests in food indeed.!!! Till today, my mother in law would remember that moment and came to know of my foodie interests through various occasions like this. I learnt the recipe from her and its definitely her recipe. I just followed the way she taught me and we enjoy this upma often in my household. Whenever I visit them during vacation, she never failed to give us a big bag of homemade biyam rava for making this yummy delight. This is once again my mother-in-law's recipe to you all my dear bloggers.

Ingredients
Biyam Rava / Broken rice rava - 1.5 cups
Pesarapappu / Moong Dhal - 3/4 cup
Salt - As Required
Fresh coconut flakes - 1 tbsp
Water - Enough to cook the upma
(Add 2.5 cups of water for 1 cup of rice rava and 1/2 cup of Moong dhal )

Tempering / Tadka 
Oil - 4 tsp
Hing / Asafoetida - 1 Dash
Mustard Seeds - 2 tsp
Jeera / Cumin Seeds - 2 tsp
Shredded Ginger - 1 tbsp
Green Chili - 2 slit into halves
Dry Red chillies - 3 or 4
Curry Leaves - 1 stem

Method
  • In a big thick bottomed vessel, dry roast the moong dal for a minute till a nice aroma emanates. Take it out and store it in a plate.
  • Add oil into the pan and do the tempering process by adding all the ingredients in order.  Once its done, add the Moong Dhal and biyam rice rava and toast the mix with the tempered seasonings for a minute. Add water in the ratio as mentioned above to the vessel. ( I added 41/4 cups of water for 1.5 cups of rice rava and moong dal ).
  • Allow them to cook on medium flame for 10-15 minutes. When its done three fourth, add salt to the upma and mix well. Allow them to cook on low flame for another 10-15 minutes till the rice rava and moong dhal get cooked to the right consistency. Switch off the flame and garnish with coconut flakes just before serving.
  • Enjoy this upma with allam pachidi / ginger chutney and fresh curd.


Tips / Suggestions 
  • Amount of water for cooking depends on the type of rice variety you use. For some rice varieties, it may require more water to cook and so check with the age of the rice you use and add water accordingly.
  • Adding salt at the end of the cooking process is ideal after the mix gets cooked to a fluffy consistency.
  • If this upma's consistency is pasty, its difficult to enjoy. If its in the form of "puttu" consistency ( where cooked rice rava and moon dal is totally separate and dry ), then its enjoyable. So, add right amount of water which is important in this process.
  • If you wish to omit coconut, its totally fine. 
  • Adding coconut flakes is recommended only if you are going to consume then. Becaz storing the coconut sprinkled upma in the refrigerator might not be good option for later use. 

Tuesday, June 10, 2014

Basic Marinara Sauce / Marinara Sauce / Italian Marinara Sauce


For making a quick pasta, we use the store bought Marianara Sauce of various combinations generally. But I noticed that the  marianara sauce served at Italian restaurants would be so rich in texture and tastes much better than the store bought ones. I tried to venture out the possibility of making marinara sauce at home by following a very good marinara recipe. I followed Giada's Marinara Sauce recipe almost with few additions from my side to suit our taste. Trust me, the regular pasta plate looked so different in texture and looked delicious. Ah, why not execute this with some real shredded picorino romano cheese? Adding a feather to the crown, this paste sauce topped with the Italian cheese melts in your mouth. Above all, I like the sauce so much and try making the sauce with vine tomatoes. I added few toasted baby bella brown mushrooms in my marinara sauce. You can store it in refrigerator for 4-5 days and consume. As I don't add more oil, I prefer to exhaust them quickly. 
Ingredients
 
2 Cans Tomato Puree - 32 Oz
Carrots - 2 peeled and shredded
Celery Stalks - 2 finely chopped
Garlic cloves - 2 finely chopped
Salt - As Required
Extra Virgin Olive Oil - 1/4 cup
Bay Leaves - 2
Yellow Onions - 2 finely chopped
Black Pepper Powder - 2 tsp ( We wanted little punch, so added more but you adjust )
Dried Oregano - 1 tsp
Dried Thyme - 1 tsp
Dried Basil Leaves - 2 tsp

Method
  • Ziti Pasta coated with homemade marinara sauce 
    In a thick bottomed pan, add oil first followed by shredded garlic and onion pieces.
  • Sprinkle little water and fry them for 5 minutes till the onion get translucent.
  • Add the shredded carrot, celery into the pan and saute them for another 3-4 minutes.
  • Add the tomato puree with all the spices except salt into the pan and allow them to cook on low flame with the lid open for nearly 30-45 minutes till the quantity reduces and get into a thick sauce consistency.
  • Add salt at the end and allow them stand on the stove for 2-3 minutes.
  • Let the sauce cool completely and store them in the refrigerator for later use.
  • Enjoy some fresh sauce with cooked pasta with a side of pickled olives, toasted rosemary bread and fresh arugula salad.
Tips
  • I used dried spices while making the sauce as the dried herbs hold the flavor for longer time when cooked on low flame. If you prefer to use the fresh herbs, try to add them at the end to hold the fresh flavours in the sauce.
  • I prefer to puree the tomato before making the sauce which gives an unique taste and texture.
  • Caramelize the onions perfectly before putting the carrots and celery into the pan.

Monday, June 9, 2014

Tiramisu / Tiramisu Dessert / An Italian Dessert - Tiramisu / Tiramisu Cake

"Tiramisu Cake" is a very popular Italian Dessert with a mild coffee flavour which stole our heart few years before. Since then, our family never fail to enjoy this dessert at the end of any Italian dinner. Due to its mild sweetness we could enjoy this Tiramisu Cake comfortably more. My kids love this cake and when I announced them that I would make them at home, their eyebrows went up and were really worried whether I would be able to duplicate the dessert perfectly or not. Well, with a list of right ingredients and at right proportions, I successfully duplicated the great "Tiramisu" at home. ( for them!!!). Of course, it has to be presented at the end of an Italian meal. So, last Friday we enjoyed a complete Italian Meal from soup to dessert comprising of Minestrone Soup, Penne Pasta with homemade Marinara Sauce sauteed with vegetables , a side of grilled vegetables seasoned with Italian herbs and Tiramisu Cake. This meal is mainly made to please our dear son on his Kindergarten Graduation Day. A change in the routine always refreshes the mind and it proved to be true. We had a terrific weekend followed by with tons of housework.!!!  My Dear bloggers, if you are calorie conscious or weight watchers, you could enjoy only a little portion of this cake sadly...

Making tiramisu is not at all a cumbersome process. With all the right ingredients in place, its an effortless job with less preparation time. You need to be patient only during the refrigeration time. Its an ideal dessert to be made well in advance during a big get together or birthdays.

Ingredients

Mascarpone Cheese - 1 Cup
Whipped Cream -2 cups
Sugar - 1/4 cup
Vanilla Extract - 1 tsp
Unsweetened Cocoa Powder - 1/4 cup ( For Dusting )
Lady Finger Biscuits - 20 to 25
Leftover Coffee or Espresso - 1 Cup ( Enough to dip to the finger biscuits )
Chocolate Powder or Chocolate shaved curls - For decorating on top ( Optional )

Method
Make the coffee / espresso ready first. In a big mixing bowl, mix the mascarpone cheese, whipping cream and sugar and whip them.
Keep the tray or rectangular pan with good depth to assemble. Soak the lady finger biscuits into the coffee espresso lightly and arrange them in order. 
 After you place one complete layer of lady finger biscuits, coat the layer with the creamy mascarpone filling on top uniformly.
 Dust the creamy layer with cocoa powder uniformly using the tea filter on all directions.

On top of it, arrange the lady finger biscuits again and repeat the process. 
Finally on top of the cocoa layer dusting, dust the chocolate powder or decorate the cake with the shaved chocolate curls. Refrigerate the Tiramisu Cake for 7 to 8 hours. Make triangular pieces or rectangular as you desire and serve the cake on a dessert plate. Just stick a dry lady finger biscuit on its top to get the restaurant style look. 

Tips / Suggestions
  • I prefer to freeze the Tiramisu for half an hour before serving as it helps out while making pieces without cracking.
  • For making chocolate curls, you can use a dark chocolate bar and peel at the corners using a vegetable peeler. It works well.
  • Refrigerate well enough for achieving good results. 
  • Don't add more sugar to this cake than mentioned. Mild sweetness gives a divine taste to Tiramisu.
  • For big parties if you decide to make the dessert well in advance, its ideal to make it as individual dessert piece for any guest. If you have individual dessert rectangular serving cups or any deep serving cups, you can adopt the same method and make mini versions of the Tiramisu cake for all the guests. In this way, there are no hastles in cutting the big Tiramisu cake before serving and worrying about cracking them. Instead, you arrange the dessert cups in a serving tray and in no time your dessert will be fixed perfectly. 

Saturday, June 7, 2014

Dal Tadka - Restaurant Style Dal Tadka


"Dal" is the staple Indian food which is widely eaten across all regions of India. Dal varieties differ from state to state and as a result there are so many varieties of Dals across India. Out of that, Dal Fry and Dal Tadka are the popular food items that are seen in almost every food menu of the Indian  Restaurants. Initially I was quite confused with the two items and I was pretty sure that they were made out of the same main ingredient Dal. Later I understood why they were called differently and its only the preparation process that actually differentiates them. 
In this post, I am blogging the recipe of Dal Tadka. Dal Tadka is a very popular dhaba food item tempered with aromatic spices and it tastes very good with hot hot rotis. Tadka means tempering in hindi which the tempering acts like a garnish to the protein rich lentil stew. Sometimes even the simplest menu choices make the meal more delicious and gives us warmth. And the combo of a simple Dal Tadka with roti is the one which reminds us of our mother all the time.
Ingredients
Masoor Dal - 1 cup
Moong Dal - 3/4 cup
Tomato diced into small cubes - 1/2 cup
Red Onion shredded - 1/2 cup
Garlic Pods - 3 or 4
Turmeric Powder - 1 tsp
Salt - As Required
Water - As Required for the Dal consistency
Grated Ginger - 1 tsp
Coriander Leaves - To Garnish

Tempering / Tadka :
Oil - 2 tsp ( To be tempered with ghee instead of oil for rich taste, add 2 to 3 tsps of ghee and do the tempering)
Hing / Asafoetida - 1 Dash
Mustard Seeds - 1.5 tsp
Jeera / Cumin Seeds - 2 tsp
Curry Leaves - 5 or 6
Dry Red Chillies - 2 Medium

Method
  • Pressure cook the dal mixture of Masoor dal and Moong dal, tomato, onion, garlic  for 4-5 whistles till they cook perfectly and get pasty. Add a tsp of turmeric powder to the contents in the pressure cooker before actually started cooking them.
  • After the pressure settles down completely, open the cooker and mash the cooked dal mixture. Add some water if its too thick and bring them to the right consistency.
  • On low flame, allow the dal to get cooked with lid open. Then, add required amount of salt, grated ginger to the dal. Simultaneously, do the tempering on the other stove.
  • In a small tempering pan, add all the ingredients for tempering to the oil and pour the tempering over the dal mixture.
  • Garnish the dal that's tempered with these aromatic spices and serve with hot rotis.
Tips / Suggestions 
Addition of a tsp of ghee to the dal tadka gives more flavour and enhances the taste of the dal. But its totally optional.
I would suggest you to dry roast the dal mixture for a minute before actually cooking them. 

Monday, June 2, 2014

Mango Salsa


Having Grown up with lots of good mango memories, I was quite interested in trying out the sweet, tangy also spicy Mango Salsa in my kitchen. Sweetness from the mangoes blends well with the spicy jalapenos and with the sourness from tomatoes and lime juice. Scoopful of this colourful salsa with a tortilla chip satisfies the tummy and its certainly not easy to resist the temptation of grabbing more and more...

Ingredients
Ripe Mango but firm diced into tiny squares - Between 1 cup to 1.5 cups depending upon its sweetness
Red Bell Pepper shredded - 1/4 cup
Yellow Bell Pepper shredded - 1/4 cup
Orange Bell Pepper shredded - 1/4 cup
Green Bell Pepper shredded - 1/4 cup
Jalapeno seeded and diced - 1/2 cup 
Coriander Leaves chopped - To Garnish 
Red Onion shredded - 1/4 cup
Lime Juice - 1 tbsp
Salt - To Taste
Spice Powder - 1/2 tbsp ( Dry roast 2 tsp of jeera( cumin seeds) and make a fine powder ) I like to add this in my mango salsa as it enhances the flavour and taste.

Method
In a big mixing bowl, add all the veggies, lime juice, spice powder and salt and mix them well. Add mango pieces at the end and mix once again. Leave the salsa to stay for few hours before serving for the real taste to set. Enjoy this salsa on a sunny day with a full bag of tortilla corn chips.!!

LinkWithin

Related Posts Plugin for WordPress, Blogger...